| Other languages Deutsch ; English ; Nederlands ; Español ; Français ; Português de Portugal ; |
Contents
BIOS or UEFI firmware
UEFI firmwares appeared some years ago to replace the BIOS firmware and its limitations (limited to 2TB partitions, only 4 primary partitions, not enough space in the MBR for the complete boot loader, etc).
All motherboards nowadays have a UEFI firmware, but they all also implement a BIOS compatibility mode (often called CSM or Legacy), though you may not be aware of it.
If you enter the boot setup, you have the option to either use the UEFI mode itself, or the BIOS compatibility mode of UEFI.
When to choose the BIOS compatibility mode
- You are happy with it so far
- You already have a disk with an MS-DOS partition table and don't want to format it with a GPT partition table (though you can use a GPT disk with BIOS firmware).
- You have another OS installed in BIOS mode (never mix both modes, even on separate disks).
| Note: In some UEFIs, it is impossible to select BIOS mode, and selecting "legacy BIOS + UEFI" mode lets the ISO's boot in UEFI mode. You can workaround this as explained for the boot.iso by David Walser in this mail: https://ml.mageia.org/l/arc/doc-discuss/2016-08/msg00019.html |
When to choose the UEFI mode
- You have a new machine, it is a good idea to start with the new UEFI mode
- You have other OS installed in UEFI mode (e.g. Windows 8.1 64bit), never mix both modes, even on separate disks.
Good to know
- Booting on a UEFI system is supported by both the 32-bit and 64-bit media from Mageia 7 and later.
- 64 bit UEFI installations are possible from Mageia 5 and later. Upgrade from Mageia 4 or lower running in non-UEFI mode is not supported.
- Despite the FALSE claims that frequently get added to various web sites, UEFI does not need GPT (GUID Partition Table) disk partitioning. There is some faulty UEFI firmware that requires the boot drive uses GPT partitioning, but UEFI firmware that follows the specifications will work with either MBR or GPT disk parition tables.
- UEFI needs an "EFI system partition" (ESP). This is a partition of about 300MB (only 100MB with Microsoft Windows) with a special partition type and mounted on /boot/EFI
- Secure boot has nothing to do with UEFI (although it needs UEFI) and must be disabled. (that is impossible on Microsoft-certified ARM devices).
- If your hardware needs some kernel options, see this page.
- If your device is using RST (Intel Rapid Storage Technology) (default for many new devices), you must read Install on device using RST.
Also see Mageia in dual boot with Windows 8 and over.
How to distinguish between UEFI and BIOS mode for Mageia boot media
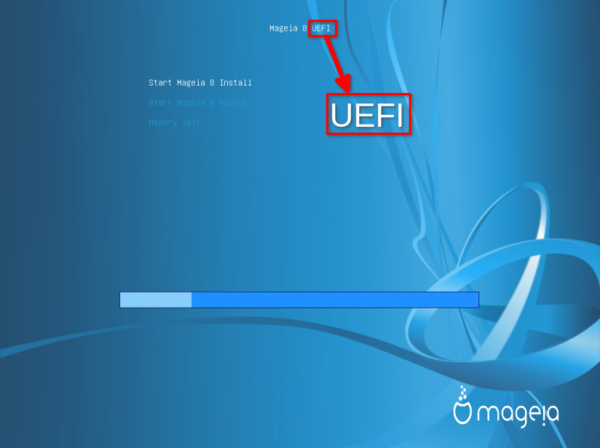
Here is the first screen when Mageia boots in UEFI mode
Here is the first screen when Mageia boots in Legacy (or Bios or CSM) mode
Terminology used in this page
- Installation on a system with BIOS firmware or BIOS compatibility mode is called "Legacy" and the one with UEFI firmware is called "UEFI".
- Mechanical disks and SSD are equally called "disks".
- We only deal with UEFI specifics in this page, see this wiki section for legacy installations and also our official installer documentation.
Some more information here:
| Note: If you aren't used to installing Mageia and only want to install it alongside Windows 8.0 and over (dual boot), see this page instead: Mageia_in_dual_boot_with_Windows8_and_over |
How to prepare the installation media
See also Dump Mageia ISO on a USB flash drive - Alternative tools.
Using a CD/DVD
Download the Mageia ISO, check the integrity and then burn the ISO to the media using the command "Burn an iso image".
Using a USB stick
- Download the Mageia ISO, and check the integrity
- Dump the ISO to the USB stick, using either IsoDumper or the
ddcommand. More information here. - Boot from the USB stick
| Note: IsoDumper is the recommended method for dumping an ISO. It has been available in the Mageia repositories since Mageia 5 (and is also in the Mageia 4/core/updates repositories). |
You have only one disk
Installing on a virgin disk
Note: You must have at least a disk over 20 GB (to be checked)
In the first screen to welcome you in the Mageia installer, as shown in the previous image, select Start Mageia X Install.
Then follow three screens regarding language, licence and keyboard. They are the same as the ones used in a legacy installation.
Next is the partitioning screen. If your disk is empty, you have only two options:
- Use free space
- Custom disk partitioning
The first one, by default, uses all the space on the disk (sda). The second option is universal but also needs some skills, and will be used in the case of a dual boot. (see below).
If "Use free space" is selected, you have nothing else to do, the system is going to automatically create three or four partitions according to the available space and using it entirely:
- an ESP (EFI system partition) for UEFI boot loader of 300 Mb, mounted on
/boot/EFI - a partition for
/of at most 50GB - a partition for
/homeif the total available space is more than 30 GB, but under 30 GB,/and/homeare on the same partition. - a partition for swap of at most 4 Gb
After partitioning, the steps are again the same as per a legacy installation.
At the end of the installation, the summary shows that the boot loader is Grub 2. Note that the bootloader is installed in the ESP partition.
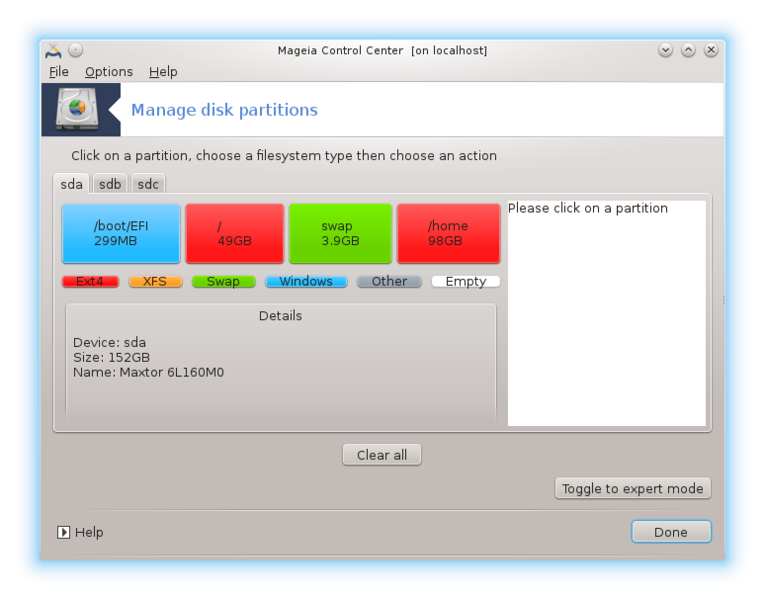
You are eventually prompted to update some packages and to reboot. Once Mageia is ready, you can go in the MCC and see what the installer has done with your disk. Note the sda1 partition (in blue, since it is formatted as FAT32). This partition, called ESP (EFI System Partition) is part of the UEFI standard.
Dual boot installation
With free space on the disk
We will use as an example, the installation of Mageia alongside another Linux installation.
The screens are the same as above except for two things:
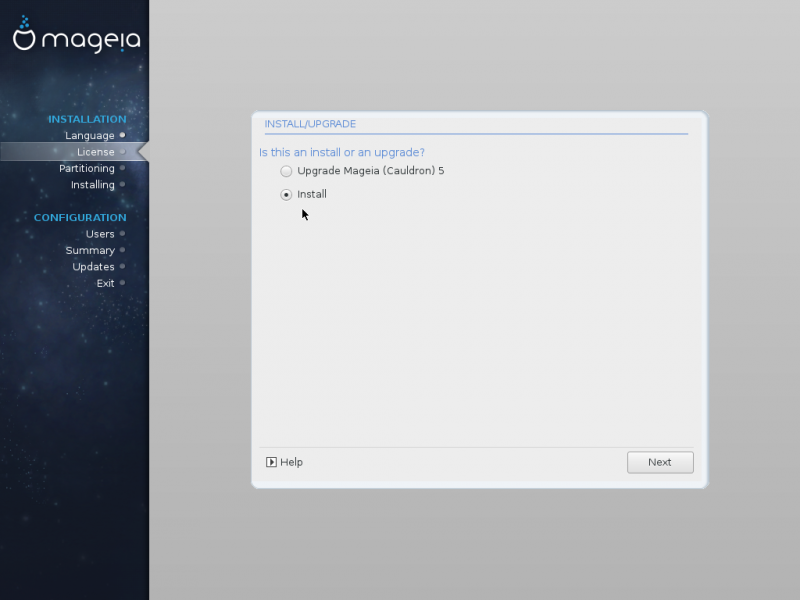
- The choice between upgrade and install if the other installation is Mageia.
- And for the partition step:
The available options are:
- Use free space
If "Use free space" is selected, you have nothing else to do, the system is going to automatically create two or three partitions according to the available space and using it entirely:
- a partition for
/of at most 50GB - a partition for
/homeif the total available space is more than 30 GB, but under 30 GB,/and/homeare on the same partition. - a partition for swap of at most 4 Gb
- a partition for
- Use existing partitions (overwriting partitions no longer required).
- Erase and use entire disk (removes whatever is on the disk).
- Custom disk partitioning (It is the option we choose).
Initially, you may suffer a graphical problem that prevent you seeing a nice display.
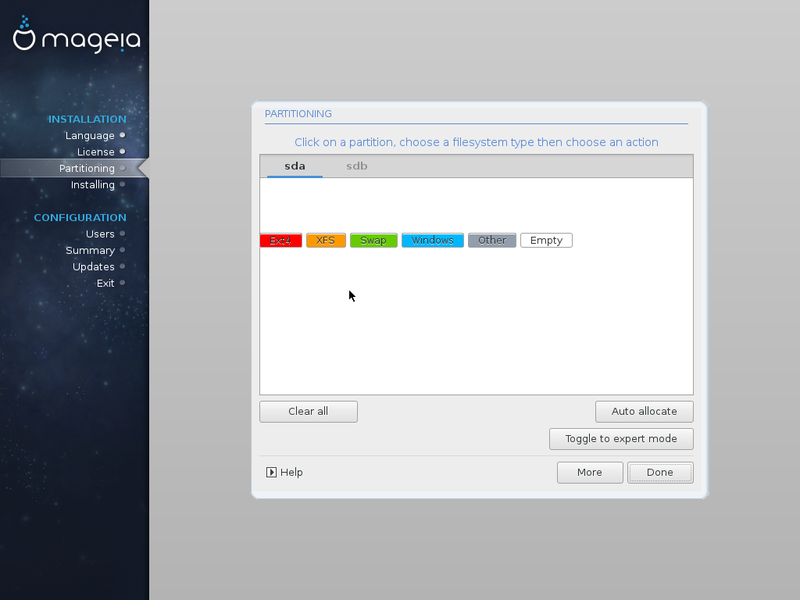
To correct that, click on another tab and then back on your disk tab.
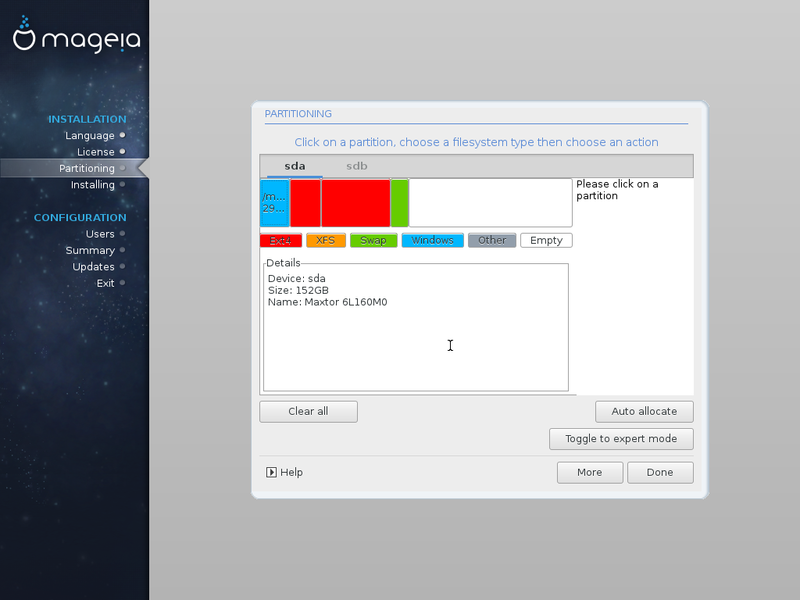
Now, we have to create partitions and mount them in the right place.
- a partition of at least 12 GB, formatted as Ext4, to be mounted on /
- a partition, the bigger possible (the size depending of your activities), formatted ext 4, to be mounted on /home
- a swap partition, if not already existing
- you have also to mount the ESP partition to /boot/EFI.
To create a partition, click in the empty space and then on "Create"
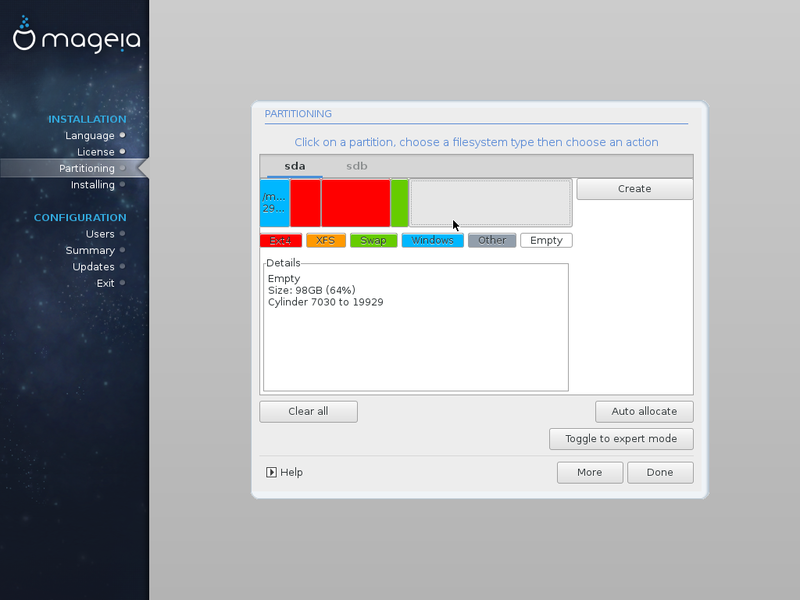
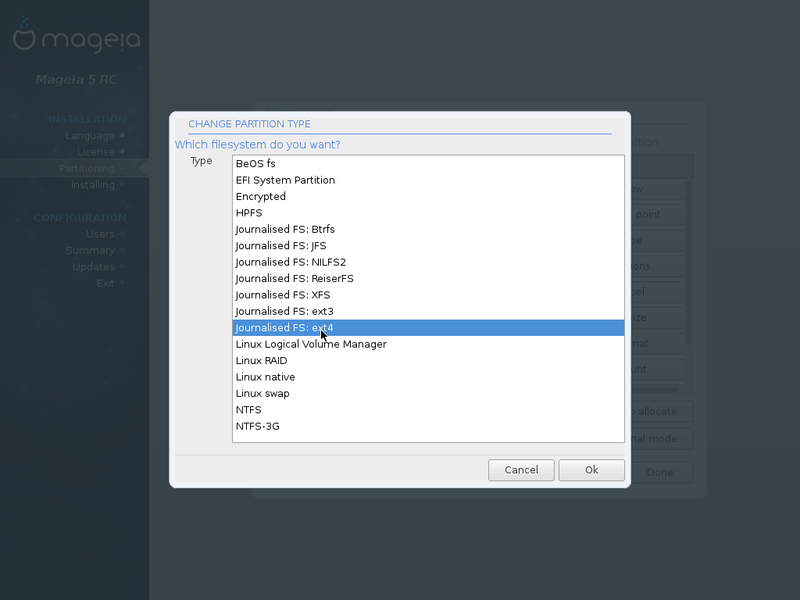
Use the cursor to set the size and then change the filesystem type to Ext4 and the mount point to / (they aren't by default).

Repeat the filesytem size and type steps for a /home partition
If you forgot to change the filesystem type, click on the "toggle to the expert mode" button, and then on "Type". To change the mount point, click on "Mount Point"
.

You should have something like this.

Finally, it is very important to check that your ESP is mounted on /boot/EFI (This partition must exist, it has been created during the first installation, even not a Linux one). In the screenshot above, it is mounted on /media/windows. To do that, click on the ESP and on "Mount Point" and then select /boot/EFI/.

When you have finished (ending up with something similar to the above screenshot), click on "Done". A message will inform you that the partition table is going to be written, and the following is then the same as for the legacy installation.
Without free space, re-using existing partitions
In this case, choose:
- Use existing partitions, or
- Custom disk partitioning
and set a partition to the mount points / and /home. If necessary, click on "Type" to set the filesystem type to ext4. Always check that the ESP is mounted on /boot/EFI.
Dual boot alongside a UEFI Windows operating system
This section suits the very common case where a computer is shipped with Windows 8.x installed on the whole disk. There are two options :
- Using the free space on a Microsoft Windows partition
It is the automatic way, the installer detects and mounts the ESP, frees space and creates /, /home and swap without asking any question.
- Custom disk partitioning
It is the manual way, you have to create /, /home, swap and even more if you want, set their size, and mount them plus the ESP. With this option you can also decide to resize your Windows partition with Windows itself or a third party software before starting the Mageia installation.
Preliminaries
- Secure boot must be disabled. It can be done in the firmware set-up.
- Fast Startup (aka Fastboot) must be disabled. open the Control Panel (icons view), and click on the Power Options icon, then click on
Choose what the power buttons do,Change settings that are currently unavailableand uncheckTurn on fast startupunder Shutdown settings. - De-fragment your Microsoft Windows mean partition
- Check there is at least 30 GB free in the Windows partition
- Back up the important data
Using the free space on a Microsoft Windows partition
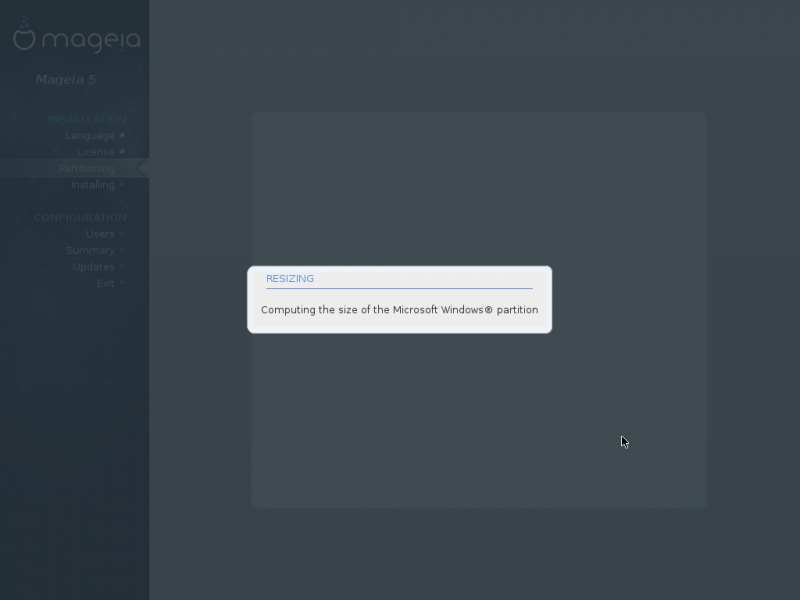
The first screens are as usual, then a warning says the installer found a Windows partition and is computing its size
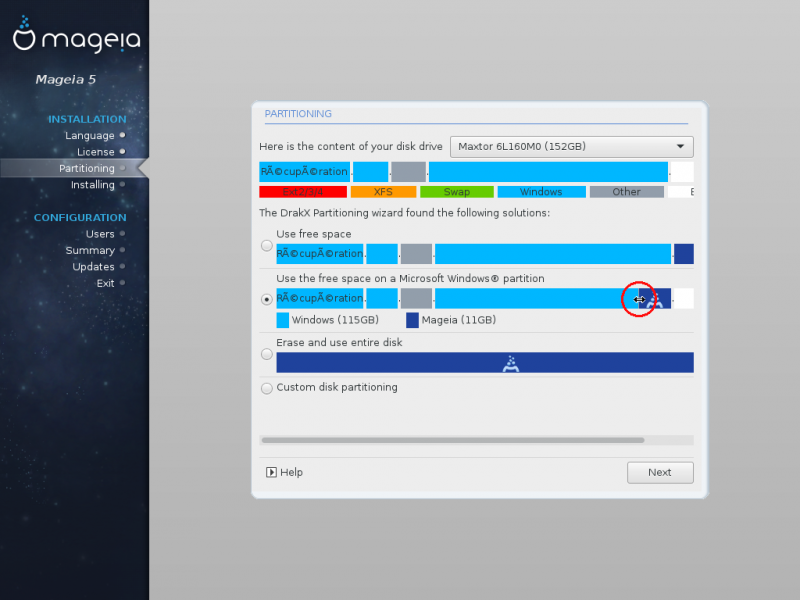
Under the option "Use the free space on a Microsoft Windows partition" you can see the size the installer suggests to free for Mageia (11 GB on the screen-shot) and the one remaining for Windows (115 GB on the screen-shot). We can enlarge the size foreseen for Mageia:

Move the mouse cursor over the interface between the Windows light blue partition and the Mageia dark blue partition, a double arrow appears. See the red circle in the screen-shot below
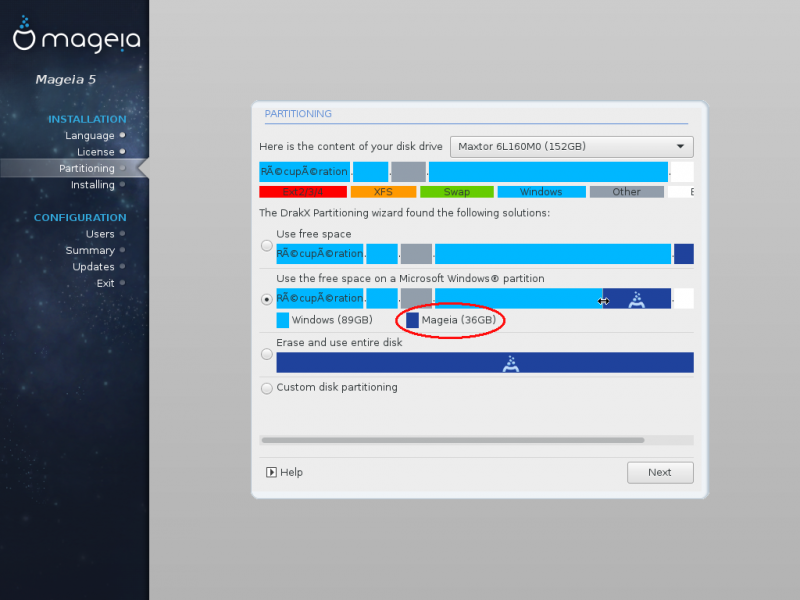
Left click and hold while moving the mouse towards your left/right hand to enlarge/reduce the Mageia partition. Keep in mind that the size you set (36 GB in the screen-shot) is for the whole Mageia (/, /home, and swap). Click on the Next button when you are done.
And another one to says Windows will launch an automatic check and reboot the next time you will start it (if any)
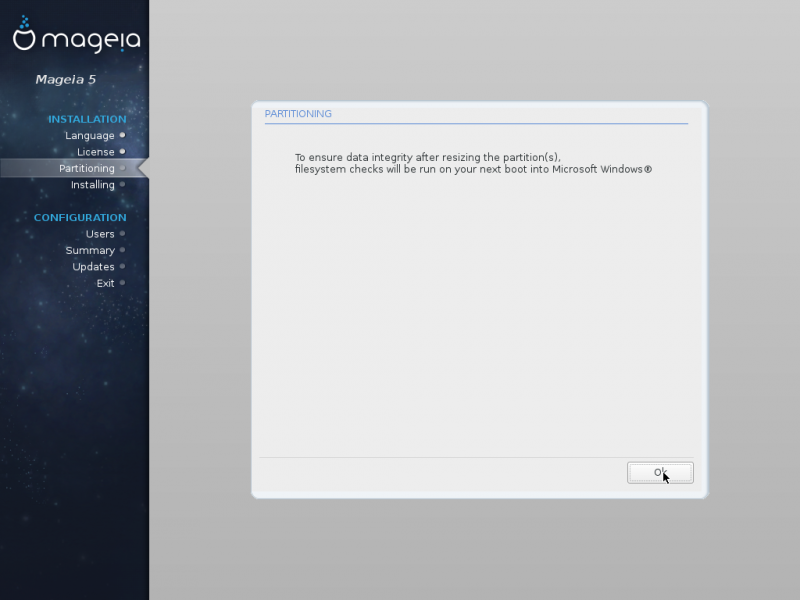
Click on OK and the installation will go on similarly to a legacy one.
Custom disk partitioning
Use this option if you want a total control of the installation. For example to create more partitions than only the traditional three, or if you want an installation partially using the free space, partially using existing partitions and partially using the free space on a Microsoft Windows partition.
Here is an example where we want to install Mageia on four partitions (/, /usr, /home and swap) on a disk that have some free space, an unused partition and a Microsoft Windows partition.
At the partition step, choose "Custom disk partitioning"
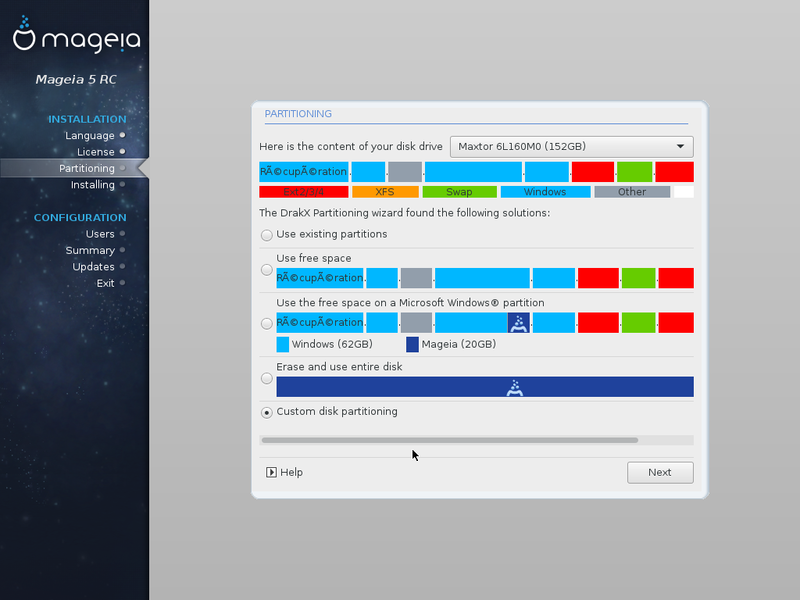
We are going to install /home in the free place. Select it and click on the "Create" button
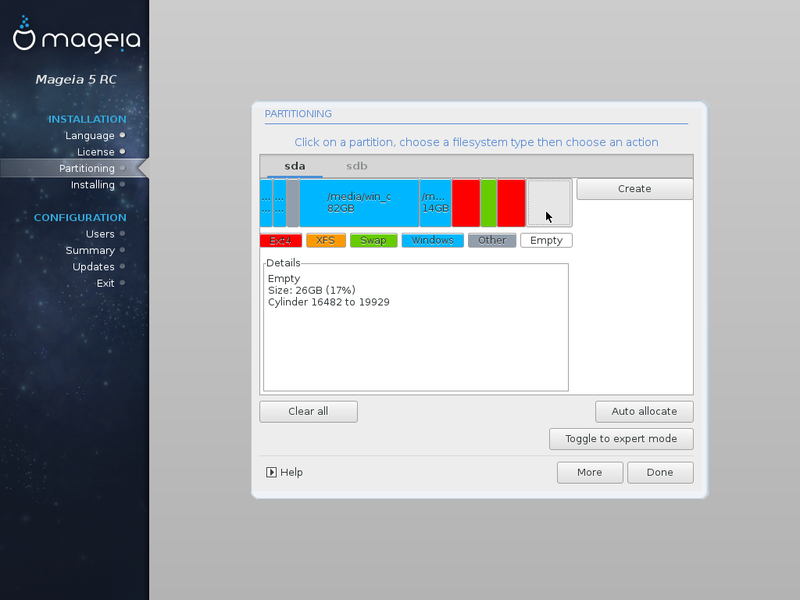
By default, the system sets the size at 1884 MB, we enlarge it to the maximum with the slider "Size in MB". We also set the "Filesystem type" to ext4 and the "Mount point" to /home using the drop-down lists. Click on the "OK button".
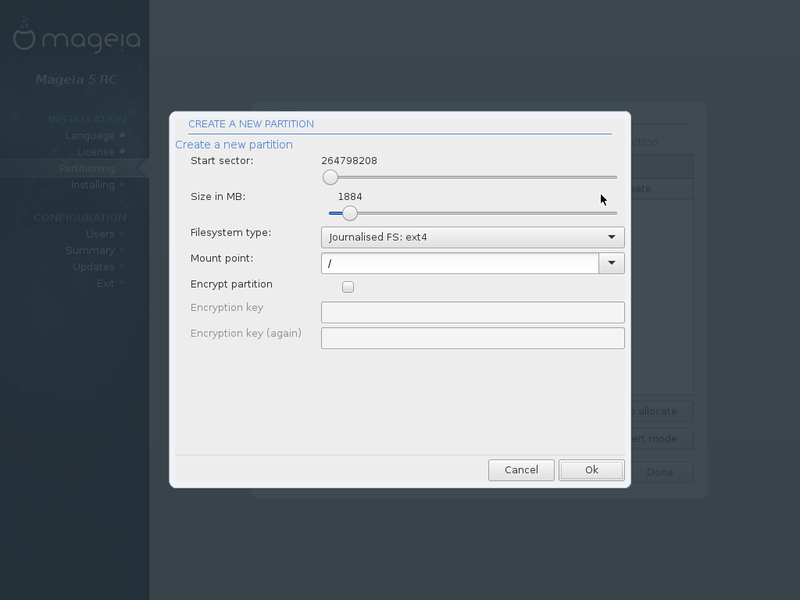
We can see /home is ready. We are going now to use the existing partition sda8 for /. This partition is formatted NTFS, it isn't the right type. To change it, click on the "Toggle to expert mode" button...
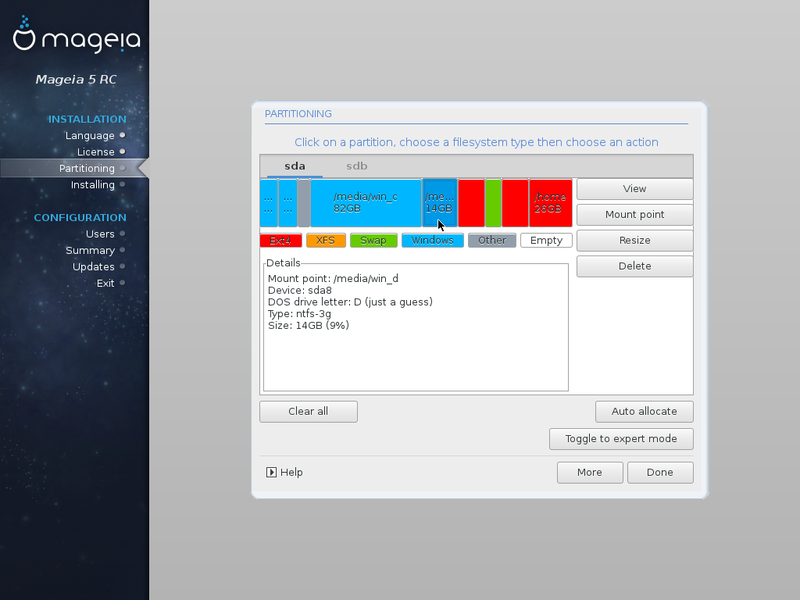
... and then on the "Type" button.
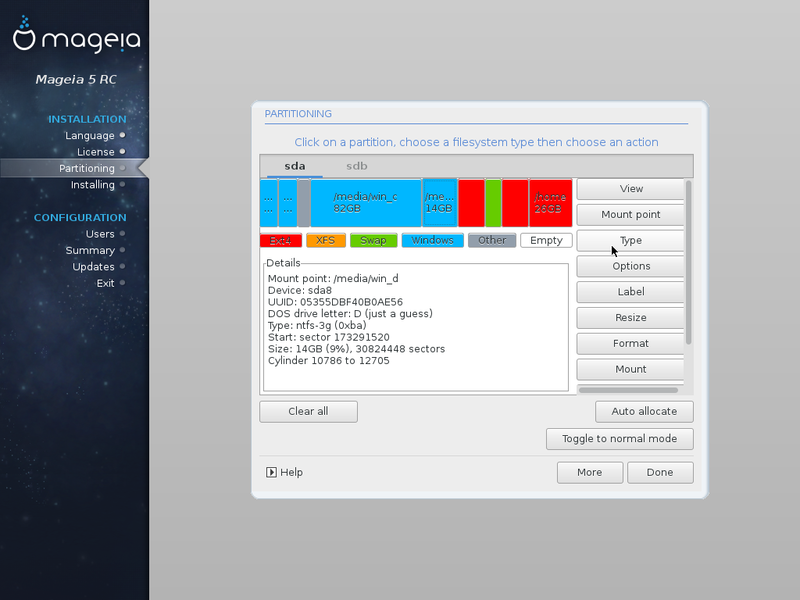
You are warned you will lose all your data on this partition

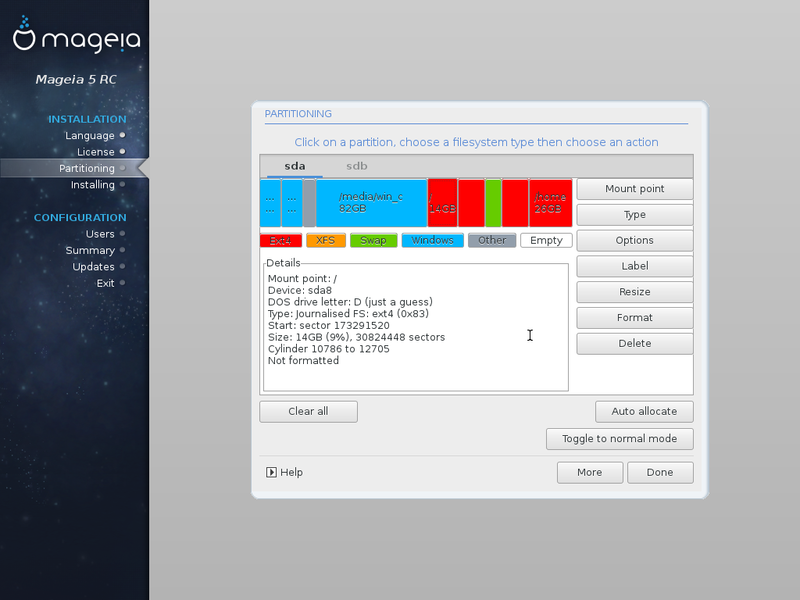
Then use the "Mount point" button to set it to /. We can check on this screen-shot that the partition is ext4 type (in red) and mounted on /.
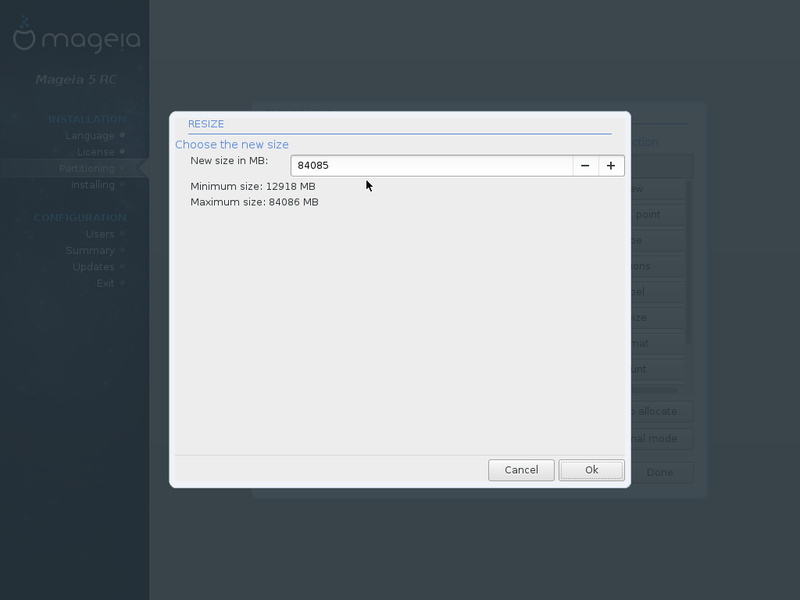
Now, we are going to shrink the Windows partition to create the partition /usr. Click on sda4 (in blue) and then on the "Resize button"
 <
<
Write the new size in the "New size in MB" field. For example 70000,
and you can see the newly created free space. Select it and then click on the "Create" button.
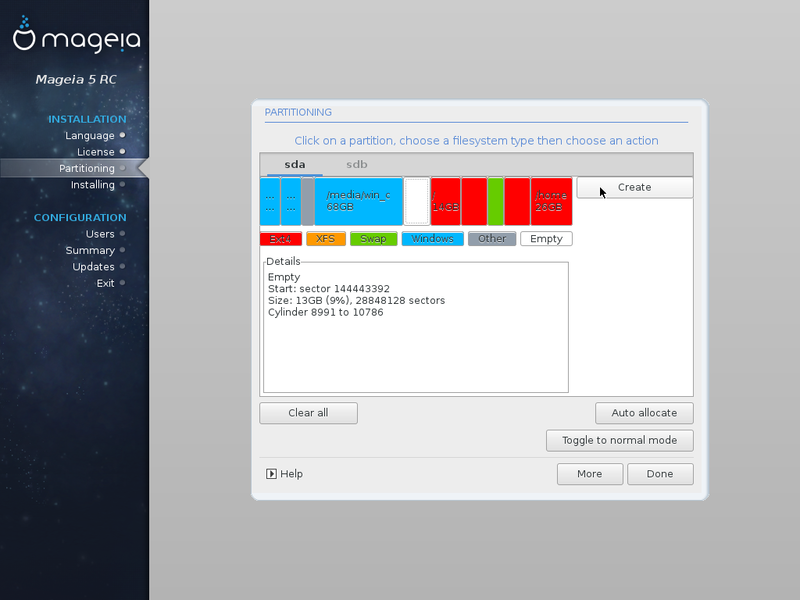
Set the size to the maximum, using the "+" button...
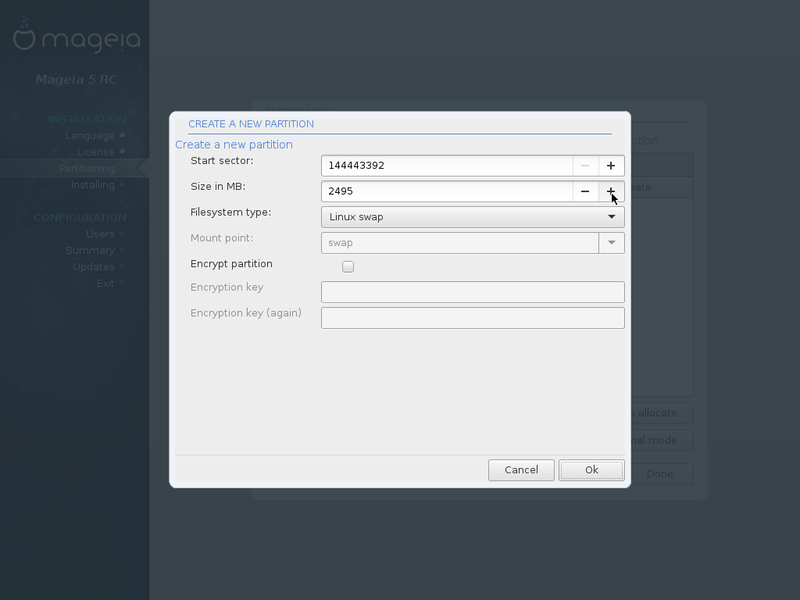
...and set the "File system type" to ext4 and the "Mount point" to /usr. Click on the "OK" button.
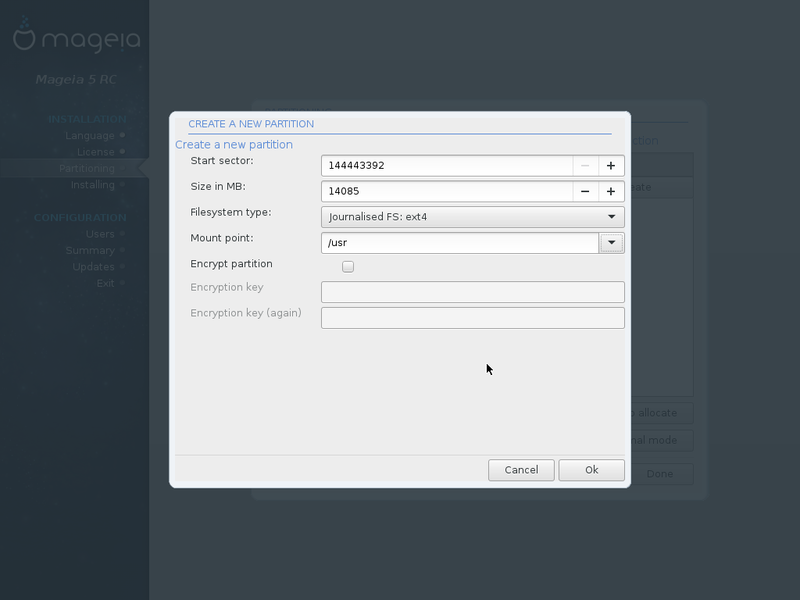
We can check on this screen-shot that sda10 is correctly mounted on /usr and has the right file-system type: ext4
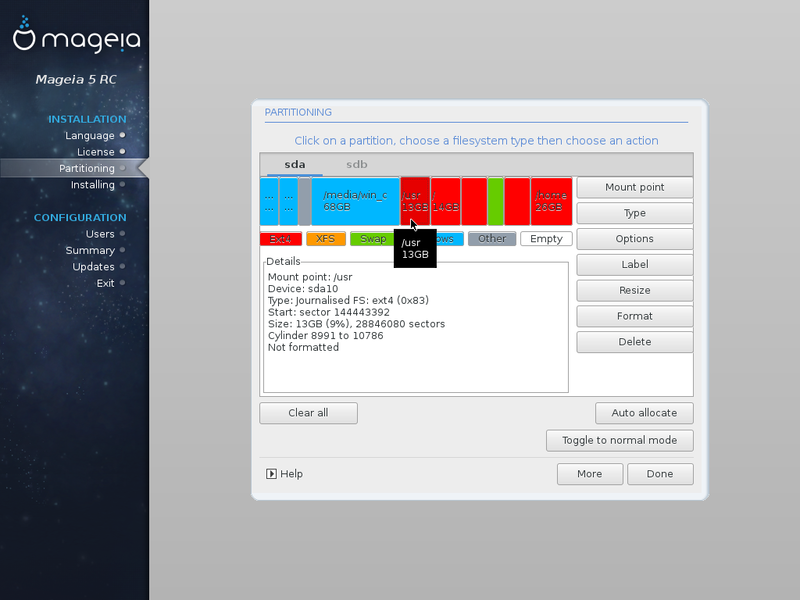
At last, always check you have the ESP (sda2 in the screen-shot) mounted on /boot/EFI. If not, fix it with the "Mount" button.

You have several disks
First, read the case with only one disk, here are the differences if you have several disks:
Click on the drop-down list in the upper right corner to choose the disk(s) to be used, knowing that :
- Use free space
Will use the free space on whatever disk it is, selected or not, external or internal. Keep in mind that you must have the ESP (EFI system partition) available when booting, so, you shouldn't put it on an external disk.
- Use the free space on a Microsoft Windows partition (not in the screen-shot)
This option only uses the place freed by a Microsoft Windows partition, one or several disks doesn't change anything. Select the disk where the Microsoft Windows partition is.
- Use existing partitions
They may be on different disks, use the drop-down list to select the disks and mount the partitions.
- Erase and use entire disk
Will only concern the selected disk, the others are ignored.
- Custom disk partitioning
As usual, the universal option to do whatever you want but needs some experience.
| Note: If you don't point out the ESP nor select the disk with it, the wizard will create a new one. That does not prevent a fine functioning |
Troubleshooting
Automatic Grub update
If after a Mageia installation in dual boot, this one boots fine but not some other OS, then re-install grub2:
Open a console in Mageia with root rights and enter:
| # grub2-install |
and reboot to check every OS is starting.
Manual Grub update
If after a Mageia installation in dual boot with Windows, Mageia boots fine but not Windows, you can update Grub manually from Mageia.
In a console, with administrator rights, enter the command:
| # ll /dev/disk/by-uuidd |
and write down the uuid for the ESP (sda2 in the screenshot below).
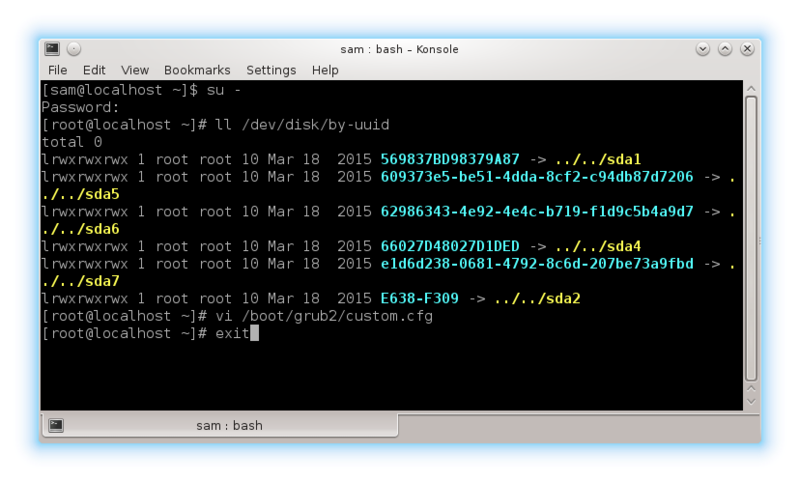
Then run the command:
| # vim /boot/grub2/custom.cfg |
You can prefer any other text editor than vi. The important is to copy out the seven lines you can see on the screen-shot below. Take care to replace the ESP uuid (in red) by your own.

Some help for vim? Enter in this order:
- i -> insertion mode
- arrow keys -> to move in the text
- enter the text
- esc -> end of the insertion mode
- : -> command mode, appears at the bottom of the screen
- wq -> save and quit (or q! to quit without save)
