| Other languages Deutsch ; English ; Français ; Nederlands ; |
Contents
Presentation
Kernel options (also called kernel parameters) are used to supply the kernel with information about hardware parameters that the kernel would not be able to determine on its own, or to avoid/override the values that the kernel would otherwise detect.
These options may be temporarily given at the boot step (starting a session or an installation), they last until the next reboot, or permanently by configuring the bootloader (Grub Legacy or Grub2). When advised to try using a particular kernel boot option, it is usually a good idea to first add the parameter temporarily for testing. Once you have determined that adding the parameter has the desired effect, you can then add it permanently. Directions for both methods are below.
Kernel boot parameters are text strings:
- case-sensitive
- sometimes just a simple word ("splash" or "noapic")
- sometimes have an = sign with various possible values ("acpi_backlight=vendor")
- sometimes include punctuation ("i8042.noloop")
| Warning! Always enter kernel boot parameters exactly as advised. Errors in spelling or formatting or invalid values will not result in any error message, they will simply have no effect. |
All the kernel options: https://www.kernel.org/doc/Documentation/admin-guide/kernel-parameters.txt
Main available options
| Option | Impact | Notes |
|---|---|---|
| vga=xxx | Set your framebuffer resolution to VESA mode xxx. | Example vga=768. See here for other values. |
| acpi=off OR noacpi | This parameter disables the whole ACPI (Advanced Configuration and Power Interface) system. This may prove very useful, for example, if your computer does not support ACPI or if you think the ACPI implementation might cause some problems (for instance random reboots or system lockups). | ACPI is a standard for the power management. It can save energy by stopping unused devices, this was the method used before APM. |
| apm=off OR noapm | Disable the Advanced Power Management. | |
| acpi=force | Activates the ACPI system even if your computer BIOS date is older than 2000. This parameter overrides acpi=off and can also be used with current hardware if the ACPI support is not activated despite apm=off. | |
| pci=noacpi OR acpi=noirq | These parameters disable the PCI IRQ routing | |
| pci=acpi | This parameter activates the PCI IRQ routing | |
| acpi_irq_balance | ACPI is allowed to use PIC interrupts to minimize the common use of IRQs. | |
| acpi_irq_nobalance | ACPI is not allowed to use PIC interrupts. | |
| acpi=oldboot | Deactivates the ACPI system almost completely; only the components required for the boot process will be used. | |
| acpi=ht | Deactivates the ACPI system almost completely; only the components required for hyper threading will be used. | |
| acpi.power_nocheck=1 OR acpi_osi=Linux | Disable the check of power state. Option two modifies the list of supported OS interface strings (changes the OS compatibility reported to the BIOS). Necessary on some broken BIOSes to make temperature/fan control work. | |
| noapic | Disable the "Advanced Programmable Interrupt Controller (APIC)". | There are two components in the Intel APIC system, the local APIC (LAPIC) and the I/O APIC. The latter one routes the interrupts it receives from peripheral buses to one or more local APICs that are in the processor. It is really useful for multi-processor systems. Some computers have problems with the APIC system which can cause freezes or incorrect device detection (error message "spurious 8259A interrupt: IRQ7"). In this case, disable APIC and/or Local APIC. |
| nolapic | Disable the "local APIC". | |
| irqpoll | Changes the way the kernel handles interrupt calls (set it to polling). Can be useful in case of hardware interrupt issues | |
| rd.blacklist=(name of driver) | Try to prevent X from using a given driver. | Here is a combination that works for some dual-GPU (Nvidia Optimus) configurations: rd.blacklist=nouveau rd.blacklist=nvidia xdriver=intel |
| xdriver=(name of driver) | Try to force the usage of a given driver. | Example: xdriver=nouveau (open source driver for NVIDIA). Other drivers: intel, nvidia (NVIDIA proprietary driver), fglrx (ATI/AMD proprietary driver), radeon (open source driver for ATI/AMD). xdriver=vesa : use the BIOS's VESA implementation. With UEFI, there is no VESA, there's EFIFB instead. |
| mem=xxxM | Set the available memory to xxx MB | Example: mem=256M would specify 256MB of RAM. |
| systemd.unit=multi-user.target | For ThinkPad R50e to reach a working Live DE when the machine boots into a frozen light black screen. | May be valid with computer with intel 915. |
| init=/bin/sh | Opens a root shell for administrative actions | Example: Change a lost root password with the passwd command. |
| init=/sbin/init/ | Disable Plymouth | |
| Remove the "splash=silent" or "splash" and "quiet" arguments if they appear. | Boot in verbose mode |
How to modify the kernel options
Grub legacy is the default loader for Mageia although it also supports Grub2 if preferred. Since Mageia 4, if you use a EFI system, the default loader is Grub 2.
If you need to add multiple parameters separate them with SPACE but do not add spaces before or after any = signs or punctuation in the parameters themselves.
| Warning! Grub uses a UK keyboard layout, mainly qwerty with the = sign on the ´ key and / on the - key. |
Temporary options to the installer
With Grub Legacy bootloader
- Boot on the media you want to install your
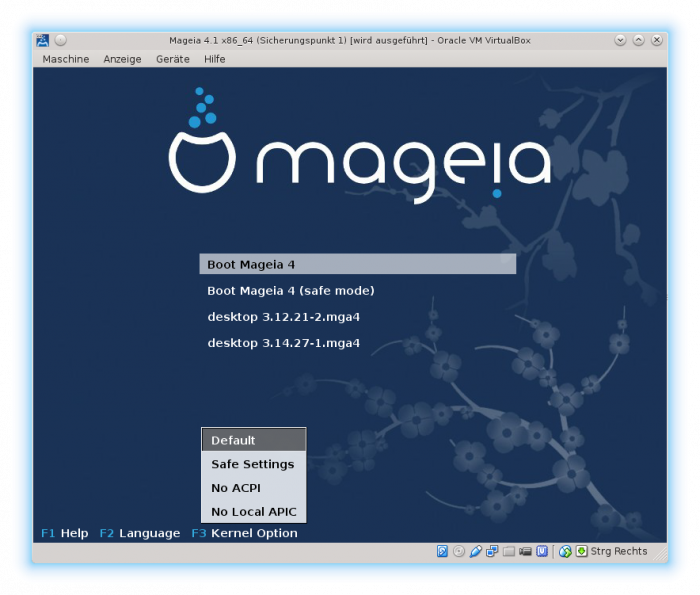
Mageiafrom. Once the "GNU GRUB" menu appears, like below (Mageia 4):
- Press F6 then select Default and press ENTER. The edit mode will look something like this:
- Use the arrow keys to move the cursor to the end of the line called "Boot Options", press SPACE to add a blank space (after install) then carefully type in the kernel boot parameter(s) that you need to add and press ENTER
With Grub 2 bootloader
- Boot on the media you want to install your
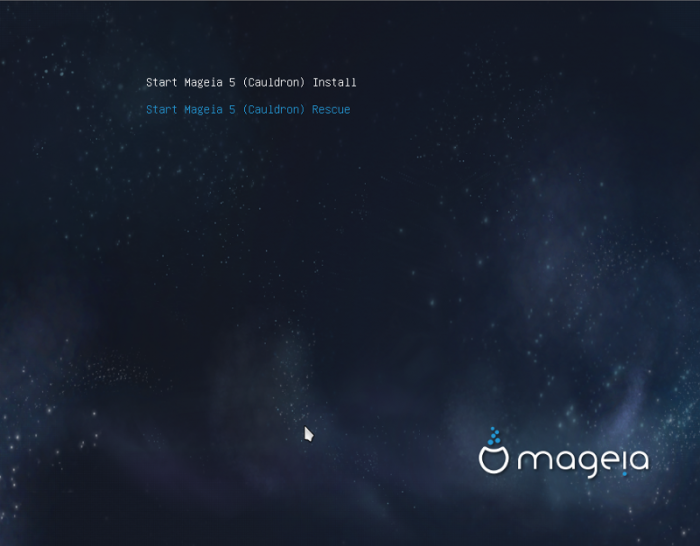
Mageiafrom. Once the "GNU GRUB" menu appears, like below (Mageia 5):
- Select "Start
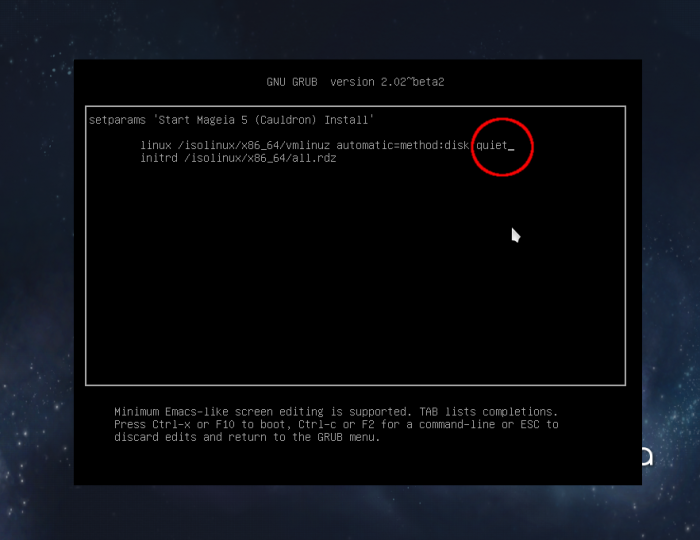
Mageia 5Install" and then press the e key to enter edit mode. The edit mode screen will look something like this:
- Use the down arrow key to move the cursor to the line beginning with the word "linux", then press the END key to move the cursor to the end of that line, in the red circle. Normally this will be just after the word "quiet".
- Press SPACE to add a blank space (after "quiet") then carefully type in the kernel boot parameter(s) that you need to add.
- Then press ESC to escape without saving or Ctrl x or F10 to boot with the new list of kernel parameters.
Temporary options to the bootloader
With Grub Legacy bootloader
- That is the default bootloader. Start your computer as usual and once the "GNU GRUB" menu appears, like below (
Mageia 4):
- Press F3 then select Default and press ENTER. The edit mode will look something like this:
- Use the arrow keys to move the cursor to the end of the line called "Boot Options", press SPACE to add a blank space (after vga=788) then carefully type in the kernel boot parameter(s) that you need to add and press ENTER. In the screenshot above, the parameters init=/bin/sh has been added.
| Warning! If you do chain loading, you have to set the options in the last bootloader in the chain (in the previous bootloaders, the line "Boot Options" is empty) |
With Grub 2 bootloader
- Start your computer as usual and once the "GNU GRUB" menu appears, like below (
Mageia 5):
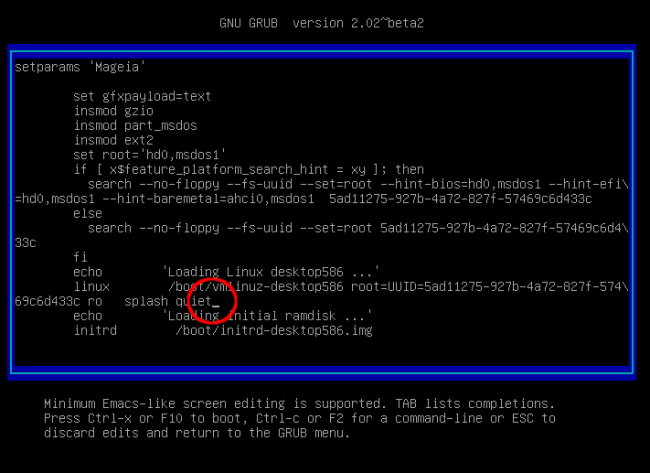
- Choose the kernel you want and then press the e key to enter edit mode. The edit mode screen will look something like this:
- Use the down arrow key to move the cursor to the line beginning with the word "linux", then press the END key to move the cursor to the end of that line, in the red circle. Normally this will be just after the words "splash quiet".
- Press SPACE to add a blank space (after "quiet") then carefully type in the kernel boot parameter(s) that you need to add.
- Then press ESC to escape without saving or Ctrl x or F10 to boot with the new list of kernel parameters.
How to permanently modify the kernel options
With Grub Legacy bootloader
- Log in to the system and start a terminal window.
- In the terminal window at the $ prompt, enter the command
su -and the password to have root rights - Then enter:
| # kwrite /boot/grub/menu.lst |
You can replace kwrite by any other preferred text editor.
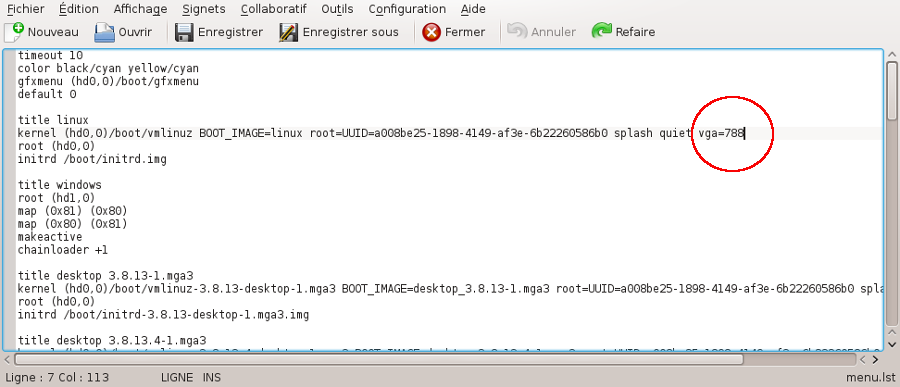
- Find the kernel you want to add a/some parameter(s) to and then move the cursor to the end of the line beginning with "kernel...", after "vga=788", see the red circle in the screenshot, then press SPACE to add a blank space, then carefully type in the kernel boot parameter(s) that you need to add.
- Save and quit
kwrite
With Grub 2 bootloader
- Do as above to open the file
/etc/default/grubinkwriteor another text editor - Find the line GRUB_CMDLINE_LINUX_DEFAULT=" splash quiet resume....." and move the cursor to the end of it, see the red circle in the screenshot, then press SPACE to add a blank space, then carefully type in the kernel boot parameter(s) that you need to add.
- Save and quit
kwrite - Run
update-grub(orupdate-grub2which does the same)
Using Mageia Control Center
Boot > Set up boot system > Next
Add it in the field "Append".


