| Other languages Deutsch ; English ; Español ; Português do Brasil ; |
Contents
Install media in Mageia (for beginners)
Why is it important to install and enable media?
- The media provide access to software repositories with software/applications to be installed in Mageia (more than included in the installation ISO images)
- Only after installation and activation of appropriate media automatic installation of security updates and bug fixes and additional software/applications is possible. You can read here how to install or remove software/applications.
What is a repository?
- Medias are also called software repository or only repository. It is the database of the files needed for the numerous programs approved for installation in the Mageia distribution. This database is replicated on multiple mirror servers/mirrors throughout the world.
- (Note that the word media in other circumstances mean the install ISO file...)
- Additionally community/3rd party programs/software repositories can be added to your set of medias. 3rd party and community repositories are not created and have not been tested by Mageia developers. It is not recommended to install programs/software obtained from 3rd party/community sources, as they may compromise the stability of Mageia. If in doubt, go to Mageia Forum, where you can open a topic on the subject and request help.
Other tips for beginners and more advanced users
Install media in graphical mode
During installation of Mageia, if the internet connection is available, it may cause automatic installation of the media/repositories, as this is necessary if you enable the optional media. Following steps describe how to install the media in the Mageia graphical mode through the Mageia Control Center (MCC).
Open Mageia Control Center
There are different ways to access the Mageia Control Center to add media:
- Click the icon "Application menu" in the lower left corner of the screen followed by accessing
Tools -> System Tools -> Mageia Control Center, - Click the icon "Configure your computer" at the bottom of the screen,
- The MCC software management can also be called up directly via the "Application menu" icon followed by accessing
Install & Remove Software(the window from Image 2 is skipped),
| |
|
Adding Media / Official Repositories
|
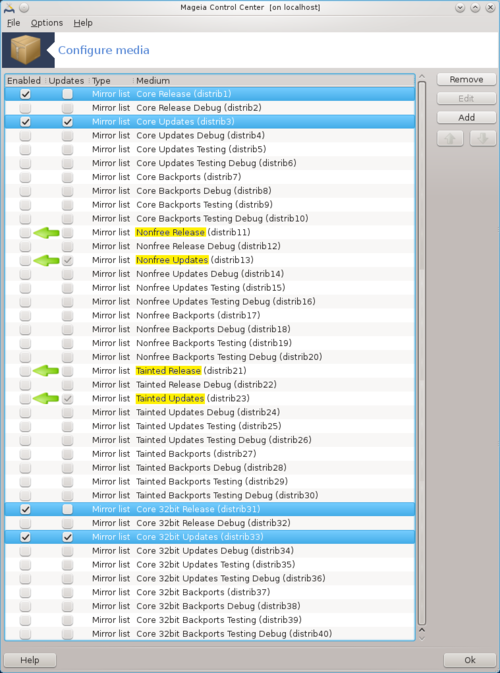
Default selected and optional media - Mageia (32 bit)
|
Default selected and optional media - Mageia (64 bit)
|
Types of Mageia media
The packages in Mageia exist in three different repositories/media, depending on what license each package uses.
Mageia official repositories for final release versions contain at least:
core repositories: The Core repository includes packages with free-open-source software, i.e. packages licensed under a free-open-source license, the set of the Core media are added by default and the “Core Release” and “Core Updates” are enabled by defaultnonfree repositories: The Nonfree repository includes packages that are free-of-charge and allowed to redistribute, but they contain closed-source software (hence the Nonfree name); For example this repository includes the nVidia and ATI graphics cards proprietary drivers, firmware for various Wi-Fi cards... etc. The set of the Nonfree media is added by default and the “Nonfree Release” and “Nonfree Updates” are enabled by defaulttainted repositories: The Tainted repository includes packages under various licenses, free and nonfree ones, but the main criteria for packages in this repository is that they may infringe patents and copyright laws in some countries in the world (e.g. multimedia codecs needed to play various audio/video files, packages needed to play commercial video DVD... etc); as such the set of the Tainted media is added by default but not enabled by default, i.e. it's completely opt-in; so check your local laws before using packages from this repository. This repository is only added for the convenience of the users. This repository is to Mageia what PLF was to Mandriva users or RPM Fusion is to Fedora users.
Each media has several sub-media:
Release: the packages as of the release day.Updates: the packages updated since the release day for security or bug concerns, or prominent functionality update. Everyone should have this medium, even with a very slow internet connection.Backports: some new versions of packages backported from Cauldron. (And sometimes intermediate versions to Cauldron). Reasons they are not in updates may be that they are a too large step forward to be backwards compatible.Updates TestingandBackports Testing: Location of new updates, to allow the bug reporters and the QA team to validate the packages before being moved to the Updates and Backports medias.Release Debug,Updates Debug,Backports Debug,Updates Testing Debug,Backports Testing Debug: contain packages with the files needed to allow the full stack trace to be generated for debugging purposes (for advanced users) of software in the corresponding media without the "Debug" part in name.
By default, only core repositories and nonfree repositories are enabled, and only with sub media Release and Updates.
When referring to medias, the names are concatenated, such as "Core Updates Testing". When listed, sometimes the protocol to fetch the content is also prepended, so it may look like "HTTPS Core Updates Testing".
Advanced users may enable more or fewer via the steps described here.
You may want to enable Tainted to make available some video codec. You may want to enable Backports for some later version of a program. If you only want free/libre software, you may want to disable Nonfree (you can do that at a question already in early step of installation).
Remember: anything with Testing or Debug in its name is only for developers and advanced users wanting to help out!


