| Other languages English ; |
Please remove this {{Draft}}template, when you're sure the page is complete and correct.
|
| Note: This page was created in order to write an official troubleshooting manual, but it can be useful as such |
Presentation
Sometimes, the official documentation embedded in the ISO image is the only one accessible to the user:
- if a problem prevents the internet connection.
- if neither forum nor wiki exist in the user language whereas official documentation does.
From this assessment, docteam decided to add a troubleshooting section in the official documentation because it is always to hand. The goal of this page is:
- first, to define the troubleshooting section summary
- then, to collect information
- and to manage the collaborative work. It's impossible to write troubleshooting documentation about hardware or software you don't have, so we will need the help of a lot of people. That is the reason why a wiki page was chosen instead of a Calenco one, more people have access to the wiki.
Note to the writers
- The target user of this troubleshooting section is a non-expert user, who can't ask for help on the internet or can't find help in his own language, we start with important problems (Boot, Display, Network...)
- Warn the doc-discuss mailing list about what you want to do, to prevent useless work.
- If people who don't speak English want to help, they just have to find somebody (both intermediary and correspondent) to translate this page into their language, then to translate their work back into English. Warn the doc-discuss mailing list.
- Don't bother with the wiki syntax as this page will be transferred in Calenco.
Where to find material?
- This very wiki, many pages to dig, for example
- * https://wiki.mageia.org/en/How_to_ask_help
- * https://wiki.mageia.org/en/Les_bons_r%C3%A9flexes_face_%C3%A0_un_probl%C3%A8me-fr
- * https://wiki.mageia.org/en/Triage_guide#Special_cases_of_specific_information_required
- * many others
- The MLO wiki (in French)
- * http://www.mageialinux-online.org/wiki/wiki.php
- MAQeia
- * https://forums.mageia.org/en/viewforum.php?f=36
- Linuxtricks
- * http://www.linuxtricks.fr
- The other distributions, for example
- * https://help.ubuntu.com/community/TroubleShootingGuide
- * https://wiki.debian.org/TroubleShooting
- * others
- Else?
Contents
- 1 Preliminaries
- 2 Troubleshooting
- 2.1 Installation Problems
- 2.2 Boot Problems
- 2.3 Problems during a Mageia session
- 2.3.1 Display problems
- 2.3.2 Networking problems
- 2.3.2.1 About wired network
- 2.3.2.2 About wireless network
- 2.3.2.2.1 Troubleshooting
- 2.3.2.2.2 Ndiswrapper
- 2.3.2.2.3 Most common drivers
- 2.3.2.2.4 I have no access point in the list
- 2.3.2.2.5 rfkill
- 2.3.2.2.6 Other problems
- 2.3.2.2.7 Structured troubleshooting for wireless issues
- 2.3.2.2.8 Overview
- 2.3.2.2.9 Steps in detail
- 2.3.2.2.10 Example
- 2.3.2.2.11 known issues with specific drivers
- 2.3.3 Issues related to specific Internet applications
- 3 Mageia HOWTOs (mostly for newcomers)
- 3.1 How to access to the command line
- 3.2 Tools and logs for diagnostics
- 3.3 Magics keys
- 3.4 I lost my root password
- 3.5 How to start an application with a new by default configuration
- 3.6 How to add kernel options
- 3.7 How to change a wrong graphic driver
- 3.8 How to set up my Internet connection
- 3.9 How to manage the packages using a console
- 3.10 How to modify a file in command line
- 3.11 Grub2-efi
- 4 Mageia 6 errata
TROUBLESHOOTING MANUAL (planning stage)
Preliminaries
Check first you strictly followed the points detailed in the section "Downloading and Checking Media" at the start of this manual. Then check the following: [to proofreaders, we are talking about the Mageia Installer Manual which will contain this addon]
The way you burn or dump the media
Avoid the use of Double Layer and Re-writing media, as these are less safe, and avoid using high burning speeds.
Note: Unetbootin should not be used to copy the ISO image to a USB drive (see below).
To dump a Mageia installation ISO on a USB stick, you may try one of several tools:
- From a Mageia system
- * IsoDumper, available since Mageia 3 inside repo.
- From Ubuntu
- * You can use the application "Disks" with the action "Restore an image" and select the .iso file
- From Mint
- * Use MintStick, which is similar to Isodumper
- From any Linux system
- * Simply copy the ISO to the USB stick with "dd" (see example below).
- From Microsoft Windows:
- * Rufus. You must use the "ISO Image" option.
- * Win32 Disk Imager, for recent versions of Windows. You will need to change to "all files" when you attempt to open the .iso since it only allows .img by default.
- * WinImage works fine on systems with restrictions, such as Microsoft Windows 7 Starter.
Minimum Hardware Requirements
- Processor: any AMD, Intel or VIA processor;
- Memory (RAM): 512MB minimum, 2GB recommended, even more to enjoy the 3D display features
- Storage (HDD or SSD): 5GB for a minimal installation, 20GB for a casual setup; This includes a few GB for user files. If you need more then you should take that in account too. Custom installations on less space are possible but this requires intermediate Linux knowledge.
- Graphic card: any AMD/ATI, Intel, Matrox, Nvidia, SiS or VIA graphic card;
- Sound card: any AC97, HDA or Sound Blaster sound card.
Which firmware do you use?
Check in your motherboard documentation whether it is equipped with BIOS or UEFI firmware. UEFI is compulsory if you have Windows8 64bit (or later). Legacy means BIOS firmware, CSM means you have UEFI firmware but it is configured to emulate a BIOS one.
Which graphic card or embedded GPU do you have ?
Check your documentation. You can have
- a standalone ATI/AMD graphic card
- a standalone NVidia graphic card
- a graphic processor (Intel HD Graphics) embedded with the Intel CPU, it is called IGP for Integrated Graphics Processors.
- a graphic processor (Radeon HD) embedded with the AMD CPU, it is called APU for Accelerated Processing Unit
- a hybrid system with both a NVidia graphic card + IGP, you may be interested in Bumblebee
Secure Boot and Fast Boot
If you have Windows 8 and later already installed:
- disable Secure Boot. See your motherboard documentation to find out how to enter the firmware set-up.
- disable Fast Startup (aka Fast Boot). In
Windows, open theMenu -> Control Panel (icons view) -> Power Options -> Choose what the power buttons do -> Change settings that are currently unavailableuncheck "Turn on fast startup" under "Shutdown settings".
| Note: Actually, if you have a dual boot with Windows 8 and later, Mageia won't boot if Windows hasn't been correctly halted or if Fast Boot is enabled AND the Windows partitions are mounted in fstab. The system boots if the Windows partitions are not mounted at start, but only when the user asks for them. |
Cannot mount NTFS partition even though Secure Boot and Fast Boot are disabled in Windows
Even though you have Secure Boot and Fast Boot disabled in Windows, Mageia is still unable to mount your Windows partition because it thinks Windows is hibernated and, as a consequence, you can't access the Windows data.
It seems for whatever reason you still have a hibernation file (hiberfil.sys) on the Windows partition. You can try to disable it as follows:
- Open a command prompt as an administrator:
Menu -> All programs -> Windows system -> right click on Command Prompt -> Run as administrator - Then Click on "Yes" in the dialog box and type:
| powercfg /h off |
Troubleshooting
We are going to consider problems according to the stage at which they happen:
- during installation
- during boot between power on and screen display (most often at the first boot after installation)
- during boot between screen display and desktop display
- during a Mageia session
If you don't know how to do some of the suggested configurations, see the Mageia HOWTOs below.
Installation Problems
Obtaining information on the problem
Traditional Installer
If you are using the traditional Installer (not a Live version) you can read the installation report in /root/drakx/report.bug.xz
An easy way for doing this is to switch to console 2 (by pressing "Ctrl-Alt-F2") during installation, put a floppy in the floppy drive or plug in a USB key/stick and type:
| bug |
then press Enter. It will put report.bug on the floppy/key.
| Note: If the bug command fails, try again with e.g (if your USB-key is on /dev/sdb): bug /dev/sdb1 Adjust the command if needed. You can find, by first running dmesg whether your USB key is on e.g. "/dev/sdb", "/dev/sdc" or "/dev/sdd", etc. |
| Note: Before partitions are mounted for installation, the content is instead in /tmp/ddebug.log So if the install does not get past the partitioning stage, this is the file to get. You must manually mount a media and copy that file over. |
| Note: For traditional installer upgrades, the /root/drakx/report.bug.xz is of the original install, not of the upgrade. Read /root/drakx/report.bug instead. |
Live Installer
For bugs related to installing from a live CD/DVD after having booted it in Live mode, as root (we remind you there is no password in Live mode) do:
| # journalctl -a |
Before rebooting after install
Press space bar to display next page. Ctrl C to quit.
Guess and try
Do you need a kernel option?
Hardware detection may fail and lead to the installation failure. If the involved hardware is not compulsory, just unplug it, you will install it later from a working Mageia. If that is impossible, perhaps due to X drivers, ACPI or such, then see How to add kernel options below. If you think any of those options may apply, you can try them with no risk.
New try of installation
Now, you can redo the installation following the Installer help, particularly:
- with UEFI, check at the mounting stage that ESP is correctly mounted on /boot/efi
- at the last screen, called Summary, check every thing is OK, no red button. [Give the "buttons" that can wait and the ones that must be solved]
Boot Problems
Boot problems between power on and screen display
Generalities
At any moment, if the screen doesn't appear:
- hit the ESC key to have a console with boot comments,
- type Alt+Ctrl+F2 to have a console and, with root rights, enter the command journalctl -xb, this command gives the kernel comments about the boot. If you suspect graphic driver problems, see also /var/log/Xorg.0.log. For further commands, see Tools and logs for diagnostics
- keep in mind that if you have a dual boot with Windows 8 and later, Mageia won't boot if Windows hasn't been correctly halted or if Fast Boot is enabled. See Secure Boot and Fast Boot
- See also Cannot mount NTFS partition even though Secure Boot and Fast Boot are disabled in Windows
Grub problems
The Grub menu should appear but doesn't - instead, another OS starts directly or nothing starts. Check first there is no CD/DVD in the drive, and no USB memory stick plugged into the computer or any hub, and then check your firmware (BIOS or UEFI) to see if the boot order is right, with Mageia listed first.
You can only access the firmware setup at the very beginning of the boot. The key to strike is quickly indicated at the bottom or the top of the screen depending on your firmware manufacturer; it may say "Press (some key or another) to enter Setup". The most common keys to try are: "Del", "Esc", "F2,", "F1" "Ctrl-Esc" or "Ctrl-Alt-Esc". Another good thing to try is to Google "BIOS Setup Key (computer name)".
.
You get a grub prompt (Grub 2)
Assuming nothing is actually broken in the Grub 2 installation you can boot manually from the Grub 2 prompt as follows:
(You can practice this by hitting 'c' at the Grub 2 menu to get a prompt)
First find the partition containing your system root:
| grub> search.file /etc/mageia-release |
This will output the 'drive,partition' pairs containing that file e.g.
| hd3,gpt4 |
Using the one you wish to boot do:
| grub> root=hd3,gpt4 grub> linux /boot/vmlinuz grub> initrd /boot/initrd.img grub> boot |
If that fails you may actually have some Grub 2 corruption.
Try using some Grub 2 commands to see whether Grub 2 is actually getting hardware info from the bios, for example 'ls' which should list all drives.
lsmod should list all loaded Grub 2 modules.
If you suspect that a module that should be loaded is missing then insmod <modulename> should load it assuming that the file system where it is stored can be read by Grub 2.
The Grub 2 command line also has auto-completion using the tab key which is useful.
HP and UEFI firmware
On some HP machines, the BIOS will automatically boot Windows even after you have installed another boot manager. To boot Mageia, you will need to interrupt the boot process (by pressing the appropriate key for your machine - usually one of Esc, Del, F2, or F10) and selecting a different EFI boot image (you may have to try the options one by one to find the right one). Once you have booted Mageia, you should be able to fix this by executing the following command in a terminal:
| # mv /boot/EFI/EFI/Microsoft/Boot/bootmgfw.efi /boot/EFI/EFI/Microsoft/bootmgfw.efi |
If you are using the grub2 boot manager, you will probably need to rerun the boot system configuration (update-grub) to let it find the new location of the Windows boot image. If you are using the rEFInd boot manager, it will automatically detect the new location.
Windows starts directly (UEFI)
The system uses the wrong boot manager, the first one installed by Windows, not the second one installed by Mageia. To change that, start Windows and open a command prompt as an administrator:
Menu -> All programs -> Windows system -> right click on Command Prompt -> Run as administrator
Then Click on "Yes" in the dialog box and type:
| bcdedit /set {bootmgr} path \EFI\mageia\grubx64.efi |
Or you can also try to enter your firmware setup and swap the boot order, check your documentation to do that.
Kernel problems
You may also meet problems with ACPI or hardware detection, see How to add kernel options below and try.
Redo the install
Redoing your installation with the "upgrade" option may solve problems and is very quick.
You can also just redo the Grub installation/configuration. Boot on a Classical ISO (not Live) and choose Rescue -> Re-install Boot Loader. It will make a new detection of all the bootable partitions and re-configure Grub. [to be checked with Grub 2]
Boot problems between screen display and desktop display
Obtaining information on the problem
See Tools and logs for diagnostics
Driver problems
Try another graphic driver, see How to change a wrong graphic driver or, for another type of driver, take the instructions for a graphic driver as an example.
Display issues
See Display problems
Update your packages
From this stage, it is possible in a console to set an Internet connection and to update using drakconf, see How to manage the packages using a console below.
Redo the install
Redoing your installation with the "update" option may solve problems.
Problems during a Mageia session
Display problems
Obtaining information on the problem
If the X server crashes at startup, open a console (Alt+Ctrl+F2) and see for information /var/log/Xorg.0.log (before restarting X), or /var/log/Xorg.0.log.old (after reconfiguring and restarting X)
| Note: Gnome doesn't create /var/log/Xorg.0.log but redirects it into the journal |
If you don't have Xorg logs there, then try (as root): journalctl -b -e /bin/Xorg
As long as the graphic mode is usable, try using the MCC (MCC/Hardware/Configure graphics) and the DE tools, for example KDE settings if you use KDE.
To know what your graphic card is, enter in a console: lspci -nn|grep -i vga (no need to be root).
In a console, see Tools and logs for diagnostics.
About the graphic parameters
If the display is too bad to use the graphic mode (MCC), see How to change a wrong graphic driver, you can change the driver using the command line, using this guide as a model. You can also disable the 3D effects and change the resolution and the screen driver.
There are three main graphic card manufacturers:
- NVidia, its open source drivers are called nouveau
- AMD, its proprietary drivers are called Catalyst and the open source ones radeon or ati (aka fglrx). Same drivers for the APU(= PCU + GPU)
- Intel, well known for its IGP (= PCU + GPU) with HD Graphics embeded, the driver to use is i810 and later.
When display problems arise, it is often a good idea to modify some parameters to find out which one is bad, beginning with the recently modified ones if any:
- swap between the free driver and the proprietary one,
- downgrade to the universal Vesa driver,
- disable the 3D effects,
- lower the resolution - VGA and HDMI are limited to 1920x1080 px, for a higher resolution DVI is mandatory.
- set the screen to "Plug and play" instead of the manufacturer reference.
Once the display is recovered, you know which parameter is the bad one. If it is a hardware problem, find another device to test. If it is a software problem, try to uninstall/re-install the package or to update your system. See How to update my system if needed.
Specific issues with some graphic cards
[ To be written, ATI/AMD, NVidia, Intel, ...]
Bumblebee
Bumblebee aims to provide support for NVIDIA Optimus laptops for GNU/Linux distributions. Using Bumblebee, you can use your NVIDIA card for rendering graphics which will be displayed using the Intel chipset. When your laptop is configured to use Bumblebee, your system starts using the Intel chipset and works by default as if there was no NVIDIA card. You can then start applications via Bumblebee using either the optirun or primusrun commands as described in a later section.
Is your computer Optimus enabled?
Open a terminal window and type the command lspci . If you see two video cards in the output like:
| $ lspci | grep VGA 00:02.0 VGA compatible controller: Intel Corporation 4th Gen Core Processor Integrated Graphics Controller (rev 06) 01:00.0 VGA compatible controller: NVIDIA Corporation GK208M [GeForce GT 730M] (rev ff) |
And one is a Intel “Integrated Graphics Controller” and the other is a “NVIDIA Corporation” chip, then you probably have an optimus notebook. To further verify, as root look for the /sys/kernel/debug/vgaswitcheroo/switch file. If it exists, then you have an optimus PC. If its missing, then you do not.
Installation
The Bumblebee package is available directly in Mageia's repositories since Mageia 5.
Due to the availability of various NVIDIA drivers, bumblebee comes in a variety of subpackages preconfigured for each situation:
- bumblebee-nouveau configures the support for the open source nouveau driver
- bumblebee-nvidia configures the support for the nonfree nvidia-current driver, compatible with recent NVIDIA cards. The Nonfree Release repositories must be enabled for this alternative to be offered.
- another flavour will soon be added to Nonfree Updates for older NVIDIA cards.
To install Bumblebee, simply run the command with root rights urpmi bumblebee, and select the flavour that fits your needs, as described above. A reboot is then needed in order for the Bumblebee daemon to start, and for the bbswitch module to be loaded by the kernel.
Usage
To run your application with the discrete NVIDIA card run in the terminal optirun [options] <application> [application parameters]. for example optirun firefox
For a list of options for optirun run optirun --help. Alternatively, you can use the primusrun command primusrun [options] <application> [application parameters]
In Mageia, both commands will use by default the "primus" bridge and therefore offer similar performances. optirun offers more options to play with, and can also use the "VirtualGL" bridge with optirun -b virtualgl <application>
VirtualGL is the default bridge of the Bumblebee project, but this default value has been changed in Mageia as primus is known to offer better compatibility (e.g. with Steam games) and performance. Feel free to experiment with both solutions for each application. Note that the VirtualGL libraries are only recommended by the Bumblebee package, so you might not have them installed if you told urpmi not to install recommended packages.
Testing
To confirm that you are properly accessing the NVIDIA card using Bumblebee, you can use glxinfo (from the glxinfo package) or glxspheres64 (from the virtualgl package - note that on 32bit systems, the command is glxspheres):
| $ optirun glxinfo|grep OpenGL |
| $ optirun glxspheres64 |
The terminal output of these commands should give the name of your NVIDIA card and the OpenGL version that it supports.
Networking problems
About wired network
To set up the network in graphic mode, see Network center -> Set up a new network interface (LAN, ISDN, ADSL, ...) in the MCC help manual joined in this distribution documentation. To set it up in a console, see How to set up my Internet connection.
Troubleshooting
Useful commands to know
- journalctl -b |grep -i net
- dmesg -> that could show some issues with involved kernel modules.
- ip route show -> displays the contents of the kernel's routing tables
- lspcidrake -v
- ifconfig
- systemctl status network
How to collect information, some help here: Tools and logs for diagnostics
About wireless network
To configure a wireless network, see Network center -> Set up a new network interface (LAN, ISDN, ADSL, ...) in the MCC help manual provided in the distribution documentation.
Troubleshooting
Ndiswrapper
You have followed the above instructions, Mageia recognised your Wifi-card, but the installation failed. You can try another step to solve this. This solution uses Ndiswrapper, which is a method that consists of installing and activating the Windows XP driver. This is useful when your network hardware is not well supported by Linux, which is probably why it's not on the list of supported cards!
| Warning! Ndiswrappper allows the use of Windows XP drivers, and XP only, for Linux |
Prerequisites:
- You will need the Windows driver for your card, either on a CD, on your hard disk or other media. You can probably also find it on the Internet, although it is best to download them from the manufacturer's web site and not via a general search for drivers.
- Place the driver in an accessible place, for example on your desktop.
- After Step 3 in the original procedure, select "Use a Windows driver (with ndiswrapper)", and then "Next". The system will perhaps install some packages it needs.
- Navigate to the directory where you stored the driver and select
the_driver_for_my_card.inf.- You have to choose the file with the ".inf" extension.
- You can continue with the above steps 5 to 12 to finalise the installation.
Some more help and many drivers can be found here : Sourceforge
Most common drivers
It may happen that Mageia fails to chose the right driver. If a first try failed, install the following drivers that seem to match your hardware.
| Manufacturer | driver |
|---|---|
| Broadcom | dkms-broadcom-wl |
| Intel | iwlwifi-3945-ucode |
| iwlwifi-4965-ucode | |
| iwlwifi-agn-ucode | |
| ipw2100-firmware | |
| ipw2200-firmware | |
| Ralink | ralink-firmware |
| rtlwifi-firmware | |
| Atheros | madwifi-source |
| Every | kernel-firmware |
| kernel-firmware-nonfree |
I have no access point in the list
If at step 5, the list is void and you have the message "non listed - edit manually", we give you another solution: You can install the package "kernel-firmware-nonfree" via MCC and restart your computer.
rfkill
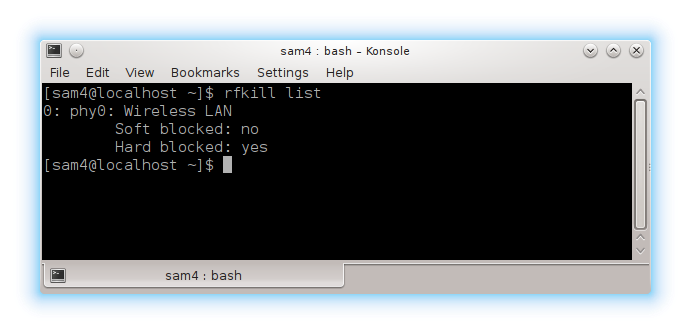
rfkill is a tool to block/unblock all radio connections, check that yours are authorized. In a console, enter:
| $ rfkill list |
If there is a line with "Soft blocked: yes" then in the console under root, enter:
| # rfkill unblock all |
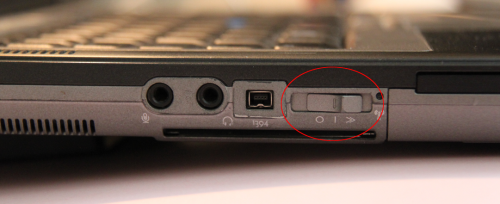
If there is a line with "Hard blocked: yes" then find the wireless button/switch on your laptop and enable it. You can see such a switch on the picture below.
Other problems
If the wireless adapter isn't detected, or if you encounter other problems, you can find help in the following information:
Hardware information
| $ inxi -n |
This command output for a PCI card:
| # lspcidrake | grep -i net |
This command output for a USB card:
| # lsusb |
The installed driver
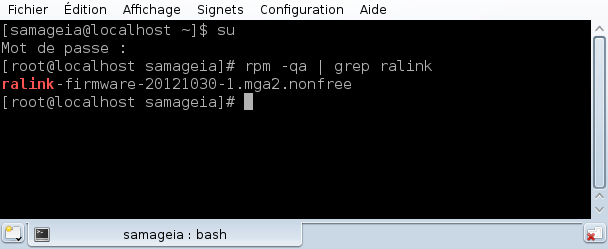
To know if a driver is installed, you can use this command in a console:
# rpm -qa|grep piece_of_the_driver_name
Example:
Structured troubleshooting for wireless issues
Overview
This section tries to describe how to go from zero to wireless in some more-or-less easy steps and in a structured manner, from the ground up, from bottom to top.
For a high-level overview, the basic steps are always as follows:
- get your device properly recognised/initialised (driver & firmware)
- make sure your device is unblocked via rfkill (soft block) or hardware switch on laptop (hard blocked)
- be able to see wireless networks, and be able to connect to wireless networks (unencrypted for testing)
- connect and authenticate to wireless network (WPA/WPA2) and stay connected
- get your IP address configuration correct
Steps in detail
- step 1. Driver/firmware installation
- 1.1 Check which physical device and chipset your have, and what is seen by the kernel
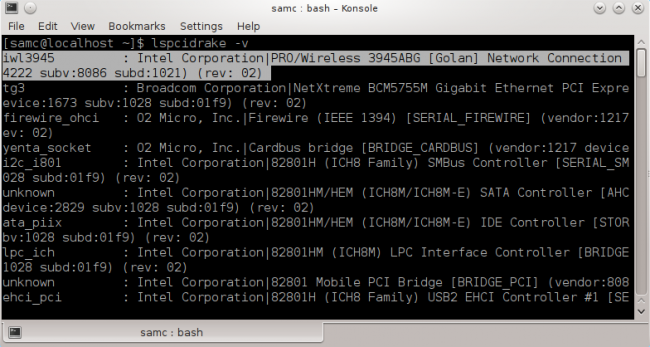
| $ lspcidrake -v |
-v for verbosity is important! Otherwise information about vendor, product and device ID is omitted. This information is used to know which wireless chipset you have, and gather specific information about that chipset and required firmware.
- 1.2 Does your chipset require firmware to work? Is the firmware installed on your box? and is it already correctly loaded ?
This is actually two-fold; one part you can investigate yourself at http://wireless.kernel.org/en/users/Drivers and use this table:
| List of firmware packages, and what repo they are contained in | |
|---|---|
| Repository | Firmware |
| Core Release | kernel-firmware |
| Core 32 bits release | zd1211-firmware |
| Non-free 32 bits release | ipw2100-firmware |
| ipw2200-firmware | |
| kernel-firmware-nonfree (most common firmware including Atheros, Broadcom, Intel IWL) | |
| ralink-firmware (RaLink) | |
| rtlwifi-firmware (Realtek) | |
- 1.3 Check which firmware is loaded (might output some more information than just firmware). Enter with root rights (Ctrl C to quit):
| # journalctl -ab | grep -iE "fw|firmware|iwl|wifi|wire|80211" |
- step 2. Check if the device is blocked with the commands
rfkill list all,rfkill list wlanorrfkill list wlan
See rfkill for more details
In some cases you might also see your wireless device listed multiple times, and one is blocked and the other one is not. Those issues are mostly laptop-specific, when the wireless switch is implemented as a softbutton and this softbutton implementation requires a specific kernel module to be loaded. Often the case with some Asus, Acer, HP or Toshiba laptops. See https://forums.mageia.org/en/viewtopic.php?f=8&t=5845 for an example.
- step 3. Check if your device is usable and can see networks
| # iwconfig |
This command above, shows if your wireless device is initialised, usable and its name (on the left).
Those commands below, search for wireless networks that can be seen by your wireless chipset. Replace wlan0 by your wireless device name.
| # iwlist wlan0 scan |
or
| # iw dev wlan0 scan |
- step 4. Check if you can connect to your network
Rule of thumb: Only use one network manager. Mageia by default comes with the inhouse net_applet and the integration in Mageia Control Center via drakconnect and draknetcenter . Also see http://doc.mageia.org/mcc/4/en/content/mcc-network.html for an overview. An alternative to net_applet would be NetworkManager, which comes by default e.g. with GNOME. Since Mageia 4 those tools should not be blocking each other, but should run smoothly in parallel.
| $ ps -ef | grep -v grep | grep -i net |
Should only show one out of net_applet or NetworkManager
For ways to switch between both have a look at the related forum thread: https://forums.mageia.org/en/viewtopic.php?f=25&t=5782
- step 5 .Check your IP addressing configuration
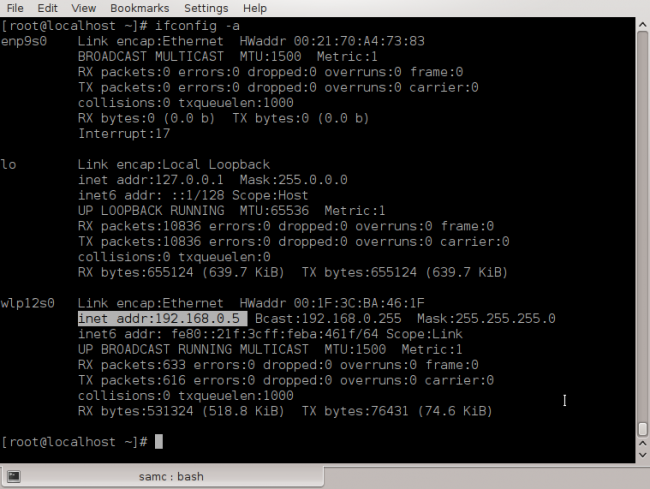
| # ifconfig -a |
shows your wireless interface IP address.
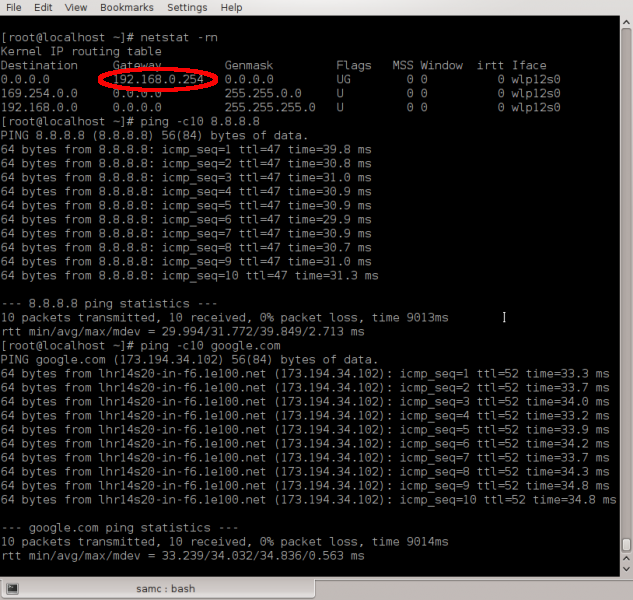
| # netstat -rn |
This command allows you to ping your router/gateway, if this doesn't work, check your wireless connection details
| $ ping -c10 8.8.8.8 |
With this command, you should be able to ping internet hosts (first by IP address to rule out name resolution issues). If this is working, you have internet connection. If next step doesn't work, you only need to fix DNS.
| $ ping -c10 google.com |
| Warning! For these two last commands, make sure your router is configured to answer to the ping command |
Example
- 1. Driver/firmware installation
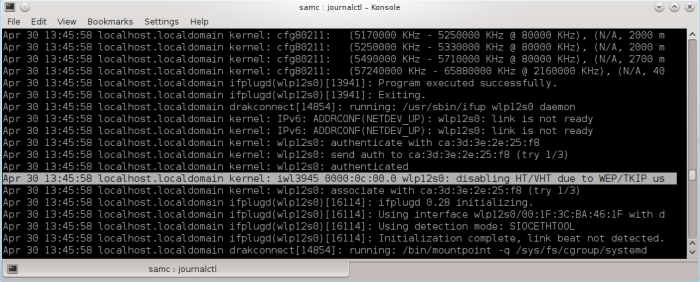
My chipset is iwl 3945 ...
... and its firmware is loaded. (Ctrl C to quit and space bar to display next page).
- 2. Check if the device is blocked with the command
rfkill list
See rfkill for more details
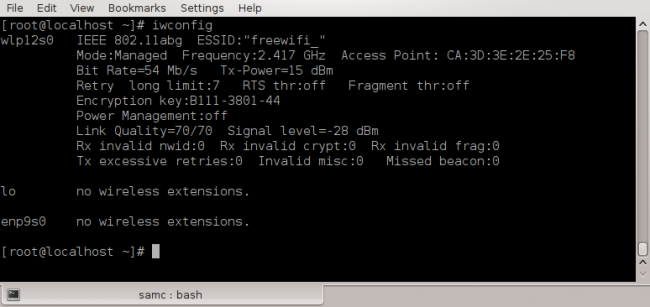
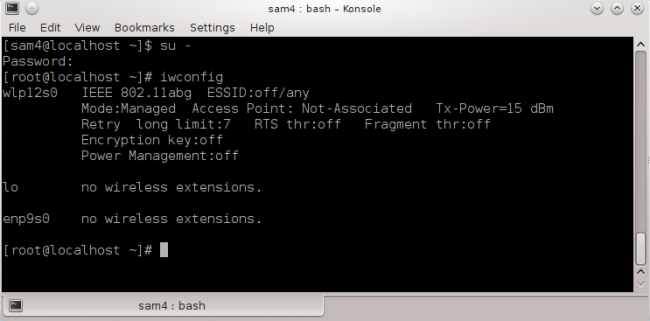
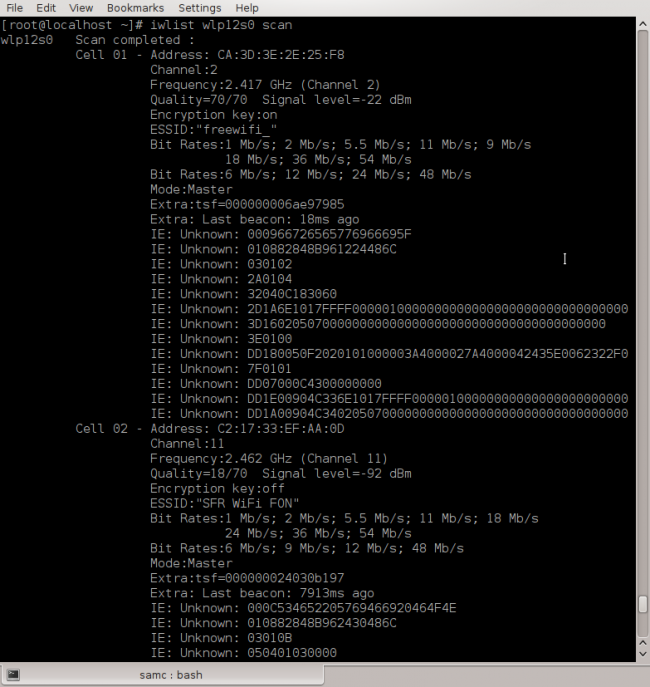
- 3. Check if your device is usable and can see networks
Yes, it is
No, it is not
Several networks are seen
- 4. Check if you can connect to your network
My file manager is net_applet and it is loaded
- 5. Check up IP addressing configuration
I can see my IP address ...
... my gateway address (red circled), and the ping is working (0% packet loss).
known issues with specific drivers
- Atheros AR9462 (vendor:168c device:0034 subv:105b subd:e052), ath9k.conf needs to be created manually for MGA3,MGA4: https://bugs.mageia.org/show_bug.cgi?id=14398
- rtl8192cu devices (e.g. TP-LINK TL-WN823N) require a patched version of the driver rather than the one that is shipped with most distros - https://forums.mageia.org/en/viewtopic.php?f=8&t=9956
- several drivers, including ath5k - https://forums.mageia.org/en/viewtopic.php?f=8&t=885
- several drivers, including Ralink RT3290 require to disable the automatic power management - https://forums.mageia.org/en/viewtopic.php?f=25&t=7225 via
iwconfig <interfacename> power offandiwconfig <interfacename> txpower fixed - * In addition, maybe also disabling of hardware encryption https://forums.mageia.org/en/viewtopic.php?f=25&t=6329 is required, this depends on the driver used
- * * for ath5k, you can use
rmmod -f ath5k; modprobe ath5k nohwcrypt=1 - iwlwifi, but maybe others too - disable the blinking LED/softkey (flickers rapidly back-and-forth between red and blue) by creating e.g.
/etc/modprobe.d/iwlwifi.confwith options iwlwifi led_mode=1 - https://forums.mageia.org/de/viewtopic.php?f=15&t=2122 - iwlwifi and other intel drivers, where direct wifi transfers (e.g. from laptop to a workstation) are slow, especially between Intel devices, might greatly benefit from the 11n_disable bitmask parameter
Adapting this setting might double the transfer speed or more. To set this option, the module needs to be unloaded and loaded again with this option set. This can be achieved viamodprobe -rf iwldvm; modprobe -rf iwlwifi; modprobe iwlwifi 11n_disable=8
Afterwards, network service needs to be restarted. More information on this can be found in https://forums.mageia.org/en/viewtopic.php?f=25&t=8682 - ath5k - https://wiki.mageia.org/en/Mageia_2_Errata#ath5k_wireless_problems_on_a_HP_Compaq_Presario_CQ60-415so
- several drivers, including Broadcom, on laptops where another laptop-specific WMI module is active/loaded (hp_wmi, hp-wifi, acer-wmi) and where the interface is soft-blocked by default
(rfkill listshows two times a wireless interface, one is not blocked, and of the other one is only soft-blocked, afterrfkill unblock allinterface is working)
solution is to blacklist that laptop-specific module as root viaecho "blacklist hp-wmi" >> /etc/modprobe.d/blacklist-mga.conf
see https://forums.mageia.org/en/viewtopic.php?f=8&t=8360 and https://forums.mageia.org/de/viewtopic.php?f=15&t=2122 - Broadcom BCM43142 https://forums.mageia.org/en/viewtopic.php?f=25&t=7211
- Broadcom BCM4313 ( vendor:14e4 device:4727 ) - wpa_supplicant segfaults when using net_applet with wl driver during AP connection, or times out during authentication with brcmsmac
after switching to networkmanager kernel panic and complete lockup with wl driver, but connection should work fine with brcmsmac driver https://forums.mageia.org/de/viewtopic.php?f=18&t=2373 - Broadcom b43 + openfwwf vs. propr. wl driver http://archive.openmandriva.org/wiki/en/index.php?title=Installing_wireless_network_cards_using_the_b43_driver and http://wireless.kernel.org/en/users/Drivers/b43#Switching_between_drivers or maybe https://forums.mageia.org/en/viewtopic.php?f=25&t=2329
- some Broadcom drivers, in combination with atl1c wired driver leads to conflicts. Workaround is to blacklist the atl1c driver by e.g. as root
echo "blacklist atl1c" >> /etc/modprobe.d/blacklist-mga.confhttps://bugs.mageia.org/show_bug.cgi?id=5087
General information
Theses packages are mandatory for multimedia: task-codec-audio, task-codec-video.
How to check plugin version in firefox: enter about:plugins in adress bar. You can also see the version and supported MIME types. At http://www.mozilla.org/en-US/plugincheck/ you can check for firefox if you have the latest version of the plugin.
Flash
Adobe no longer supports Flash Player after December 31, 2020 and blocked Flash content from running in Flash Player beginning January 12, 2021. All major internet browsers disabled the possibility to activate the Flash Player browser plugin.
Skype
To install Skype, please visit: https://wiki.mageia.org/en/Skype_with_video
Alternatives to Skype
Are present in the Mageia 5 repositories:
- Ekiga - Internet fone (voip)
- Linphone - Internet fone (voip)
- Mumble - Mumble - is an open source voice communication application that features a customizable in game overlay, application skins, conversation recording, and advanced voice activity detection.
- kopete has the option to communicate by voice and webcam.
Known issues with Skype
- Skype has no sound: Please check that you are using PulseAudio
- If Skype crashes, it can help starting it with this command in a terminal:
/usr/bin/skypeforlinux. - Also a broken or old user profile could be the reason. Please try the following as user to fix this:
mv ~/.config/skypeforlinux ~/.config/skypeforlinux.org. Then try to start Skype again in a terminal, and see what error it gives.
Mageia HOWTOs (mostly for newcomers)
How to access to the command line
The different ways to reach the command line in the different situations:
- If the computer doesn't start at all: boot on a CD/DVD/USB stick where is a Classical Iso (not Live) and on the first menu choose: Rescue System -> Go to console
- If the computer starts until the Grub menu and nothing more, choose in this menu:
- * with grub Legacy: Boot Mageia ... (safe mode)
- * with Grub2 Advanced options for ... and then failsafe
- During install: Alt Ctrl F2 to have a console, Alt Ctrl F1 to come back
- During boot: ESC to read information, Alt Ctrl F2 to have a console, Alt Ctrl F1 to come back
- During a session:
- * Alt Ctrl F2 to have a console, Alt Ctrl F1 to come back
- * In graphic mode, it may vary according to the DE, it is something like:
Menu -> tools -> (c/k)onsole
Tools and logs for diagnostics
During installation
- with the Traditional Installer: Read /root/drakx/report.bug.xz or ddebug.log
- with the Live Installer: enter journalctl -a in a console with root rights
During boot or during a session
[to be sorted]
Here are some commands to help you:
lspcidrake -vto list the hardwarecat /proc/cpuinfoto see the cpu featuresfree -mto know the memory load- journalctl -a to read the logs
- The graphic applications errors are generally in the files /home/<user>/.Xsession-errors or /home/<user>/.xsession-errors
All these commands need Root rights:
lsusb(with Root rights) to list the usb deviceslsmoda list of modules that have automatically loaded in response to kernel devices detectionmodinfo modulenamefromlsmodwill list details of a moduledmesgthis lists recent kernel and system messages, including failure to load or identify a bit of hardware.ethtoola command to list lots of info about networkethtool -I eth0will list the version and details of your nic.ethtool -S eth0will list just about every counter related to an Ethernet card.dmidecodeequivalent to MS system info gives lots of info about your hardware.rpm –qawill list all packages on a system, pipe it through grep to reduce this to relevant packages.ifconfig -alists the tcpip settings set on your network cards.lshwmeaning list hardware. You have to install the lshw package.
Since Mageia 3 you will have a new tool called inxi (you have to install the package), here are the main commands :
inxi -Fto have generalitiesinxi -nto provide the network card onlyinxi -uothe mounted and unmountend partitions onlyinxi -xGthe graphic cardinxi -t m5to have a snapshot of your 5 biggest memory usersinxi -t c5to have a snapshot of your 5 biggest CPU users
Also have a look in the files or directories:
/etc/sysconfigwhere many config files live, relating to network services etc,/etc/X11/xorg.conf, it is the config file for the Xdisplay server,/var/log/Xorg.0.log(before restarting X), or/var/log/Xorg.0.log.old(after reconfiguring and restarting X). It is the logs about X server. You can focus on the error messages with the command:cat /var/log/Xorg.0.log, since all the line about errors start with EE.
| Note: Gnome doesn't create /var/log/Xorg.0.log but redirects it into the journal |
Keep in mind you have also much information in the Mageia Control Center and using your DE utilities (e.g. KDE settings for KDE users)
How to print the command output in a file
For a report for example, you may need to have the command output in a file instead of the screen. Just follow the command name by "> output.txt" and the file output.txt is created to receive the command output.
Examples:
- $ systemctl -a > output.txt
- # ifconfig -a > output2.txt
The file name is free and the file is created either in /home/<user> or in /root according of who launched the command, user or root.
Magics keys
Here is a extract from Wikipedia:
A common use of the magic SysRq key is to perform a safe reboot of a Linux computer which has otherwise locked up. This can prevent a fsck being required on reboot and gives some programs a chance to save emergency backups of unsaved work. The word "BUSIER" read backwards, is often used to remember the following Sysrq-keys sequence:
unRaw      (take control of keyboard back from X),
 tErminate (send SIGTERM to all processes, allowing them to terminate gracefully),
 kIll      (send SIGKILL to all processes, forcing them to terminate immediately),
  Sync     (flush data to disk),
  Unmount  (remount all filesystems read-only),
reBoot.
- Hold down the Alt and SysRq (Print Screen) keys.
- While holding those down, type the following keys in order, several seconds apart: REISUB
- Computer should reboot.
In practice, each command may require a few seconds to complete, especially if feedback is unavailable from the screen due to a freeze or display corruption.
I lost my root password
In the bootloader menu press "F3 Kernel option" then select "Default" and then append init=/bin/sh at the end of the line and it should boot to a command prompt.
Set a new root password there by entering the command "passwd"
How to start an application with a new by default configuration
In case of problems with an application, you can delete its configuration file stored in the folder /home/<user>. A new configuration file with default parameters will be created. For example if you have problems with your KDE configuration, delete the file /home/<user>.kde4. Note the dot (.) before the file name, it means it is a hidden file, think to enable the hidden files display in your file manager.
How to add kernel options
Presentation
Kernel options (also called kernel parameters) are used to supply the kernel with information about hardware parameters that the kernel would not be able to determine on its own, or to avoid/override the values that the kernel would otherwise detect.
These options may be temporarily given at the boot step (starting a session or an installation), they last until the next reboot, or permanently by configuring the boot loader (Grub Legacy or Grub2). When advised to try using a particular kernel boot option, it is usually a good idea to first add the parameter temporarily for testing. Once you have determined that adding the parameter has the desired effect, you can then add it permanently. Directions for both methods are below.
Kernel boot parameters are text strings:
- case-sensitive
- sometimes just a simple word ("splash" or "noapic")
- sometimes have an = sign with various possible values ("acpi_backlight=vendor")
- sometimes include punctuation ("i8042.noloop")
| Warning! Always enter kernel boot parameters exactly as advised. Errors in spelling or formatting or invalid values will not result in any error message, they will simply have no effect. |
Main available options
| Option | Impact | Notes |
|---|---|---|
| vga=xxx | Set your framebuffer resolution to VESA mode xxx. | Example vga=768. See here for other values. |
| acpi=off OR noacpi | This parameter disables the whole ACPI (Advanced Configuration and Power Interface) system. This may prove very useful, for example, if your computer does not support ACPI or if you think the ACPI implementation might cause some problems (for instance random reboots or system lockups). | ACPI is a standard for the power management. It can save energy by stopping unused devices, this was the method used before APM. |
| apm=off OR noapm | Disable the Advanced Power Management. | |
| acpi=force | Activates the ACPI system even if your computer BIOS date is older than 2000. This parameter overrides acpi=off and can also be used with current hardware if the ACPI support is not activated despite apm=off. | |
| pci=noacpi OR acpi=noirq | These parameters disable the PCI IRQ routing | |
| pci=acpi | This parameter activates the PCI IRQ routing | |
| acpi_irq_balance | ACPI is allowed to use PIC interrupts to minimize the common use of IRQs. | |
| acpi_irq_nobalance | ACPI is not allowed to use PIC interrupts. | |
| acpi=oldboot | Deactivates the ACPI system almost completely; only the components required for the boot process will be used. | |
| acpi=ht | Deactivates the ACPI system almost completely; only the components required for hyper threading will be used. | |
| acpi.power_nocheck=1 OR acpi_osi=Linux | Disable the check of power state. Option two modifies the list of supported OS interface strings (changes the OS compatibility reported to the BIOS). Necessary on some broken BIOSes to make temperature/fan control work. | |
| noapic | Disable the "Advanced Programmable Interrupt Controller (APIC)". | There are two components in the Intel APIC system, the local APIC (LAPIC) and the I/O APIC. The latter one routes the interrupts it receives from peripheral buses to one or more local APICs that are in the processor. It is really useful for multi-processor systems. Some computers have problems with the APIC system which can cause freezes or incorrect device detection (error message "spurious 8259A interrupt: IRQ7"). In this case, disable APIC and/or Local APIC. |
| nolapic | Disable the "local APIC". | |
| irqpoll | Changes the way the kernel handles interrupt calls (set it to polling). Can be useful in case of hardware interrupt issues | |
| rd.blacklist=(name of driver) | Try to prevent X from using a given driver. | Here is a combination that works for some dual-GPU (Nvidia Optimus) configurations: rd.blacklist=nouveau rd.blacklist=nvidia xdriver=intel |
| xdriver=(name of driver) | Try to force the usage of a given driver. | Example: xdriver=nouveau (open source driver for NVIDIA). Other drivers: intel, nvidia (NVIDIA proprietary driver), fglrx (ATI/AMD proprietary driver), radeon (open source driver for ATI/AMD). xdriver=vesa : use the BIOS's VESA implementation. With UEFI, there is no VESA, there's EFIFB instead. |
| mem=xxxM | Set the available memory to xxx MB | Example: mem=256M would specify 256MB of RAM. |
| systemd.unit=multi-user.target | For ThinkPad R50e to reach a working Live DE when the machine boots into a frozen light black screen. | May be valid with computer with intel 915. |
| init=/bin/sh | Opens a root shell for administrative actions | Example: Change a lost root password with the passwd command. |
| init=/sbin/init/ | Disable Plymouth | |
| Remove the "splash=silent" or "splash" and "quiet" arguments if they appear. | Boot in verbose mode |
How to modify the kernel options
If you need to add multiple parameters separate them with SPACE but do not add spaces before or after any = signs or punctuation in the parameters themselves.
| Warning! Grub uses a UK keyboard layout, mainly qwerty with the = sign on the ´ key and / on the - key. |
Temporary options to the installer
With Grub Legacy boot loader
- Boot on the media you want to install your
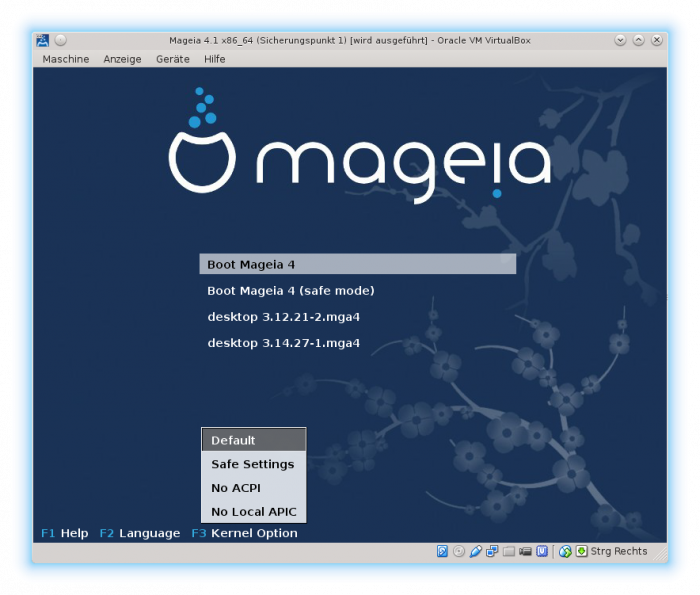
Mageiafrom. Once the "GNU GRUB" menu appears, like below (Mageia 4):
- Press F6 then select Default and press ENTER. The edit mode will look something like this:
- Use the arrow keys to move the cursor to the end of the line called "Boot Options", press SPACE to add a blank space (after install) then carefully type in the kernel boot parameter(s) that you need to add and press ENTER
With Grub 2 boot Loader
- Boot on the media you want to install your
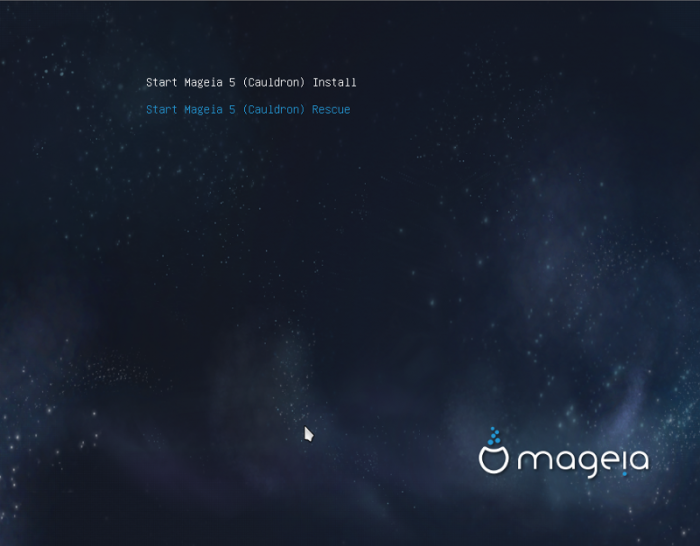
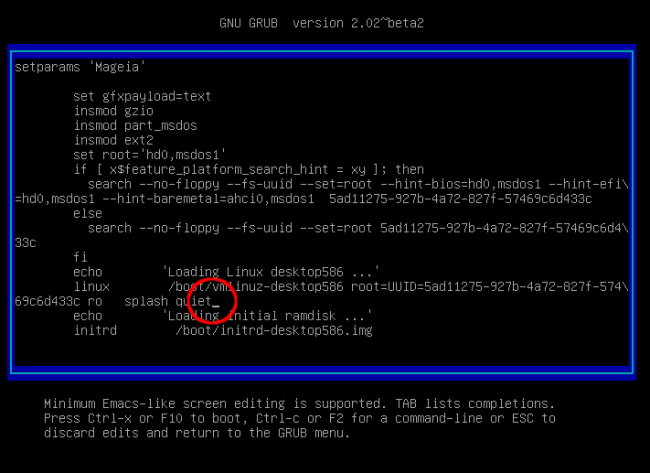
Mageiafrom. Once the "GNU GRUB" menu appears, like below (Mageia 5):
- Select "Start
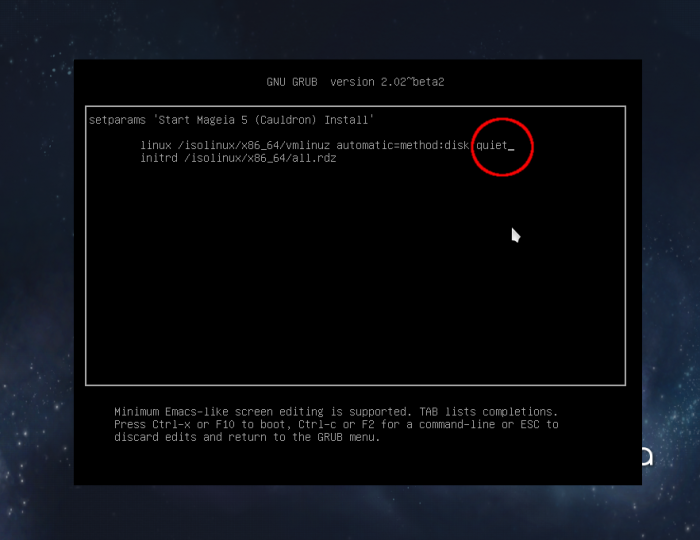
Mageia 5Install" and then press the e key to enter edit mode. The edit mode screen will look something like this:
- Use the down arrow key to move the cursor to the line beginning with the word "linux", then press the END key to move the cursor to the end of that line, in the red circle. Normally this will be just after the word "quiet".
- Press SPACE to add a blank space (after "quiet") then carefully type in the kernel boot parameter(s) that you need to add.
- Then press ESC to escape without saving or Ctrl x or F10 to boot with the new list of kernel parameters.
Temporary options to the boot loader
With Grub Legacy boot loader
- That is the default bootloader. Start your computer as usual and once the "GNU GRUB" menu appears, like below (
Mageia 4):
- Press F3 then select Default and press ENTER. The edit mode will look something like this:
- Use the arrow keys to move the cursor to the end of the line called "Boot Options", press SPACE to add a blank space (after vga=788) then carefully type in the kernel boot parameter(s) that you need to add and press ENTER. In the screenshot above, the parameters init=/bin/sh has been added.
| Warning! If you do chainloading, you have to set the options in the last bootloader in the chain (in the previous boot loaders, the line "Boot Options" is empty) |
With Grub 2 boot Loader
- Start your computer as usual and once the "GNU GRUB" menu appears, like below (
Mageia 5):
- Choose the kernel you want and then press the e key to enter edit mode. The edit mode screen will look something like this:
- Use the down arrow key to move the cursor to the line beginning with the word "linux", then press the END key to move the cursor to the end of that line, in the red circle. Normally this will be just after the words "splash quiet".
- Press SPACE to add a blank space (after "quiet") then carefully type in the kernel boot parameter(s) that you need to add.
- Then press ESC to escape without saving or Ctrl x or F10 to boot with the new list of kernel parameters.
How to permanently modify the kernel options
With Grub Legacy boot loader
- Log in to the system and start a terminal window.
- In the terminal window at the $ prompt, enter the command
su -and the password to have root rights - Then enter:
| # kwrite /boot/grub/menu.lst |
You can replace kwrite by any other preferred text editor.
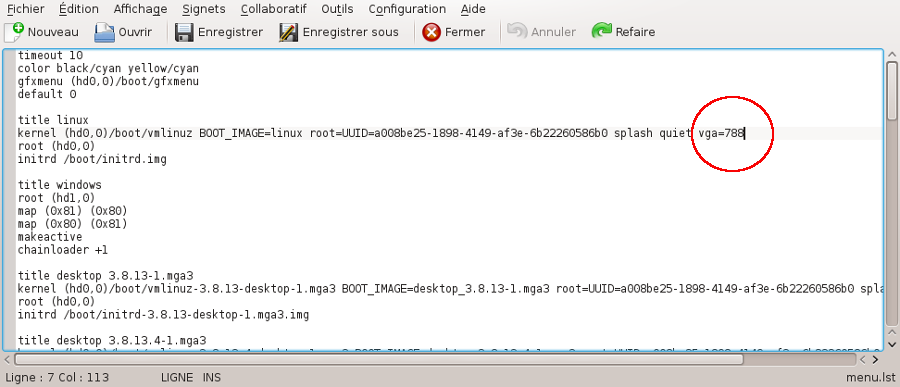
- Find the kernel you want to add a/some parameter(s) to and then move the cursor to the end of the line beginning with "kernel...", after "vga=788", see the red circle in the screenshot, then press SPACE to add a blank space, then carefully type in the kernel boot parameter(s) that you need to add.
- Save and quit
kwrite
With Grub 2 boot Loader
- Do as above to open the file
/etc/default/grubinkwriteor another text editor - Find the line GRUB_CMDLINE_LINUX_DEFAULT=" splash quiet resume....." and move the cursor to the end of it, see the red circle in the screenshot, then press SPACE to add a blank space, then carefully type in the kernel boot parameter(s) that you need to add.
- Save and quit
kwrite - Run
update-grub(orupdate-grub2which does the same)
How to change a wrong graphic driver
You can take this as an example to change another driver, but, most often, when it isn't a graphic driver, you can do it in graphic mode.
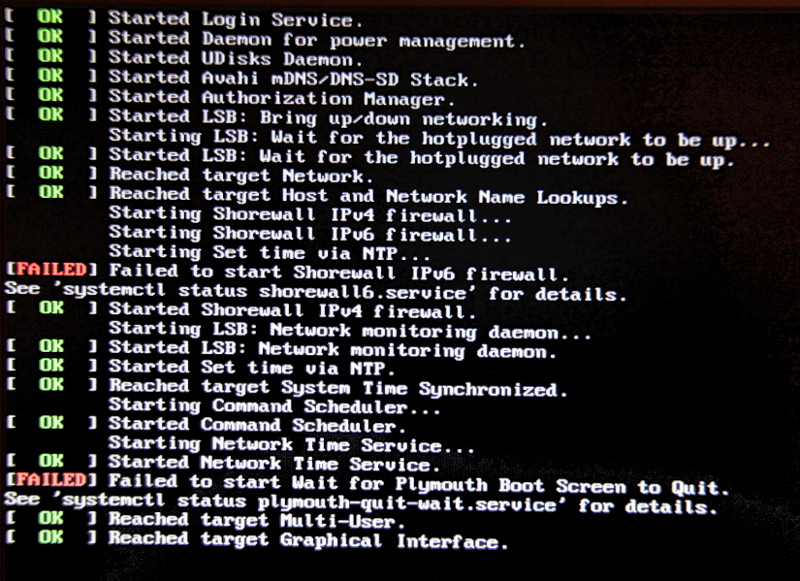
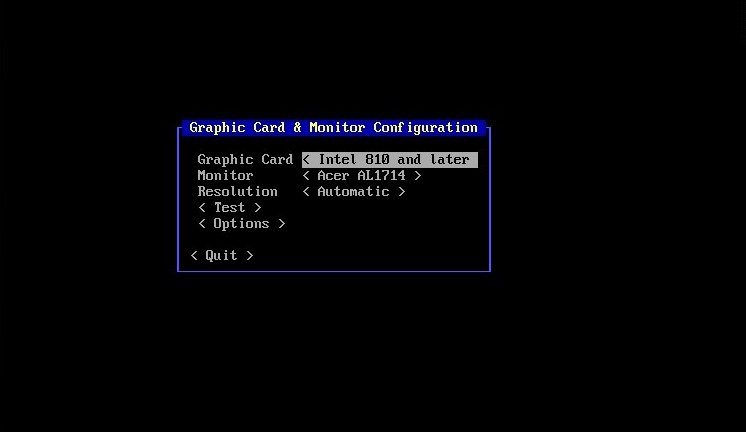
Whoever did the mistake, if the graphic driver isn't correct, Mageia boot freezes and this kind of screen below doesn't progress any more, or sometimes the screen stay totally black except the blinking cursor.
Open a console (tty) typing simultaneously the keys Alt+Ctrl+F3
As login, enter root, then the password (it isn't displayed)
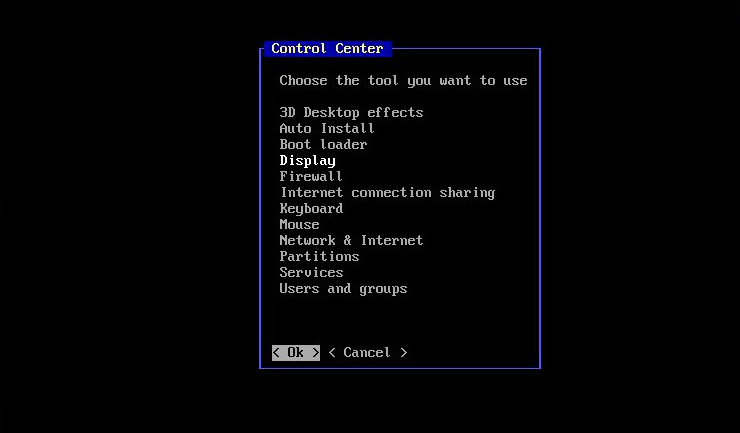
Once connected as root -there is the # symbol- enter the command drakconf, the command line equivalent to the Mageia Control Center, and then press Enter
Here, use the key TAB to go from the list to OK, to Cancel, then to the list again. Inside the list, chose the item Display with the arrows keys up and down.
Display is highlighted, type TAB to select OK and press Enter
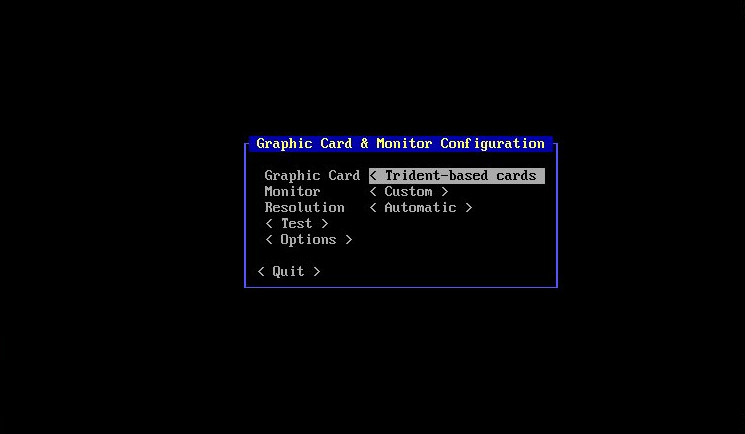
Now, using the same keys as previously, select the item Graphic Card and press Enter
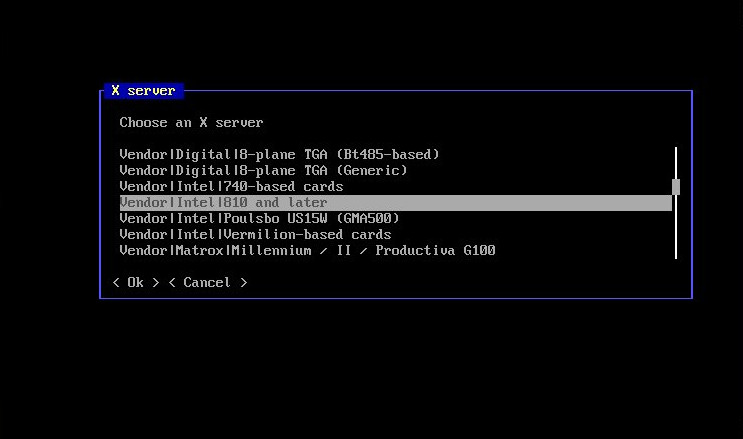
Select the right driver in the list. If you don't know it, choose the generic driver Xorg/Vesa
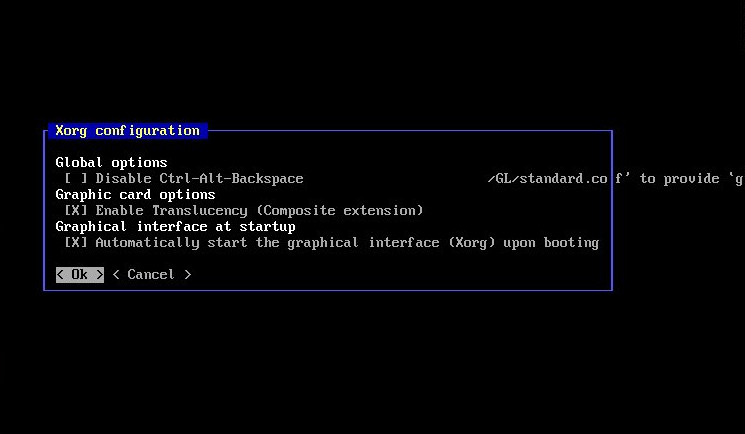
Don't change anything in this screen, it will always be possible to set the options later in the graphic mode.
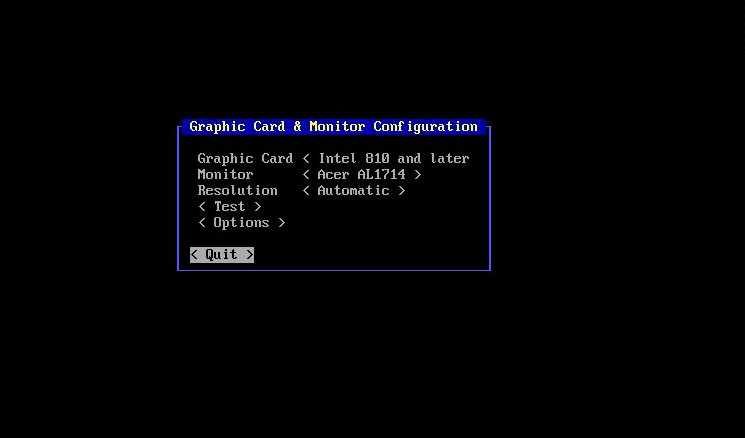
The chosen driver is now visible, if necessary, set alike the right configuration for the monitor.
When done, press TAB to select the button Quit and press Enter.
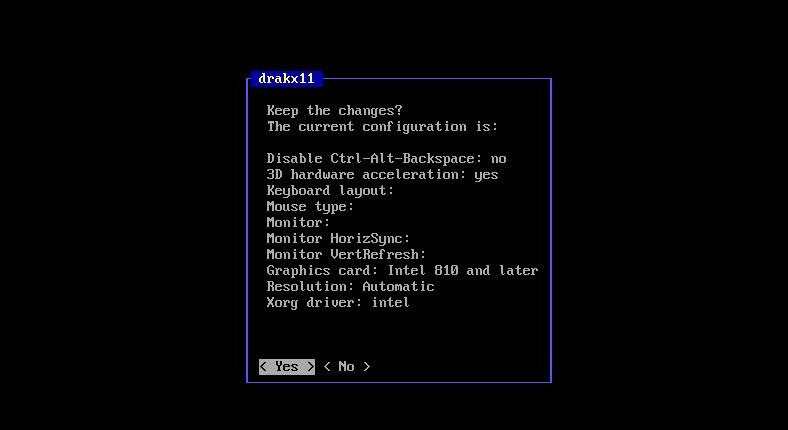
Select Yes and press Enter.
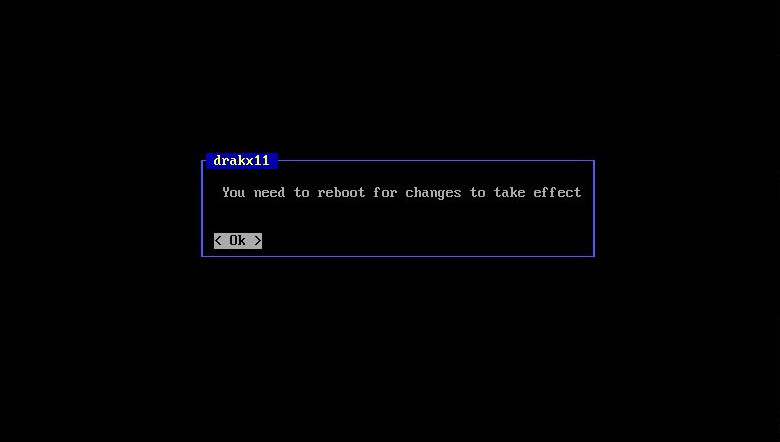
Just press Enter.
When back at the prompt, enter the command shutdown now to shut the session.
From now, the PC will start with the new driver and it will be possible to continue the neat configuration in graphic mode with the Mageia Control Center.
How to set up my Internet connection
You need first to have a console, see How to access to the command line above.
The automatic way
Then if not already done, configure an Internet connection, for that:
- enter the command
drakconfand press Enter, - is this menu
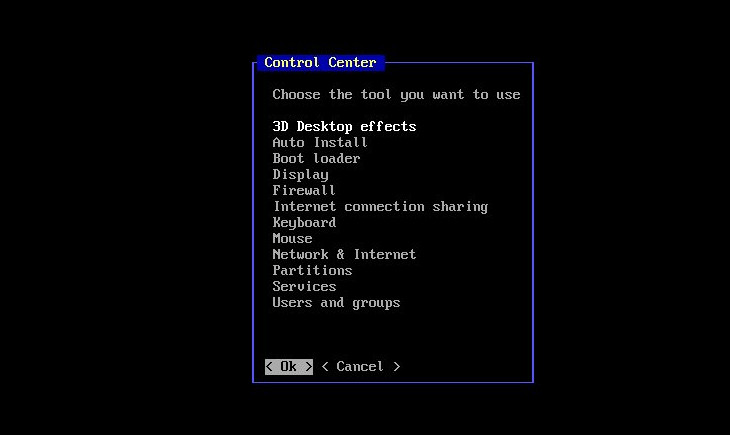 use the key TAB to go from the list to OK, to Cancel, then to the list again,
 - inside the list, chose the item Network & Internet with the arrows keys up and down, Network & Internet is highlighted, type TAB to select OK and press Enter
- using the same keys as previously, select the item Wired (Ethernet) preferably, Wireless (Wi-fi) otherwise and select Next
- in every following screen, choose either the default value or the Automatic option
- if you chosed Wireless (Wi-fi), in the Wireless settings, you have to enter the Network name (ESSID) the Encryption mode and the Encryption mode
- in case of problems with the Internet connection, you may try The manual way here after.
The manual way
It may happen that the automatic way doesn't work, due for example to DHCP problems (nothing to do with Mageia). Start like in the automatic way, but at the question Please select your connection protocol choose Manual configuration instead of Automatic IP (BOOTP/DHCP). Then you need to have some information:
- IP address: it looks like 192.168.x.y; x and y are to be chosen according to your private network, check your router/modem documentation, x is probably 0 and y is probably a number between 1 and 10, if you don't know, try 192.168.0.2.
- Netmask is 255.255.255.0
- Gateway: it is your router IP address, given by your provider. It is often 192.168.0.0 or 192.168.0.1 or 192.168.0.254.
- DNS servers : They are given by your provider, if you don't know them, use the Google public DNS servers that are 8.8.8.8 and 8.8.4.4.
How to manage the packages using a console
The list of all available Mageia repositories (aka mirrors) can be seen at http://mirrors.mageia.org/
How to update my system
If the repositories are already configured, just enter with root rights, the command :
urpmi --auto-update --auto
If you need to configure or re-configure everything, enter the commands:
urpmi.removemedia -aurpmi.addmedia --distrib --mirrorlist 'http://mirrors.mageia.org/api/mageia.6.<arch>.list'replacing <arch> by either x86_64 or i586.urpmi --replacefiles --auto-update --auto -download -all --testthis command will download all the packages and test them for more safety, if everything seems OK,urpmi --replacefiles --auto-update --auto -download -all
This above method use mirrorlist. It is a mechanism which takes a list of all available Mageia mirrors (aka repositories) and, using geolocation, tries to automatically choose those mirrors first which are near you current location and give the fastest reponses. This may not work always that well, as some mirrors sync not that often. To configure your repos from one particular mirror and not use mirrorlist, use the following commands to add a complete set of repositories from one specific mirror (in the example ftp-stud.hs-esslingen.de is used). The other commands don't change.
urpmi.addmedia --distrib 'ftp://ftp-stud.hs-esslingen.de/pub/Mirrors/distrib/6/<arch>'
How to rebuild the rpm data-base
If you get an error message like:
| A fatal error occured: Couldn't open RPM DB () at /usr/lib/perl5/vendor_perl/5.16.3/Rpmdrake/open_db.pm line 74 .. |
or if you have problems to update your packages, you probably have to rebuild your rpm data-base. Open a console with root rights and enter the commands:
| # rm -f /var/lib/rpm/__db* |
| # rpm --rebuilddb |
Other useful commands
- List of all configured repositories :
urpmq --list-media - List of active configured repositories :
urpmq --list-media active - List history of installed packages since the installation of Mageia:
rpm -qa --last - List of installed packages having "foo" in their name:
rpm -qa - list of all configured repos and their URLs:
urpmq --list-url - To print the full URL to any given packages:
urpmi --sources packagename - Tell urpmi to be verbose, useful in case of package installation/update errors to see the underlying dependency solver and why it really fails or does not what you expect it to do:
urpmi --debug - To query the URL on mirror for a given package name:
urpmq --sources <packagename>
How to modify a file in command line
If you need to modify a file in a console, say config.conf, you can use the command vi.
| $ vi path/to/config.conf |
if config.conf doesn't exist, it is created.
Enter in this order:
- i -> insertion mode,
- arrow keys -> to move in the text,
- do the modifications,
- esc -> end of the insertion mode
- : -> command mode, appears at the bottom of the screen
- wq -> save and quit (or q! to quit without save)
Grub2-efi
Grub2-efi is installed by default when installing Mageia 5 and over in UEFI mode. This page explains how to carry out a Grub2-efi post installation configuration and/or customization. Don't follow this page if you are using Grub Legacy or Grub2 in MBR mode.
Grub2-efi structure
When installing Mageia, the installer did the following things:
- it looked for an EFI System Partition (ESP), created it if not already existing, and mounted it in
/boot/EFI, - it installed
Grub2-efi, that means: - * it wrote the file
/boot/EFI/EFI/mageia/grubx64.efiin the ESP, - * it wrote the configuration scripts in the
/etc/grud.dfolder and the configuration file/etc/default/grub, - * it executed the scripts to create the main configuration file
/boot/grub2/grub.cfg. This file is read each timeGrub2-efiis executed and can be re-written with the commandgrub2-mkconfig, - it created an entry in the non-volatile RAM on the mother board, this entry is placed first in the boot order and points to
/boot/EFI/EFI/mageia/grubx64.efi.
In case of problems with the /boot/EFI/EFI/mageia/grubx64.efi file or the /boot/grub2 folder, they can be rewritten with the grub2-install --target=x86_64-efi --efi-directory=/boot/EFI --bootloader-id=mageia --recheck command. "--efi-directory" specifies the mount-point of the ESP. "--bootloader-id" specifies the folder name where grubx64.efi is copied, it is also the name of the new entry the command creates in the non-volatile RAM, you can write what you want.
See Interacting with the UEFI firmware for more information about managing the entries in the non-volatile RAM.
The ESP
ESP (for EFI System Partition) is a small partition of about 100 to 300 MB that contains the boot loader programs for all installed operating systems. It is part of the UEFI specification and OS independant. During an UEFI installation, the Mageia installer detects it automatically (or creates it if any), it is generally /dev/sda and mounts it on /boot/EFI.
Here is the ESP on the computer used in this page:
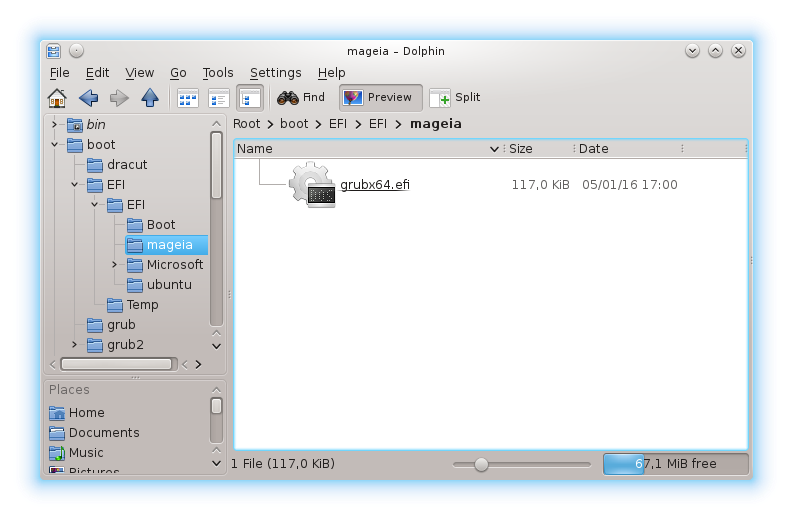
You can see in the ESP and more precisely in /boot/EFI/EFI there is three folders called /boot/EFI/EFI/mageia, /boot/EFI/EFI/Microsoft and /boot/EFI/EFI/ubuntu. They have been created each one by their matching installer. If Mageia had been installed a second time, it would still have only one folder called /boot/EFI/EFI/mageia for both.
Grub configuration
Principle
Each time you start your computer, grub2.efi is executed, it acts according to its configuration file called grub.cfg situated in /boot/grub2/. This file isn't intended to be modified by hand, but if you are able and want to do it, then do so. grub.cfg is written in Grub's built-in scripting language, which has a syntax quite similar to that of GNU Bash and other Bourne shell derivatives.
For the others, a tool called grub2-mkconfig can do it quite well. It uses a bunch of scripts stored in /etc/grub.d and a configuration file called /etc/default/grub. This file contains the grub2.efi menu settings that are read by the scripts and written into grub.cfg. It is the customization part of the grub2.efi. This means that if you want to change the grub2.efi menu, you will have to edit existing scripts or create new ones, then update the menu.
The configuration scripts
Let's have a look to the /etc/grub.d folder:
- 00_header, is the script that loads GRUB settings from
/etc/default/grub, including timeout, default boot entry, and others. - 10_linux, loads the menu entries for the installed distribution.
- 20_linux_xen,
- 20_ppc_terminfo,
- 30_os-prober, is the script that will scan the hard disks for other operating systems and add them to the boot menu.
- 40_custom, is a template that you can use to create additional entries to be added to the boot menu.
- 41_custom
- 90_persistent
- 93_memtest, loads the memtest utility.
Have you noticed the numbering in the script names? It defines precedence. This means that 10_linux will be executed before 30_os-prober and therefore placed higher in the boot menu order.
Like the /boot/grub2/grub.cfg file, they are not intended to be edited, save for 40_custom and 41_custom. You need to be very careful when working with these scripts. Scripts are meant to be executed. This means that they have the execute bit turned on. If you want to disable a script, don't delete it, turn the execute bit off and it will not run,
You can place as many files as you want into the /etc/grub.d directory, all the executable shell scripts will be read in their numbering order.
The configuration files
The main configuration file is /etc/default/grub, it is parsed by the 00_header script

- GRUB_DISABLE_OS_PROBER= allows or not OS_PROBER to probe all the OSes installed on the hard disks to automatically create a menu with each detected one .
- GRUB_CMDLINE_LINUX_DEFAULT= allows to add options to the kernel.
- GRUB_THEME= specifies the default theme.
- GRUB_TIMEOUT= specifies the default timeout. Setting to -1 will make
grub2wait indefinitely until you manually select an entry and hit Enter.
You can also dispose of another configuration file /boot/grub2/custom.cfg
Naming convention
It differs from grub-legacy.
- it names hard disks hd and floppies fd, and counts them from 0, hd0 for sda, hd1 for sdb, ...
- it names partitions gpt and counts them from 1, gpt1 for the first one, gpt2 for the second, ...
example: sdb4 is named hd1,gpt4
If there is a path after the drive and partition, use the brackets, example: (hd0,gpt4)/boot/grub2
Grub-customizer
Grub-customizer in a graphical tool to manage the main grub2 settings. It is present in the Mageia repositories.
On the first tab, you can recognize your menu. It is possible here to modify the entries titles, to create or remove entries and to change their order.
The second tab is obvious, except the check box "look for other operating systems", if checked the 30_os-prober script is enabled. The "advanced settings" button allows to set the options of the /etc/default file.
The last tab deals with the resolution and themes. The "advanced settings" button is the same than above.
For more information see https://launchpad.net/grub-customizer
Interacting with the UEFI firmware
Don't mix up the boot loader (grub2-efi in our case) installed by the operating system and the UEFI boot manager that is part of the UEFI software shipped with you mother board. Each time you install a new operating system it creates an entry in the UEFI boot manager that launch its boot loader. grub2-efi is independent of the boot manager, but in case of problem with a boot loader, you can ask the boot manager to boot another operating system, using another bootloader.
From Mageia
With the efibootmgr -v command, you can see your UEFI entries:

BootCurrents tells which entry is the current one and and Timeout tells how long to wait before using the default entry that means the first one in BootOrder.
Boot0002 is the boot entry produced by the mageia installation, Boot0004 by the Ubuntu installation and Boot0001 by the Windows one.
Suppose you are having problems with grub2-efi that freezes before it reaches the menu. You can then try to boot the fail-safe mode and change the boot order using this command:
| # efibootmgr -o 4,2 |
and the Ubuntu entry will be used first, that mean the boot loader installed with the Ubuntu installation.
From Windows
To set an entry to be the default one, start Windows and open a command prompt as an administrator:
Menu -> All programs -> Windows system -> right click on Command Prompt -> Run as administrator
Then Click on "Yes" in the dialog box and type:
| bcdedit /set {bootmgr} path \EFI\<id>\grubx64.efi |
specifies the folder name where grubx64.efi is copied, for example "mageia" or "ubuntu", see The ESP.
Mageia 6 errata
[Full recopy of the erratas ?]


