Please remove this {{Draft}}template, when you're sure the page is complete and correct.
|
Contents
Using Lokalize To Translate Mageia Software, Web Sites and Documentation
Introduction
There are two separate workflows in the translation process, suited to the different types of content, namely, static content (fiction books, scientific monographs, other static texts) and dynamic content (application interfaces, documentation, common documents, etc.).
Lokalize can be used in both workflows but better suits to translate dynamic content.
Why Lokalize?
There is a plenty of FLOSS software for translation you can install and use in Mageia. So why Lokalize? Below is a comparison table of the application features.
| Feature | GTranslator | Qt Linguist | Lokalize | OmegaT | poEdit | VirTaal |
|---|---|---|---|---|---|---|
| File format | PO | PO, TS | PO, TS, XLIFF | PO, INI, SRT, HTML, LaTeX, etc. | PO | PO, MO, TS, QM, XLIFF |
| Technological base | GNOME | Qt | KDE | Java | GTK+ | GTK+ |
| Autocomplete | - | - | + | - | - | - |
| Translation memory support |
+ | - | + | + | - | + |
| Translation memory import/export |
- | - | + | + | + | + |
| Translation synchronization between separate files |
- | - | + | - | - | - |
| Projects support | - | - | + | + | - | - |
| Automatic pre-translation | - | + (pre-created phrasebook) |
+ | - | + (limited) |
- |
| Can work with tags and entities | + | - | + | + | - | + |
| Comparison with translations into other languages |
- | + | + | - | - | - |
| Out of box integration with Internet dictionaries and translation services |
- | - | - | + | - | + |
| Configurable shortcuts | - | - | + | - | - | - |
| Fuzzy translation with with word-by-word diffs |
+ | + | + | + | - | + |
Common Formats of the Translation Material
Mageia consists from a very large set of different packages with very different localization systems. The Mageia localization core includes the following components:
- Mageia documentation and Mageia exclusive software (Drak, bootloader and some other tools). These components use gettext PO files for translation.
- Mageia website. This component uses specially crafted format of translation files (lang-files).
- Mageia documentation. This component is based on DocBook format.
- Mageia blog. This component can be translated as plain text or HTML.
There are also several other source text formats that are used in Mageia packages:
- Qt TS files.
- Uncommon localization formats, like in GNU TeXmacs, SciTE, Man2DVD, Chromium, etc.
It is not very convenient to have separate tools for each of these formats, but they can be easily converted to a common denominator which is PO format for this case.
All Mageia core component texts can be converted to PO files for further consistent and convenient translation using FOSS software from Mageia repositories.
A comprehensive guide to the structure of PO files can be found in the official GNU Gettext manual.
But for the usual translator, there is no need to learn Gettext procedures extensively. In the real world, it is usually enough to know how to use some translation tool with a graphical interface, e.g. Lokalize.
Lokalize Interface and Tools
Lokalize has its own documentation which is installed with the application and available online as HTML and PDF.
Here, we only concentrate on the details that can be useful for Mageia translations.
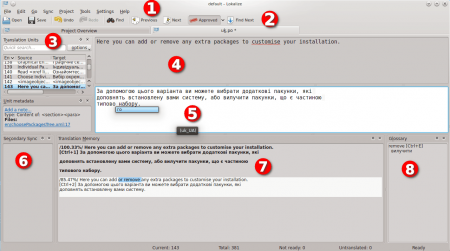
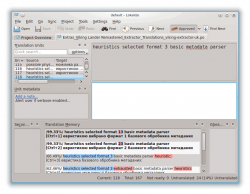
The numbers in the figure above denote the following components of Lokalize window
- Menu bar. The translation memory and glossary can be configured using the Tools menu. The Tools menu can be used to search and replace translation in the whole translation catalog (Search and Replace item or simply F6). Use Settings → Toolviews to add or remove toolviews, e.g., Secondary Sync, from Lokalize window.
- Toolbar. Can be configured using Settings → Configure Toolbars... menu item.
- Translation units list. Can be used to see the context (adjacent units), filter the messages (e.g. filter out all the messages that were not changed) and quicksearch in the current file for the units.
- Source unit pane. Here, you can see the source string (spelling mistakes are underlined).
- Translation unit pane. Here, you can enter the translation. Autocompletion and spellchecking are made by KTextPart (KDE text editor module), so the colors of highlighting should be configured in KDE System Settings.
- Additional toolview windows (the Secondary sync is shown). Can be useful to fix the translation of the same file for the different Mageia releases (see the Lokalize docs to learn more).
- Translation memory pane. Fuzzy matches are shown with highlighted diffs. The shortcuts to copy the matches into the translation are shown at the left. Hover the mouse cursor on the matching item for a while to see some information about its source. The item to open the source file can be reached by the right clicking on the match.
- Glossary pane. The pane to show and to configure the glossary of your translation team.
All these interface elements are configurable. You can completely change the layout with a simple drag and drop.
Tutorials
A screencast of the tutorials below can be found here.
Creating Mageia translation project
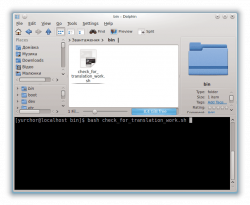
- Use check_for_translation_work.sh script to download all available Mageia translations into your language. A comprehensive instructions on how to use this script are given here. For those who prefer to not follow the links the detail description is given below.
- Download the script and save in in your home directory under subdirectory bin (just right-click the link and choose Save Link As..., then create bin directory in you home folder and click OK).
- Install git package with Mageia package manager.
- Navigate to the bin subdirectory in your file manager and open console in the subdirectory (press F4 in Dolphin)
- Type bash che then press Tab and Enter.
- Press Alt + F2 and type kwrite ~/.mageia-i18n-config then press Enter (you can use any text editor you want instead of KWrite).
- Use the instructions in the opened window to fill up the necessary data.
- Please upload your public key if you have an access to commit changes into Mageia repositories.
- Save the changes and quit the editor.
- Switch back to the file manager window.
- Press ↑ in the console part of the window, then press Enter.
- The script will download all Mageia translation files with one command.
- Start Lokalize.
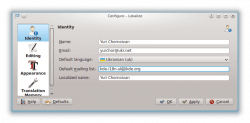
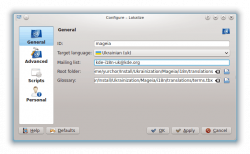
- Click on Configure Lokalize...
- Choose your identity parameters and your language.
- Switch to the Translation Memory page and configure its parameters as follows:
- Press OK button.
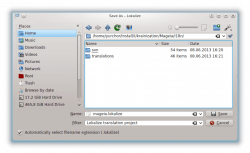
- Press Create new project.
- Choose translations directory and a name for your project (e.g. mageia).
- Choose mailing list and your language for the project.
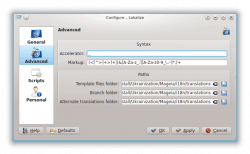
- Switch to the Advanced page.
- Choose _ as an accelerator (Mageia uses GTK+ scheme).
- Choose the translations directory for templates, any branch folder if you want to translate different branches simultaneously and an alternative translation folder (if you want to compare your translation with some translation into a different language).
- Press OK button.
Filling up Mageia translation memory
- Choose Tools → Manage translation memories form Lokalize main window menu.
- Press Add Data button.
- Select a directory with your translation file. (e.g. translations).
- Press OK button.
- Wait until scanning is finished.
Searching for some phrase in the translation memory
- Suppose you want to fix some Mageia translation.
- Open Lokalize window.
- Press F7
- Configure the search parameters as you like.
- Click on the Search button.
- Right click on the matches to proceed.
Mass search and replace in the translations
- Suppose you want to fix some Mageia translation in all Mageia project files.
- Open Lokalize window.
- Choose Tools → Search and replace in files... from Lokalize main menu or press F6.
- Configure the parameters as needed.
- Click on the Preview button.
- Click on the Mass Replace button.
Using translation memory to ease up the work
- Open some documentation PO file for translation using Lokalize File → Open...menu item (or press Ctrl + O, or use Open toolbar button).
- It is evident that some of the strings in this documentation have been already translated in the interface. Use Tools → Fill in all exact suggestions and mark as fuzzymenu item to fill the exact suggestions.
- Use Ctrl + Page Up and Ctrl + Page Down to move between fuzzy translations and Ctrl + U to approve them.
- Use Alt + Page Up and Alt + Page Down to move between untranslated messages.
- Some of the messages can have fuzzy suggestions shown on the Translation memory pane. Use the shown suggestion shortcuts and Lokalize stemming feature to fill in the translations.
Proofreading an external translation
- Open with Lokalize the main .po file that is in the Mageia repository.
- From the Sync menu select Open file for sync/merge
- Select the contributed PO file (the one that you want to review and merge).
- Copy the changes from the contributed file to the main file one by one with Alt + ↓ and Alt + Enter (checking and correcting them if needed).
| Note: You can also copy all the changes at once with Copy all new translations (Ctrl + Alt + A). then filter the changes with the Translation units list. |
