| Other languages English ; français ; Portuguese (Portugal) ; |
| Synopsis: This page will allow you to set up a web server, powered by Apache, driven by PHP using a MariaDB database. |
Contents
Overview

Each of these software pieces is independent and has a specific function.
LAMP is an acronym:
- Linux is the operating system that controls the use of a computer's resources.
- Apache is the HTTP server
- MySQL is the relational database management server, replaced by MariaDB
- PHP is an interpreted programming language
Of course, these software pieces are the most popular, but they can be substituted by others: Linux by Windows (contraindicated!), Apache by Lighttpd or Nginx, MySQL by MariaDB or Drizzle, PHP by Python or Perl.
With LAMP, we can therefore set up a web server, hosting a dynamic website written in PHP, while retrieving data from a MySQL/MariaDB database.
Some distributions, including Mageia, offer a metapackage called LAMP to install everything in a single command.
Mageia has made the choice from version 2 to privilege the Mysql fork called MariaDB. You won't notice any noticeable difference between these two software packages.
Installation
To start installing your LAMP server, your urpmi database must be up to date. Only then...
To do this, type the following command: urpmi.update -a
Installing the meta-package task-lamp-php to implement all related services. (Apache, MySQL/MariaDB et PHP)
In a terminal, type the following command: urpmi task-lamp-php
Or just with Mageia's Control Center.
Apache: the web server (1/4)
Method N°1 the Apache server can be started in graphical mode.
|
Method N° 2 the Apache server can be started with a terminal.
- In a terminal as root (super user) you can enter these commands:
To check the status.
| $ systemctl status httpd.service |
To start the service if inactive.
| $ systemctl start httpd.service |
To restart the service if already active.
| $ systemctl restart httpd.service |
To activate the service at startup.
| $ systemctl enable httpd.service |
To disable the service at startup.
| $ systemctl disable httpd.service |
To stop the service.
| $ systemctl stop httpd.service |
- To check that the Apache server is running enter in the address bar of your favorite browser (Firefox) «localhost». It works must be displayed, as shown in the image below.
| Note: To find out the IP address of a server, enter this command either as root or in sudo mode, which will tell you for sure the destination of your local server. In this case, the name of the network card is enp1s0. You must obviously replace this name by that of your network card.
|
Change your working directory
By default, the working directory is located in /var/www/html/. You can, if you wish, change this state. To do so, the configuration file is located in the folder /etc/httpd/conf/.
Modify line 117 containing the expression DocumentRoot in the file httpd.conf. Also modify lines 122 and 129 <Directory "/var/www"> while respecting the structure.
For this new directory to be taken into account, enter the following command:
| # systemctl reload httpd.service |
The directory change is effective but the directory is empty, so the page is displayed with a index of /. To rectify this, create an index.html file or copy the one in the /var/www/html/ folder to your newly created folder.
| Note: Remember to refresh the page of your browser, to take into account your new index.html
|
MariaDB: the database server (2/4)
Method N° 1 The MariaDB server can be started in graphical mode.
- To do this, after launching the Mageia control centre in
Sytem -> Manage system services by (de-) activating them - To be able to start the service, tick the box mysqld to make it available during system start-up phases. Click on the start button to make it active or stop to stop it.
Method N° 2 the MariaDB server can be started with a terminal.
| Note: It can be confusing for a beginner, when you are going to execute these commands for the first time (MySQL/MariaDB), but we are indeed dealing with MariaDB |
- In a terminal as root (super user) you can enter these commands:
To check the status.
| # systemctl status mysqld.service |
To start the service.
| # systemctl start mysqld.service |
To enable the service at startup.
| # systemctl enable mysqld.service |
To disable the service at startup.
| # systemctl disable mysqld.service |
To stop the service.
| # systemctl stop mysqld.service |
| Warning! MariaDB is installed without a root password, it is recommended to set the root password with the following command as soon as possible: mysql_secure_installation.
|
| # mysql_secure_installation |
| NOTE: RUNNING ALL PARTS OF THIS SCRIPT IS RECOMMENDED FOR ALL MariaDB SERVERS IN PRODUCTION USE! PLEASE READ EACH STEP CAREFULLY! In order to log into MariaDB to secure it, we'll need the current password for the root user. If you've just installed MariaDB, and you haven't set the root password yet, the password will be blank, so you should just press enter here. Enter current password for root (enter for none): OK, successfully used password, moving on... Setting the root password ensures that nobody can log into the MariaDB root user without the proper authorization. You already have a root password set, so you can safely answer 'n'. Change the root password? [Y/n] New password: Re-enter new password: Password updated successfully! Reloading privilege tables. ... Success!}} |
- The following questions will secure the installation of your database. You can leave the default options and validate each of them with [Enter].
| By default, a MariaDB installation has an anonymous user, allowing anyone to log into MariaDB without having to have a user account created for them. This is intended only for testing, and to make the installation go a bit smoother. You should remove them before moving into a production environment. Remove anonymous users?[Y/n] ... Success! Normally, root should only be allowed to connect from 'localhost'. This ensures that someone cannot guess at the root password from the network. Disallow root login remotely? [Y/n] ... Success! By default, MariaDB comes with a database named 'test' that anyone can access. This is also intended only for testing, and should be removed before moving into a production environment. Remove test database and access to it? [Y/n] - Dropping test database... ... Success! - Removing privileges on test database... ... Success! Reloading the privilege tables will ensure that all changes made so far will take effect immediately. Reload privilege tables now? [Y/n] ... Success! Cleaning up... All done! If you've completed all of the above steps, your MariaDB installation should now be secure. Thanks for using MariaDB! |
Test MariaDB
Now that the parameters have been entered, test MariaDB. Make sure that MariaDB is started with the following command as root or in sudo mode: {{command|systemctl restart mysqld.service You can connect to the database.
| mysql -u root -p |
Enter your root password created previously.
| Enter password: Welcome to the MariaDB monitor. Commands end with ; or \g. Your MariaDB connection id is 8 Server version: 10.3.12-MariaDB Mageia MariaDB Server Copyright (c) 2000, 2018, Oracle, MariaDB Corporation Ab and others. Type 'help;' or '\h' for help. Type '\c' to clear the current input statement. MariaDB [(none)]> show databases; +--------------------+ | Database | +--------------------+ | information_schema | | mysql | | performance_schema | +--------------------+ 3 rows in set (0.004 sec) MariaDB [(none)]> |
To exit the database
| exit |
PHP: the content server (3/4)
| Note: Check that the apache-mod_php package is installed and that the httpd service is restarted. |
In order to increase the PHP interpreter's capabilities, install the following packages. Of course, this is not an obligation.
- php-bcmath : For high-precision mathematical calculations
- php-dba : database abstraction layer for PHP applications.
- php-enchant : Enchant provides consistency and conformity for all spelling libraries.
- php-fpm : FastCGI process manager with useful additional functionality for heavily loaded sites.
| Note: To find out whether or not a package is already installed on the system, execute the following command: urpmq --fuzzy PackageName
|
Test PHP
To check that the system is configured properly, create a PHP script in this example info.php, then try to display it with your web browser.
| echo "<?php phpinfo();?>" >>/var/www/html/info.php && chmod a+r /var/www/html/info.php |
Therefore, when you enter the url http://<YourServerName>/info.php, in this case http://localhost/info.php
| Warning! If you have changed your working directory, don't forget to indicate the right one, so that the page is displayed. |
you should be able to display the PHP homepage, below.
phpMyAdmin, a user-friendly interface (4/4)
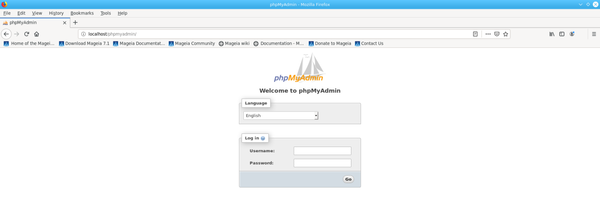
This application allows you to manage your database with a web interface that is much more user-friendly than the console.
Method 1 : From the local browser (on the server concerned):
To start phpMyAdmin, in the address bar of your browser, type:
| [http://localhost/phpmyadmin '''http://localhost/phpmyadmin'''] |
Method 2 : From a remote browser (you do not have a graphical user interface):
If your server does not have a graphical user interface, you can access phpMyAdmin from another computer on your network. To do this, you need to modify the phpmyadmin.conf file to declare the IP address of the client machine. You can modify this file using a text editor such as Vim or Nano, the file is located in the folder /etc/httpd/conf/site.d/
| # cd /etc/httpd/conf/site.d/ |
| # vim phpmyadmin.conf |
| # phpMyAdmin - Web based MySQL browser written in php # # Allows only localhost by default # # But allowing phpMyAdmin to anyone other than localhost should be considered # dangerous unless properly secured by SSL Alias /phpmyadmin /usr/share/phpmyadmin <Directory /usr/share/phpmyadmin/> <IfModule mod_authz_core.c> # Apache 2.4 <RequireAny> Require ip 127.0.0.1 Require ip 192.168.1.x Require ip ::1 </RequireAny> </IfModule> <IfModule !mod_authz_core.c> # Apache 2.2 Order Deny,Allow Deny from All Allow from 127.0.0.1 Allow from 191.168.1.x Allow from ::1 </IfModule> ErrorDocument 403 "Access denied per /etc/httpd/conf/webapps.d/phpmyadmin.conf" php_flag session.auto_start 0 </Directory> <Directory /usr/share/phpmyadmin/setup/> <IfModule mod_authz_core.c> # Apache 2.4 <RequireAny> Require ip 127.0.0.1 Require ip 192.168.1.x Require ip ::1 </RequireAny> </IfModule> <IfModule !mod_authz_core.c> # Apache 2.2 Order Deny,Allow Deny from All Allow from 127.0.0.1 Allow from 192.168.1.x Allow from ::1 </IfModule> ErrorDocument 403 "Access denied per /etc/httpd/conf/webapps.d/phpmyadmin.conf" </Directory> |
Once modified, all that remains to be done is to type in the host browser bar:
| '''http://192.168.1.x/phpmyadmin''' |
In the interface, enter the password you previously created as root user.
The first time phpMyAdmin is launched, an error is displayed by the absence of the tmp directory.
To fix this problem, we create this folder in /usr/share/phpmyadmin/ as root or in sudo mode.
| # cd /usr/share/phpmyadmin && mkdir tmp |
We do the same to grant read and write rights for the repertoire tmp/.
| # chmod 700 tmp/ |
Giving ownership rights to apache to the repertoire tmp/.
| # chown apache:apache /usr/share/phpmyadmin/tmp |
Secure phpMyAdmin
By default, in phpMyAdmin, the administrator account is named root. An attacker already owns 50% of the solution, and, should only focus on finding the password. I know, we're on a local installation, but common sense dictates that we do the best we can.
First of all, it is strongly advised to create another administrator account with a wacky name.
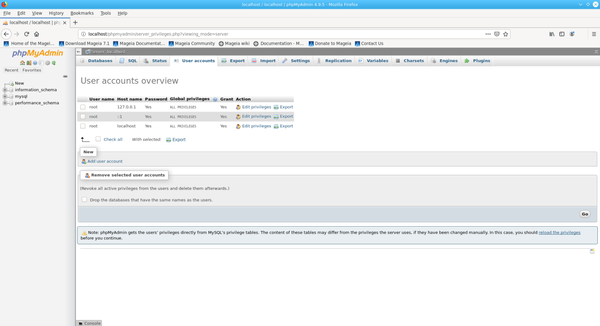
- To do so, click on the tab
User accounts -> Add user account. Enter a user name and password sufficiently complex. For the Host name, stay Local. - Database for user account
- tick Create database with same name and grant all privileges.
- tick Grant all privileges on wildcard name (username\_%)
- Global privileges
- tick Check all, which will have the effect of selecting Data, Structure, Administration
- To complete the creation of the newly created administrator account, click on Go.
Secondly, it is more than advisable to create a user account with limited rights to do routine work. This will limit any possible clumsiness.
- Repeat the previous operations except with Global privileges
- Tick only Data and Structure
| Warning! When creating your root or ordinary user, do not put accents on words. When connecting to phpMyAdmin, accents are not supported. specificity for languages with accented letters. |
Thirdly, you can now remove the default accounts root Remove selected user accounts.
- Tick Drop the databases that have the same names as the users.
Fourthly, it is advisable to secure the web address which is predefined as http://localhost/phpmyadmin/. We are going to change this state of affairs to make it more secure. Again, this is not necessary because we are locally on our own machine, but on a remote machine, it is not the same thing. Therefore it is better to be more vigilant than not vigilant enough.
| # cd /etc/httpd/conf/sites.d |
Edit the file phpmyadmin.conf.
| # vim phpmyadmin.conf |
| # phpMyAdmin - Web based MySQL browser written in php # # Allows only localhost by default # # But allowing phpMyAdmin to anyone other than localhost should be considered # dangerous unless properly secured by SSL Alias /TheNameYouWish /usr/share/phpmyadmin |
Put the alias you want. If this one is TheNameYouWish your web address will look like this: http://localhost/TheNameYouWish/. For the changes to be taken into account, enter this command.
| # systemctl reload httpd.service |
Default links
Enter in the address bar : http://127.0.0.1/ If the page displays: "It works!" Apache is well set up.
Access to phpmyadmin: http://127.0.0.1/phpmyadmin
Welcome to phpMyAdmin
login : root
by default
pass :
Access to the pages: http://127.0.0.1/
Access to the working file is here: /var/www/html/
Add the SSL
Try to open first
https://127.0.0.1/
If you get an "error" page,
Install the package from the Mageia control center:
apache-mod_ssl
Restart :
https://127.0.0.1/
Confirm the security exception.
Thus ends this tutorial, with the valuable help of this documentation and much other information gathered from the web.


