Please remove this {{Draft}}template, when you're sure the page is complete and correct.
|
| Synopsis: This page is a reference guide for users that want try to install and customize Mageia distro to obtain a mediacenter/htpc. Waiting for Mageia 5 official release to update guide... |
Contents
Introduction
To set up our Mageia distribution for this purpose we need to consider the following:
- We need a reduced operating system loading time
- Lower use of resources
- Rock-solid system stability
- Faster system responsiveness
For this purpose I used:
Use of these managers requires manual editing of some configuration files but the performance improvement is noticeable.
| mediacenter desktop | |
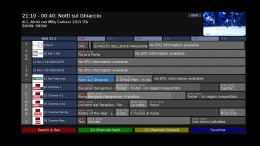
DVB-T, DVB-S, DVB-S2 device are handled by VDR - Video Disk Recorder, front end application to manage mediacenter are:
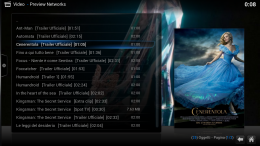
- Kodi to play audio and video contents from local and streaming from internet (using some supported addons as Youtube, Previewnetworks, etc.)
- Softhddevice (VDR plugin) used to watch tv (HD channels included).
|
Kodi screenshots |
Vdr screenshots | |
Hardware used
- Zotac ID-11 MiniPC with Atom D510 dual core CPU, WiFi on board, video NVidia ION2 Next Generation 512MB DDR3
- 4GB RAM (Kingston)
- 250GB Hard Disk (7200 rpm Western Digital)
- TeVii S660 DVB-S/S2 USB
Install Mageia and configure
Preparing system
Start with the Dual Arch ISO image of Mageia 5 selecting x86_64 (64bit). During the installation, choose LXDE as the window manager. Use mediacenter as the default user.
After installation, the first step is add the on-line repositories using: Mageia Control Center > Software. Once you've added them, run an update to make sure you have all the latest package versions in the database:
[root@localhost ~]# urpmi --auto-update --auto-select --no-verify-rpm
Next step is to install the NVIDIA driver using: Mageia Control Center > Hardware > Video.
We need to install some packages to get, extract and build sources:
[root@localhost ~]# urpmi gcc gcc-c++ make automake autoconf cmake wget unrar
Get firmwares for DVB-S2 drivers
Copy TeVii s660 firmware under /lib/firmware folder:
[root@localhost ~]# wget http://www.tevii.com/dvb-usb-s660.rar
[root@localhost ~]# unrar e dvb-usb-s660.rar
[root@localhost ~]# rm -rf dvb-usb-s660.rar
[root@localhost ~]# cp dvb-usb-s660.fw /lib/firmware
[root@localhost ~]# wget http://tevii.com/tevii_ds3000.tar.gz
[root@localhost ~]# tar xf tevii_ds3000.tar.gz
[root@localhost ~]# rm -rf tevii_ds3000.tar.gz
[root@localhost ~]# cp -f tevii_ds3000/dvb-fe-ds3000.fw /lib/firmware
Install required packages
[root@localhost ~]# urpmi openbox thunar lxdm vlc k3b amule transmission obconf gedit
[root@localhost ~]# urpmi xfce4-terminal flash-player-plugin wget git hg sudo java gnome-system-monitor
[root@localhost ~]# urpmi ssh-server libreoffice mate-icon-theme mate-themes mate-faenza-icon-theme
[root@localhost ~]# urpmi xterm file-roller nano smplayer gxmessage xmessage tint2 volumeicon kodi
[root@localhost ~]# urpmi lib64ncursesw-devel lxappearance lib64graphicsmagick-devel lib64graphicsmagick3
[root@localhost ~]# urpmi lib64magick++-6Q16_5 lib64magick-6Q16_2 lib64magick-devel alsamixergui
[root@localhost ~]# urpmi lib64cap-devel gettext lib64ffmpeg-devel lib64xcb-util-wm-devel
At this list can add all applications that you want, but consider that this is a mediacenter pc, so screen could be placed distant, my opinion is limit installed applications only to applications that are really used.
Enable users to reboot
Need to add to /etc/sudoers file follow row:
mediacenter ALL=(ALL) ALL
mediacenter ALL = NOPASSWD: /sbin/shutdown, /vdrbox/vdr-start.sh, /vdrbox/vdr-stop.sh, /vdrbox/vdr-run.sh, /vdrbox/oscam-start.sh, /vdrbox/oscam-stop.sh
also need to comment follow row to use sudo from menu:
# Defaults requiretty
Setup HDMI audio as default
Edit file /etc/asound.conf as follow:
# HDMI default
pcm.!default hdmi:NVidia
pcm:iec958 hdmi:NVidia
create file /etc/modprobe.d/sound.conf as follow:
options snd-hda-intel enable_msi=0 probe_mask=0xffff,0xfff2
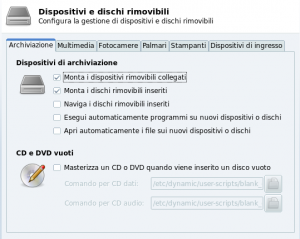
Enable Thunar to auto mount
Launch Thunar > preferences > advanced > enable volume... enable only first 2 check (mount connected media and mount inserted disk) as follow:
Login Manager configure (LXDM)
Set LXDM as login manager from Mageia Control Center
Set from Mageia Control Center > Boot, user mediacenter as autologin with openbox session. Modify file /etc/sysconfig/desktop as follow:
  DISPLAYMANAGER=LXDM
  DESKTOP=openbox-session
Set LXDM also as default login manager in systemd:
[root@localhost ~]# systemctl lxdm enable
Modify file /home/mediacenter/.dmrc with this parameters (in my case lang is italian):
  [Desktop]
  Session=26Openbox
  Language=it_IT.utf8
  Layout=it
Modify file /etc/lxdm/lxdm.conf with this parameters:
  session=/usr/bin/startopenbox
  autologin=mediacenter
Window Manager configure (Openbox)
Create /home/mediacenter/.config/openbox/autostart file as follow:
# To use nvidia-settings
nvidia-settings -l &

# thunar daemon
thunar --daemon &

# set desktop background
feh -B black --bg-center /usr/share/kodi/media/Splash.png

# Programs that will run after Openbox has started (taskbar manager and volume manager)
tint2 &
(sleep 2 && volumeicon) &
Set as executable:
[mediacenter@localhost ~]$ chmod 775 ~/.config/openbox/autostart
Don't forget to edit file ~/.config/openbox/menu.xml to create your personal main menu (right click on desktop). You could insert in menu a shortcut to Kodi or to VDR (using softhddevice as frontend plugin).
Also edit file ~/.config/openbox/rc.xml to associate key to a specific action/script (such as print key with screenshot generation). You could set a specific key (such as F11, F12 etc.) as shortcut to Kodi or to VDR (using softhddevice as frontend plugin).
In my case i use F5 to launch sudo /vdrbox/vdr-run.sh and F6 to launch kodi. After VDR started, if i press F5 again, script detect presence of vdr and close it.
Taskbar configure (Tint2)
To personalize aspect of taskbar can use:
[mediacenter@localhost ~]$ tint2conf
that update file ~/.config/tint2/tint2rc
Fonts aspect configure (Qt and Gtk)
First modify file /etc/fonts/fonts.conf adding:
    <fontconfig>
     ...
     ...

       <match target="font" >

         <edit mode="assign" name="hinting" >
           <bool>true</bool>
         </edit>

         <edit mode="assign" name="hintstyle" >
           <const>hintslight</const>
         </edit>

         <edit mode="assign" name="antialias" >
           <bool>true</bool>
         </edit>


       </match>


       <match target="pattern">

         <edit name="dpi" mode="assign">
           <double>96</double>
         </edit>

       </match>

     </fontconfig>
Then to setting Qt4 aspect can use:
[mediacenter@localhost ~]$ qtconfig
To setting Gtk aspect can use:
[mediacenter@localhost ~]$ lxappearance
selecting Fonts > Details > Hinting Enable > Slight
Create file /home/mediacenter/.Xresources as follow:
Xft.dpi: 96
Xft.hinting: 1
Xft.hintstyle: hintslight
Xft.antialias: 1
Get, build and install VDR with plugins
Get build and install scripts
To perform all steps i created a bash scripts collection to help, so checkout it from github:
[mediacenter@localhost ~]$ cd /tmp
[mediacenter@localhost ~]$ wget https://github.com/armando-basile/vdr-scripts/raw/master/prepare_vdr.sh
[mediacenter@localhost ~]$ wget https://github.com/armando-basile/vdr-scripts/raw/master/install_plugins.sh
[mediacenter@localhost ~]$ chmod 775 prepare_vdr.sh
[mediacenter@localhost ~]$ chmod 775 install_plugins.sh
Scripts uses /vdrbox as VDR default folder and mediacenter as user that start pc.
Need to launch scripts as root user
[root@localhost vdr-scripts]# cd /tmp
[root@localhost vdr-scripts]# ./prepare_vdr.sh
Other Plugins
In plugins source folder can add other plugins that you need, can go on this website to see a list vdr repository. If you add new plugins, remember that you need to update also install_plugins.sh scripts.
Build
[mediacenter@localhost ~]$ cd /vdrbox/vdr-<version>
[mediacenter@localhost ~]$ make
Install plugins
[root@localhost vdr-scripts]# cd /tmp
[root@localhost vdr-scripts]# ./install_plugins.sh
How use installed scripts
Installed bash scripts perform start and stop of VDR and, if you need to use, also Oscam. Three are main scripts:
- vdr-start.sh that contains launch parameters for VDR
- vdr-stop.sh that kill VDR instance
- vdr-run.sh that manage start script if there isn't any VDR instance, or stop script if there is an instance already running
to use a remote control, can associate a specific key to vdr-run.sh script to start and stop VDR with only one key. To do this in Openbox can edit file /home/mediacenter/.config/openbox/rc.xml and add into <keyboard> section a <keybind> node as follow:
  <keyboard>
  ...
    <keybind key="F5">
      <action name="Execute">
        <execute>sudo /vdrbox/vdr-run.sh</execute>
      </action>
    </keybind>
  ...
  </keyboard>
in this case key F5 launch script vdr-run.sh
Keep updated your channels list
To perform this action in developed a Python script named vdr-getchannels that use KingOfSat channels list to update local channels.conf file.


