Contents
Converting a Legacy BIOS install to a UEFI install for unencrypted systems.
- As UEFI becomes more common, you may need to consider converting your existing legacy BIOS installed x86_64 system to the more modern UEFI system.
Whom should consider converting from legacy BIOS install to UEFI install?
- You are someone whom has upgraded in-place for several releases.
- Your system has been tweaked to your requirements.
- You know, even with your extensive notes and some automating scripts, downtime after a new UEFI install to get the system back to your requirements is not something you relish.
- You have upgraded your system HDD / SSD over several years up to the 2TB MBR limit via cloning and expanding your partitions as required.
- Your MBR partition scheme does not have 4 Primary Partitions.
- You have already cloned your system into a GPT partition schemed HDD / SSD and created the required “bios boot” partition.
- You are now looking to purchase, or have purchased, a new laptop or desktop and the option for Legacy / CSM is no longer an option. UEFI only.
Overview and software required
- Be aware that some BIOS’s just will not accept Mageia’s UEFI bootloader.
- The procedure that follows is quite straight forward, and requires minimal terminal use. There are several variations on the theme, but they basically follow the same path:
- Update your system.
- Backup your system.
- Change your BIOS from Legacy or CSM to UEFI.
- Create the required partition and install the boot loader.
- Reboot (and some housekeeping).
- Software needed to do this is freely available, and most of it is provided by Mageia.
- Before starting, as you will need to manipulate partitions, take a backup image of your system. I would recommend Clonezilla for this, as it is well regarded for this. It does have a learning curve, so do practice with it before committing to use it for your production system / daily driver. It is quite usable in a Virtual machine, so do try it to become comfortable with its use. Backup –> restore, boot up. Backup –> restore, boot up… etc.
The software needed is:
- Clonezilla, or backup software of your choice.
- Isodumper, a USB writer, available from your local Mageia repos.
- One of the following that matches your current Mageia system:
- Mageia Nonfree-Net-install-x86_64.iso
- Mageia Classical-Installer-x86_64.iso
- Mageia’s x86_64 installer .isos after Mageia 6 are all UEFI capable, so are all able to be used.
- Ideally, you should set up an internet connection as part of the initial setup.
- If you do not already have these handy, download the Clonezilla and at least the Nonfree-Net-installer ISOs (I used the current Cauldron one and a Mga8 Classical Install.iso, see the final section for notes).
- Install Isodumper and then burn the downloaded .isos to separate USB sticks and label them.
Some useful notes
Preparations
First, take a look at your partitions.
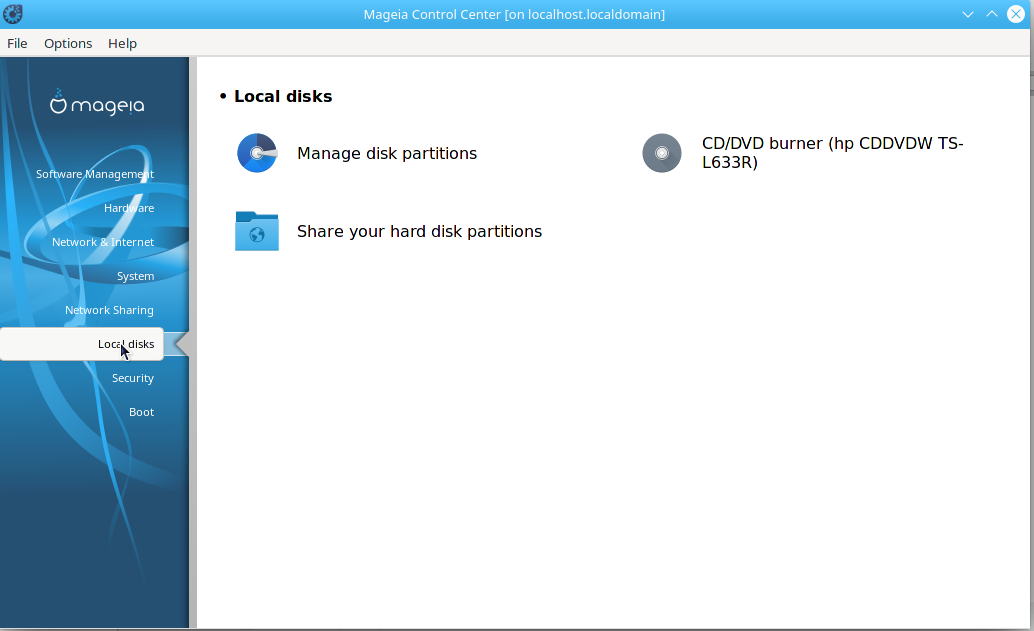
Invoke Mageia Control Center and select Local disks:
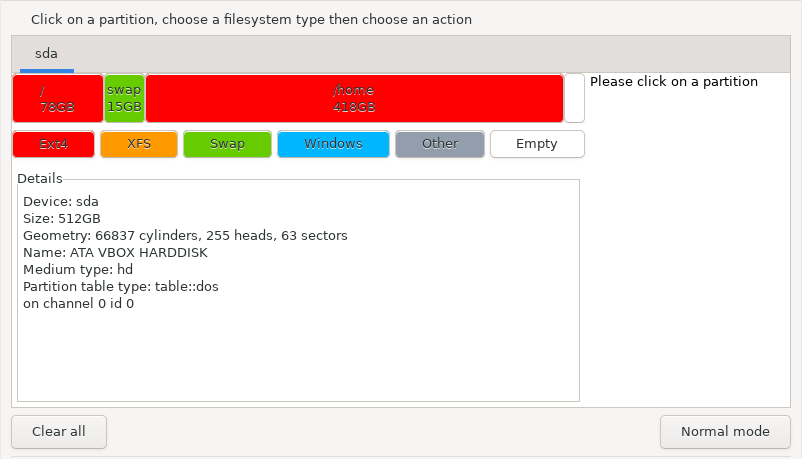
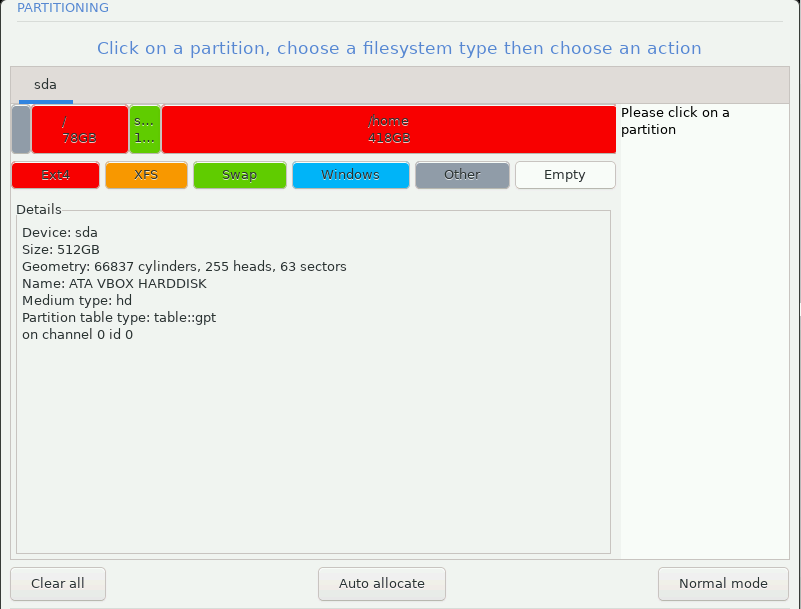
- Click on Manage disk partitions and, if you have an unmodified partition layout for your original install, it should look like one of the following:
- msdos partition scheme: Combined root and /home with /swap partitions
- msdos partition scheme: Separate root and /home with /swap partitions
- GPT partition scheme: Separate root and /home with /swap and bios boot partitions
Downgrading Grub2
- Do attempt the conversion first, ideally on-line.
- If you are un-able to attempt the conversion online, then you can use the Classical Installer burnt to USB or DVD.
- First you will have to downgrade your system grub2 (to match the Classical Installer version.)
- To accomplish this, use MCC, disable your online media, and add a Custom Medium: your installer medium. see also Creating_local_repos_from_a_classical_install.iso :[1]
- Then
# urpmi grub2 --downgrade
- will install the previous version of grub2 (and some other packages).
- This can also be performed via GUI using MCC => Install and Remove Software.
- Search for grub2, select to install the earliest un-installed version, which should match your grub2 in your installer medium.
Suggestion for multi user systems
- The conversion has been tested using single user systems, both Mga8 and Mga9.
- The following is just a suggestion.
- If your system has multiple users, take a note of the User names, User ID, Password and Groups for each. This information may be required to be re-entered at the completion of the conversion.
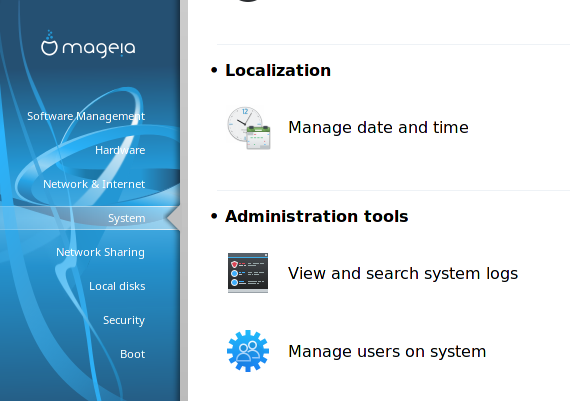
- See Mageia Control Center> System> Manage users on system
- If your system has multiple users, take a note of the User names, User ID, Password and Groups for each. This information may be required to be re-entered at the completion of the conversion.
Can the conversion be reversed?
- If, after the initial conversion, you discover that your UEFI BIOS is not Mageia friendly, the conversion can be reversed.
- Again, you will need either the Net-Install or Classical Install boot media.
- Reverse the BIOS from UEFI to Legacy /CSM.
- Boot up the installer medium, mount only your usual partitions ( / and or /home). No formatting again.
- Add on-line media. Select your usual Desktop environment. Enter your correct passwords and user info.
- Install the bootloader.
- reboot to your usual system.
Running the Conversion
Update your current system
- Update your system.
- Done? OK, Shut down your system, no system hibernation.
- Onto the next step!
Back up your system
- Backup your system. As you have practiced this in a Virtualbox, this is now straight forward.
- Boot to the Clonezilla USB.
- Backup your system!
- Shut down your system.
- Remove your Clonezilla USB.
- Done? OK, Onto the next step!
Changing your BIOS setting from Legacy /CSM to UEFI
- Reboot your system and enter your BIOS.
- Find the switch to change from Legacy / CSM to UEFI.
- Do also turn off secure boot and fast startup.
- Save and exit.
- Check that your boot order is set to boot USB first.
- Some of these switches may be hidden, so you may have to become supervisor/administrator for you BIOS.
- How to do this is beyond the scope of these notes, but your user manual for your machine should describe the method.
Boot the Installer
Insert the USB stick containing the Mageia installation ISO. Boot up the Installer system.
- For the Net-installer choose an online repo and follow the prompts up to the Install / Upgrade prompt. Choose Install
- For the Classical installer, follow the prompts up to the Install / Upgrade prompt. Choose Install.
Creating the required /boot/EFI partition
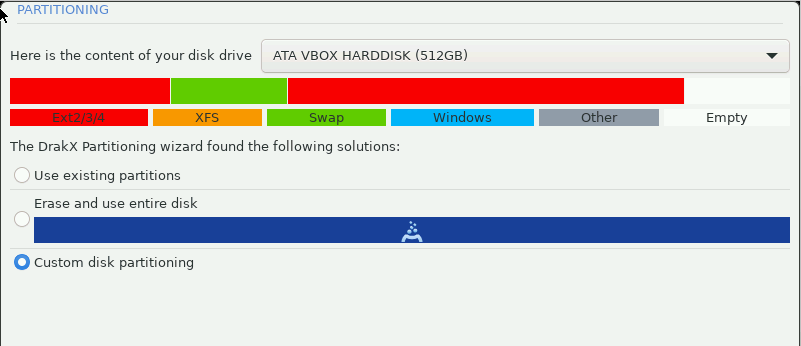
- The installers will present an image similar to this:
- choose Custom disk partitioning
After pressing Next, you will be presented with an image similar to the images as found in Some Preparations above.
| Warning! There are inherent risks with manipulating partitions, from loss of data to having a system that just wont boot and is completely borked(TM). Backing up your system is an attempt to mitigate this risk. |
The safest way to manipulate partitions with low risk to the system is to manipulate one with no data in it: /swap, and without moving the start sectors of, or renumbering the existing partitions.
Typically, the msdos Mandrake/Mandriva/Mageia installers generally created an Extended Partition and installed swap there (sda5).
By shrinking the swap partition in the Extended Partition, and then creating a new /boot/EFI partition, all existing partitions retain their original start sectors and existing partition numbers.
The /boot/EFI partition does not need to be large, and conveniently, it does not have to be in a specific location.
Typically, if you were to erase the disk now and let the installer populate the partition table, it would create a /boot/EFI partition between 112MB and 300MB.
- On the right lower of the partition editor there is a button Expert mode.
- Congratulations, you have now just been promoted and need to click it.
- It now changes to Normal mode
- Click on the partition coloured green=*Swap*. (there is a legend of colours below the partiton table)
- To the right, a list of editor tool buttons now appears.
- The one you need to use first is Resize, so click it.
- A warning will appear, please read it, and accept the consequences.
- A new editor window is presented, with the current size of the partition in MB and a (-) and (+) adjusters to the right.
- Also shown are min and max values for the partition.
- Either manually adjust down the partition size by a value between 112 and 300, or just change the 3rd from the right value down by a desired value (ie: 3456 => 3256)
- When you are happy, press Ok.
- You will be returned to the main editor window.
- Looking at the partition layout, there is now a white section to the right of the swap.
- Click on it, and Create is displayed to the right in the editor tool list.
- As it is the only option, click this button.
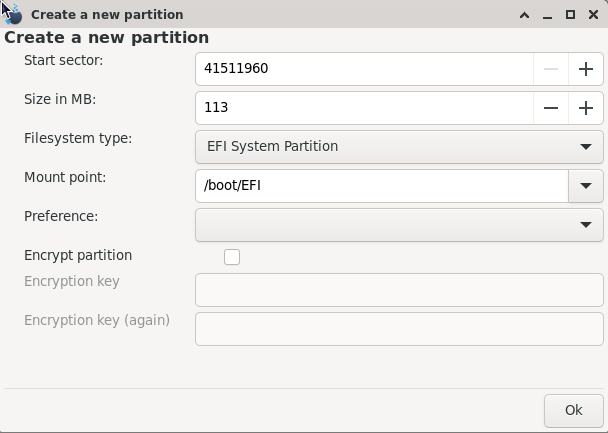
- A screen similar to this should appear:
- As you can see here, the size is 113, use the (+) to max it out if you want.
- The file system EFI System Partition should be pre-selected
- The mount point /boot/EFI should be pre-selected. If not, select it.
- Everything is ok? Then press Ok
- You will be returned the main editor window.
- You now have to choose your / mount point for your root partition and, if required, any other mount points for any other partitions.
- When finished, press Done and accept the consequences.
- Now you are presented with the option to choose which partitions to format
or
- Choose only to format the /boot/EFI partition, and choose Next
- At the Media selection prompt, do add supplementary media (on-line repos). (Classical Installer only)
- At the Desktop Selection, choose the desktop that you have been using in your usual system.
| Note: If the desktop selection does not present – do not panic.
|
- Continue with the install as you normally would.
- For Net-install or Classical Installer: At the password manager, input the correct passwords and user name. An incorrect user name here will create a new /home directory and will likely make your data difficult to access.
- For a multi-user set-up, do add the users at the Summary page: User management: Configure
Bootloader installation
Some UEFI implementations leave a lot to be desired, so, do first just accept the configuration page by clicking next.
- If there is an error loading the bootloader, the configuration page will be represented.
- Click on the Bootloader – grub2-graghic on ESP: Configure( see above image) and accept the first page.
- You will then be presented with a page similar to this:
- Choose Install in /EFI/BOOT (removable device or workaround for some BIOS’s)
- Click Finish and you will be returned to the configuration page.
- Now accept the page and finish your conversion: Next.
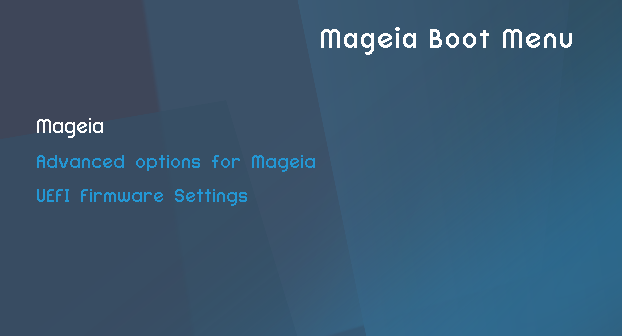
- You do not need to accept updates, so another next, and then reboot, remove the install media and you should be presented with a whole new boot menu:
- Accept the boot option and login to your usual Desktop. Check that everything is in order.
- Housekeeping: disable your custom media, and remove if you like, re-enable your online media and update the system, as you may still have the original release grub2 version.
Notes from a Mga8 x86-64 off-line conversion
 $ lsblk
 NAME   MAJ:MIN RM  SIZE RO TYPE MOUNTPOINT
 sda      8:0    0 74.5G  0 disk
 ├─sda1   8:1    0 23.6G  0 part /
 ├─sda2   8:2    0    1K  0 part
 ├─sda5   8:5    0    4G  0 part [SWAP]
 └─sda6   8:6    0 46.9G  0 part /home
 sda1 = 1st Primary Partition.
 sda2 = Extended Partition designator.
 sda5 = 1st Logical Partition in the extended partition.
 sda6 = 2nd Logical Partition in the extended partition.
Downgraded grub2, to match the installation iso: Mageia-8-x86_64.iso.
 [root@localhost ~]# urpmi grub2 --downgrade
 The following packages have to be removed for others to be upgraded:
 grub2-2.06-1.1.mga8.x86_64
  (in order to install grub2-2.04.0-29.mga8.x86_64)
 grub2-common-2.06-1.1.mga8.x86_64
  (in order to install grub2-common-2.04.0-29.mga8.x86_64)
 grub2-mageia-theme-2.06-1.1.mga8.noarch
  (due to unsatisfied grub2bootloader == 2.06) (y/N) y
 To satisfy dependencies, the following packages are going to be installed:
   Package                        Version      Release       Arch
 (medium "Core Release (Installer) (Mga8 local 1)")
   grub2                          2.04.0       29.mga8       x86_64
   grub2-common                   2.04.0       29.mga8       x86_64
 383KB of disk space will be freed.
 7.1MB of packages will be retrieved.
 Proceed with the installation of the 2 packages? (Y/n) y

 installing grub2-common-2.04.0-29.mga8.x86_64.rpm grub2-2.04.0-29.mga8.x86_64.rpm from /home/work/mga8_x86-64/x86_64/media/core
 Preparing...                     #############################################
     1/2: grub2                 #############################################
     2/2: grub2-common          #############################################
 removing package grub2-mageia-theme-2.06-1.1.mga8.noarch
     1/3: removing grub2-mageia-theme-2.06-1.1.mga8.noarch
                                #############################################
     2/3: removing grub2-common-2.06-1.1.mga8.x86_64
                                #############################################
     3/3: removing grub2-2.06-1.1.mga8.x86_64
                                #############################################
 Installing for i386-pc platform.
 Installation finished. No error reported.
Shut down.
Change from legacy bios to UEFI.
Boot to installer (Mageia 8 Official-x86_64), create /boot/EFI partition and complete conversion. I needed to choose the /EFI/BOOT option at bootloader install. (Asus X54C laptop)
Reboot
 $ lsblk
 NAME   MAJ:MIN RM   SIZE RO TYPE MOUNTPOINT
 sda      8:0    0  74.5G  0 disk
 ├─sda1   8:1    0  23.6G  0 part /
 ├─sda2   8:2    0     1K  0 part
 ├─sda5   8:5    0   3.8G  0 part [SWAP]
 ├─sda6   8:6    0  46.9G  0 part /home
 └─sda7   8:7    0 202.6M  0 part /boot/EFI
Total time for the conversion, from legacy shutdown, to login to UEFI system: less than 5 minutes. There is a lot of clicking the “Next” button.
