This page is also available in german
Türkçe(tr) : IsoDumper USB belleğe ISO imajı yazma
Presentation
IsoDumper is a tool for writing ISO images on an USB stick. Iso images are for example provided by Mageia.org to install the Linux distribution.
You are supposed to have first downloaded the ISO image on your system. You must select a USB stick with a size bigger that the image size.
| Warning! All your data on the stick will be erased ! |
The tool will check something before writing:
- the partition of the USB device is unmounted
- the size of the ISO should be smaller than the size of the stick
- if the size of the stick is greater than 32 Go, a warning asks to confirm that this is the good device.
Installation
Isodumper is available in Mageia since the version 3. You can install it through the Mageia Control Center, or in commandline with:
urpmi isodumper
For previous version, you can find a rpm on Mageialinux-online.org
Usage
Launch the tool from the menu Tools > System tools > IsoDumper or from the command line
isodumper
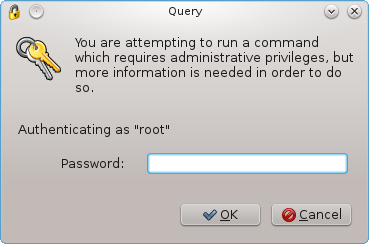
- You will be asked for the root password, as you need to be root to write an ISO image on the USB stick.
- The tool looks for an USB device. If it does not find at least one, you get a pop-up as below :

- You can still introduce your stick and click the "Refresh" button.
- At first you have to select the image to be written. A standard window will pop up. A filter is applied so that only *.img and *.iso files will be displayed.

- At second, you have to select a USB device from the rolling list.
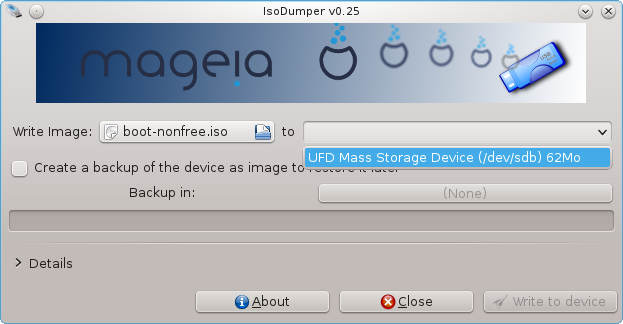
- You can also choose to have a backup of the content of the stick. Check the box and select a destination file. The name proposed is constructed from the name of the device; it will have an .img suffix. The backup file has the same size as the device. It can be restored with Isodumper in the same way as writing an iso file, but selecting the backup *.img file.
- Then the "Write to device" button will be active. After clicking it, you will be warned about the lost of all the data on the USB device. If the backup is selected, the process starts with the backup and then follows with the writing on the device.
You can display a log view to have information about the progression.

- At the end, a log file will be written in /home/<user>/.isodumper/isodumper.log which is a copy of log view.


0.40 release
A new release is available since Mageia 5.
It add a new feature to prepare a media for UEFI booting.
After choosing the destination and the image to use, you tick a checkbox to apply the format for UEFI, i.e.
- formatting the device in FAT32
- naming it "MGALIVE"
- copying the content of the image to the device.
