| Other languages Deutsch ; English ; |
Contents
- 1 Aim
- 2 Inventory
- 3 PC Preparation
- 4 Installation
- 5 Troubleshooting
- 6 I changed my mind, to go back in the previous state
- 7 The dual boot maintenance
- 8 Life with two operating systems
- 9 Delete Windows
Aim
|
The ambition of this page is to allow newcomers to discover Mageia by installing it alongside Windows, using a system called dual boot. There are no IT skills required. We will take into account PCs with one or two hard disk(s) and already equipped with Windows XP, Vista or Seven with the exception of any other OS. If you don't know anything about Linux in general, nor Mageia in particular, read this page First step with Linux and Mageia first. It will help. Honest. ;-) |
Inventory
We are going to find out your configuration.
- Windows release (XP, Vista or Seven)
- The number of hard disk(s)
- Their size, both total and available
For now, we don't need anything more, if your hardware is powerful enough for Windows, it will be the fine for Mageia. If you already know all this, you can skip to the next chapter: PC Preparation
Your Windows release
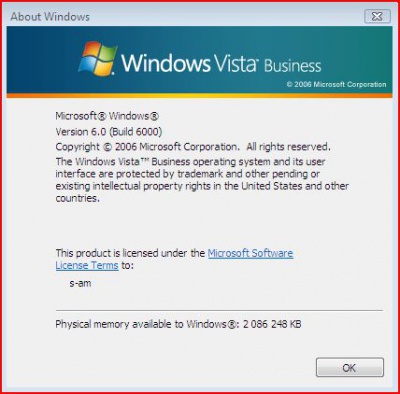
Click on the start button in your screen bottom left corner (green background rectangle or blue background circle), then click on Execute. In the pop up window, write winver and click on OK. Another window appears, with the Windows logo on the top followed by the release name.
Examples:
- Windows XP Home Edition
- Windows Vista Home Premium Edition
- Windows 7 Ultimate
Your disks and partitions
What is a partition??
A hard disk can be divided in independent parts called partitions. The advantages, especially for large disks of such a division are:
- The destruction of a partition or the appearance of faults in a partition doesn't affect the others.
- Some maintenance actions are easier to manage on smaller volumes, e.g. Formatting.
- Each partition can host a different operating system.
- Each partition can be used with a different file-system
- etc.
Most often, a Windows disk contains only one or two partitions.
Windows needs only one partition, the one where all the system files are stored, and which is called the "system partition". However, it is possible with Windows to use as many partitions as necessary on one or several disks. The other partitions don't host any system files but only data. They aren't essential but strongly recommended as it makes it possible to reformat the system partition without losing any data (in case of serious failure such as non-booting, for example).
| Note: Some part of the hard disk can be left without being partitioned, in this case, this area is inaccessible and remains unused. It is possible to partition it at any time. |
Mageia like any other Linux system can be installed in a single partition but will exploit your hardware better when installed in three partitions, usually installed by default:
- The first one of about 10GB is for the system, called
/(root directory) the equivalent of the WindowsC:\(it can be downsized to 6 GB for a simple system, but expect to need 15 GB to 20 GB for an installation with a lot of applications) - A second partition for the data, called
/home, the equivalent of the WindowsC:\Documents and settingsorC:\Userdirectories. This partition houses a directory for each user and in the user directories are sub-directories called Documents, Images, Music, Download, ... like in Windows. You can create as many directories as you want for your data. - The last partition of about 2 GB to 4 GB is for memory swap, called
/swap. In Windows, the memory swap is a file (a very large file) inC:\.
The Mageia installer takes total control of the creation of the partitions if necessary. We can also ask it to use existing partitions or to let us create them as we like.
How to know one's Windows XP partitions
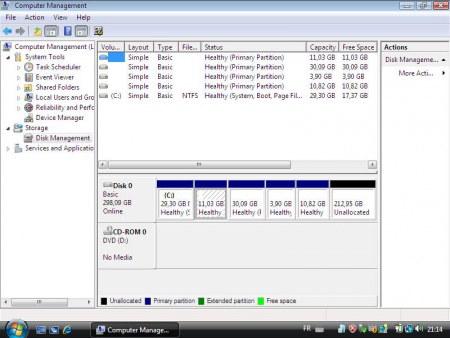
Click on Start -> Control Panel -> Administrative Tools -> Computer Management -> Storage -> Disk Management
Or, if you have access to the My Computer icon, right-click on it and chose “Manage”, then as above.
| You get a window looking like the one opposite. Partitions are detailed at the middle top and the disk(s) at the bottom. In our example, we can see that the PC has one disk, Disk 0, that houses 5 partitions and a large non formatted area (in black). The first one is called C: (system partition) and has an NTFS file-system. The other ones are Linux partitions - I can tell you because they are mine. Windows isn't very smart. It can't recognize them, no file-system is written and it tells you they are primary partitions (in blue). That is false, they are extended partitions (don't worry for now, if you don't know what that is). So, you should never trust Windows tools out of Windows itself. Keep that in mind. Linux is able to give true information about any common file-system. |
How to know one's Windows Vista / 7 partitions
Click on Start -> Control Panel.
In the top left corner, click on Classic View if not already selected, and then on Administrative Tools-> Computer Management-> Continue (to give permission) -> Storage -> Disk Management and you get the same window as above.
Or, if you have access to the Computer icon, right-click on it and chose “Manage”, then as above.
PC Preparation
| Note: 1. Some well-known PC manufacturers such as NEC, HP... sometimes refuse to honour their guarantee if any operating systems have been installed on the computer, other than those that it came with pre-installed. 2. If your system has UEFI firmware, then please make sure you read this page Installing on systems with UEFI firmware, too. It contains very important information you'll need. 3. As a precaution you should back up any valuable existing data before proceeding. |
Organising the new partitions
Before starting the installation, it is necessary to have in mind, or better, sketched on paper, any changes you wish to make to your hard disk. This is to avoid a catastrophic accidental formatting of precious data. Don't forget that the installer will soon ask where to install Mageia, with some propositions, and you will have to give a smart answer.
We will only study four simple and very common cases:
- Case 1: to use the available space (not partitioned)
- Case 2: to use free space on a Windows partition. This means that Windows doesn't need all the space of the partition and we will pinch a bit of space from it. There are two ways to do that:
- the automatic one; and
- the customized partitioning one.
- Case 3: to use an existing available partition with customized partitioning.
- Case 4: to clean and use the whole disk (if you have at least two disks).
At installation time, all the possibilities that suit your PC will be suggested by the installer.
You have only one hard disk
Case 1
You have sufficient unpartitioned space on your hard disk. This is ideal since you have nothing to do. Continue your installation!
Case 2
All the disk is partitioned, but the Windows partition is much larger than necessary and a lot of space is unused, it can be reduced. Look at the example given below:
Case 3
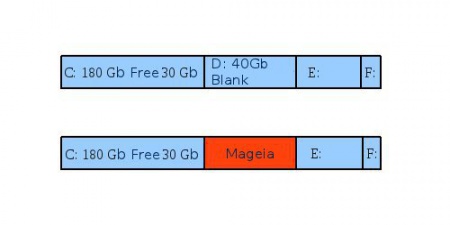
Your whole disk is partitioned. This may mean that you have a lot of partitions and possibly one of these partitions could be used to house Mageia. In the example shown below, the partition D:\ will be used to house Mageia.
The second strip shows the disk after Mageia installation. We can immediately see that the E:\ and F:\ partitions will probably (but not certainly) be renamed D:\ and E:\ at the next reboot. If you want, you can easily put back the former letters. Go to the disk manager, as seen in the How to know one's Windows XP partitions or How to know one's Windows Vista / 7 partitions chapter and right-click the partition to select the original disk letter.
It is not necessary to defragment a partition prior to removing it. This representation of the Mageia partitioning has been simplified, as another partition (called a swap partition), may also be required, but this partition will be small in comparison. |
You have two hard disks (case 4)
You have one more possibility at your disposal: erasing and using the whole disk. Nothing to do again, if your disk contains data, it will be lost, so back up everything you want to keep!
The procedure is the same with two disks, except that you have to choose the right disk! To set them apart, write down their references (brand and model) and their size. These features are shown by the installer when it will ask you to make your choice.
| Here be dragons! Be very sure that you *really* don't want to keep anything on the disk that is about to be erased. |
Partition naming
A major difference between Windows and Linux is that in Windows, disk partitions tend to be mounted as "Drives", so partitions would be called "Drive C:\", or "Drive K:\". This is not always the case and in more modern versions of Windows it is actually perfectly possible to mount partitions as sub-directories in exactly the same way as in Linux. However, even in this case the root of the file system is still known as "Drive C:\" and a partition (let's call this one "system"), mounted under C:\Windows" in this case, would still be shown as C:\Windows\system.
Linux follows a Unix convention of not naming partitions after letters, but collecting them together in a tree, which grows out of the "root" partition, which is shown by the symbol /. This is not so different to modern Windows file system layouts, but the lack of a drive letter can be a little disturbing at the beginning.
Disks are named "hd" (older IDE Hard Drive) or "sd" (a SCSI, USB or SATA Drive), the first one hda (sda), then hdb (sdb) and so on. Partitions on the first disk are named hda1 (sda1), then hda2 (sda2) and so on. These names are not used in paths, for example /usr/bin
For historical and technical reasons applicable to both Windows and Mageia, a disk can't hold more than four partitions. They are called primary partitions. A workaround exists to have more partitions by creating an extended partition. You can have, at most, three primary partitions and only one extended partition. This last one can be divided in logical partitions, kind-of sub-partitions. By default, the Mageia installer creates an extended partition which holds three logical partitions. It is a convention that primary partitions are called sda1 (hda1), sda2 (hda2), ... and the first logical partition is called sda5 (hda5), even if you have only one primary partition. It is a good way to identify them.
Example :
The first diagram shows an example of a disk with two Windows primary partitions seen by Windows.
On the second diagram, the same disk seen by Mageia before being installed.
And on the third diagram, after the installation.
Lastly, on the fourth diagram, the same thing seen by Windows. Note that in this simplified representation, Windows does not recognise the competition. This isn't strictly true. Windows would actually mark the Mageia partitions as "Unknown Partition". It would recognise that the partitions exist and will warn you that you may be making a big mistake if you try to delete any of them, but it cannot read their contents without the use of third-party drivers. [I'll put some updated screenshots in here soon simonnzg 23:30, 9 March 2012 (UTC).]
It is easy to mount a Windows partition in Mageia and this is a common way of sharing a user's files between operating systems in a dual-boot environment such as this.
| Note: Take your time to understand partitioning well and how it works. It is the only delicate point of the installation where decisions, once made, are difficult to undo. |
Defragmentation of the affected disks
Windows has a nasty habit of fragmenting files, which means the files are chopped into small pieces and scattered all over the drive. To make room for Mageia, you need to move all these file pieces to the start end of the drive before you chop a piece off the end of it or you will lose data. In order to move all these file fragments, you should defragment the partition you wish to shrink.
A tool is shipped with Windows which you can use to do this:
- With XP :
Start > All programs > Accessories > System tools > Disk Defragmentation
- With Vista :
“Start button” > Programs > Accessories > System tools > Disk Defragmentation
- With 7 :
“Start button” > All Programs > Accessories > System tools > Disk Defragmentation
Start the defragmentation tool and follow the directions. Keep in mind that this may take hours depending on the disk size and the elapsed time since the last defragmentation. Force it, even if Windows says it is not necessary. It is recommended you do not use the PC during the operation.
Things you will need
You must have at hand:
- The Mageia DVD. (To download and burn the Mageia ISO file see Installation Media)
- The Windows recovery CD or access to the recovery partition, if you have one. More and more often, you have to burn a recovery DVD set yourself and a tool is usually supplied by your PC vendor for this purpose. You will find it if you are looking for it in the menu, try something like
“Start button” > All programs > brand-name > Create the recovery CD. The files used to create the recovery DVD are usually located in the recovery partition. Remember our advice not to delete it to make space for Mageia? This is where you may need it!
- The backup of your important data
- Something to write and your own notes about your partitioning choices after reading of this section.
Booting the PC from CD or DVD
The easy way: f12
As your PC starts to boot up, try hitting the f12 key a few times. You should be doing this at the same time that you would normally press the special key sequence to access your BIOS (see below). With luck, you should see a boot device menu pop up. This makes it easy to boot from the CD/DVD by simply selecting it from the list. You can then ignore the rest of this section!
If f12 doesn't work for you, check carefully that your PC BIOS doesn't mention any other key combination to bring up the boot menu. I have an EeePC that needs the "Esc" key to be pressed to get to the boot menu.
If all else fails, go on to the next section.
Checking the boot sequence
OK, so the f12 key didn't work for you? Never mind. Let's try a few other things instead.
Check to see if your PC has been set up to boot from the CD/DVD drive without modification. The easiest way to do this is to insert a bootable CD/DVD, restart the machine and see if it boots.
Some CD/DVDs you could try:
- Windows installation CD (XP) or DVD (Vista, 7)
- CD Recovery Vista
- Mageia DVD, the one with the ISO you downloaded and burned
Put the CD/DVD in the drive and restart your PC. It must either start directly on the CD/DVD or ask you if you want to boot from the CD/DVD by striking a key or, if you do nothing, from the hard disk. Strike a key and you will arrive on a welcome page or a menu that is not your usual Windows desktop or login prompt. For example, this is what you get if you boot from the Windows Vista Recovery CD
.
If the test is good, just take out the CD/DVD and reboot back into Windows.
If the machine didn't boot from the CD/DVD and Windows started as usual, then see if you have a second CD/DVD drive and try the process with that one. If the same thing happens or if you have only one CD/DVD drive, you will have to go into the BIOS Setup and modify the boot sequence.
Boot sequence setting
The BIOS is the place where you can modify your boot settings and Setup is its text mode interface. You can only access to the BIOS Setup at the very beginning of the boot, the key to strike is quickly indicated at the bottom, or the top of the screen with your BIOS manufacturer.
| Here be dragons! Be very careful when modifying the BIOS. Don't change anything other than the boot sequence. If you aren't sure about what you have done, you can exit without change, and then, try again. Always note any changes you have made. If you get into a real muddle, most BIOS have an option to load the "default" settings. This will, at least, make your machine bootable again. |
.
Common CMOS Access Keys
The most common keys to try are: "Del", "Esc", "F2,", "F1" "Ctrl-Esc" or "Ctrl-Alt-Esc". Watch your machine booting up - look for a very short instruction at either the top or bottom of the screen that may say "Press (some key or another) to enter Setup".
Another good thing to try is to Google "BIOS Setup Key (computer name)".
Websites such as http://www.cpucare.net/Hardware/BIOS/Access_BIOS.htm may also help.
Brand new hardware
If you have a new computer there is a chance that it is shipped with an EFI-capable motherboard and GPT disk(s). That means:
- You can have disks larger than 2TB
- There is no longer a four-partition limit (the maximum number for GPT is 128 partitions).
- The boot sequence doesn't matter any more since if a DVD is detected in the drive, the PC will ask you if you want to boot from the DVD or on the hard disk (true with recent PC EFI or not).
So it is the best in the best world! Well that isn't sure because Mageia installer can't create GPT partitions. See this page Installation with GPT Partition Table if that concerns you. Note that GPT disks can have less than 2TB.
Our new UEFI how-to contains the most recent information about how several Mageia developers and other contributors installed Mageia on a UEFI/GPT system.
Installation
Overview (case 1)
With your notes in hand, you are now ready to boot your PC with the Mageia1 DVD in the drive. Write down all the choices you make, if the system sends comments or error messages, write them also, that will be helpful to avoid the same errors in case of a second try or to ask help on the forum. We will start by an overview of the whole installation, which should be sufficient most of the time, and then have some more details about some steps.
The first screen is a menu asking you what do you want to do?
- Boot from hard disk -> You start as usual
- Install Mageia 1 -> Yes !!
- Rescue system -> Don't forget this possibility, it might be useful and we will have a presentation in the troubleshooting section.
- Memory test -> if you have a doubt
- Hardware detection
|
The next screen asks you which language you want Mageia to use. You can find the same language in different continents, this doesn't mean it is the same installation because, apart from the language, things may vary from one continent to another, like the keyboard layout for example. Check your mouse is working and click your continent and language. If not, you can use the arrow keys to choose, TAB to change the focus and ENTER to validate. |
The Help button is for an obvious use, but it isn't available with Mageia1.
|
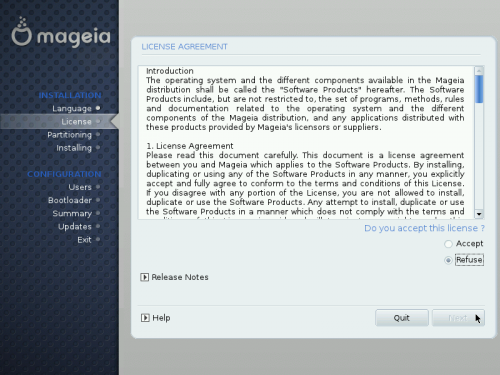
Click on the Next button to continue. The second screen is the license agreement, you must accept to be able to continue. |
|
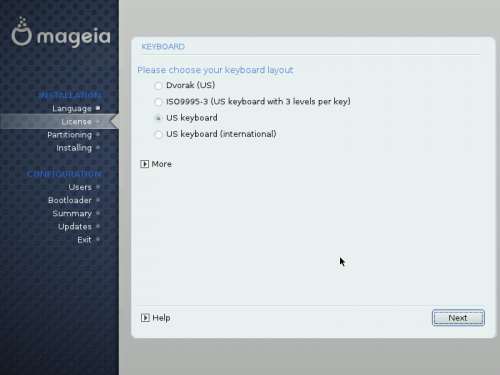
Choose your keyboard layout. The installer suggests the ones which match with your language, but you can choose another one by clicking on More. |
|
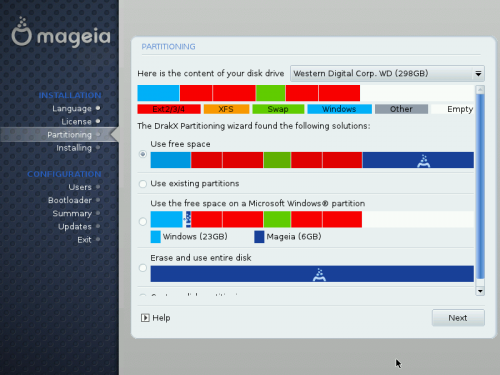
Now we have the very important partitioning step. On the top, you have the designation of your first disk, click on it to select the second one, if it exists! Just below are the disk partitions: red for Linux, blue for windows, green for the memory swap, grey for the others and white for nothing (no formatting). Be careful with the white, it isn't very visible (confusing with the background). |
So, in the given example, we have firstly a Windows partition, then two Linux partitions, a swap, two Linux partitions again and a lot of free space. At least, you can study all the installation possibilities suggested by the installer, the place for Mageia is shown in dark blue with the Mageia logo (The famous magic cauldron). There are 5 possibilities, you can't see the last one on the screenshot because that would need scrolling the vertical bar, it is "Customized partitions". This option is always available. For the first 4 cases, the installer will automatically take the maximum possible place and create alone three partitions the root /, the /swap and /home with a generic sizing. These cases are:
- use free space, it is our case 1.
- use existing partitions, it means, use one partition for /, another one for /swap and a third one for /home. This solution is convenient when you have an already Linux OS installed, so you can re-use its partitions. That is different from our case 3 which considers using only one partition for all Mageia.
- use the free space on a Microsoft Windows partition, our case 2. It is impossible here because the installer says it would allocate only 6 GB to Mageia, it is too small.
- erase and use the entire disk, our case 4.
- customized partitions. This solution could be used choice to realize our case 3 or to do "manually" each other of the 4 previous cases". It allows you to allocate the size and the place you want to each Mageia partition. This solution is the most universal but also the one that needs some skills.
If you need to preserve all the data on the disk, you can only choose "Use Free space", check this solution and then click on the Next button.
| Note: 1 The installer will take all the available space, to take a part of it only, you should choose Customized partitions |
| Note: 2 Once the choice is made, you can't go back! |
All the other partitioning solutions are detailed in the next section All partitioning solutions
|
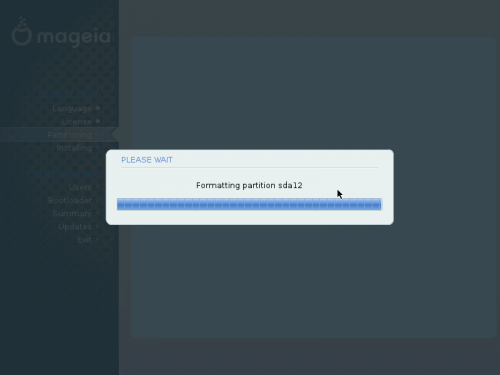
Once the partitioning choice is made, the installer automatically create and format the partitions, nothing to do. |
|
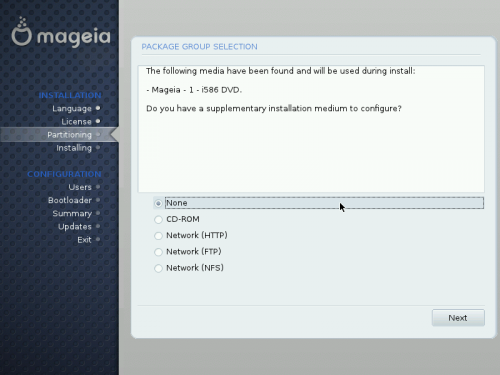
After formatting is done, the installer asks you if you have other media to configure. You don't know what this is about, so answer None, it is without consequence. |
|
As said |
|
Another important point. Unlike Windows, Mageia offers several desktop environments. KDE is the one which looks a little like Windows, Gnome is a MacOS like, and Custom allows you to have other possibilities. For example to choose a light desktop environments (LXDE, ...) or to customize KDE/Gnome. You don't know, since this page is for newcomers from Windows, so choose KDE. |
|
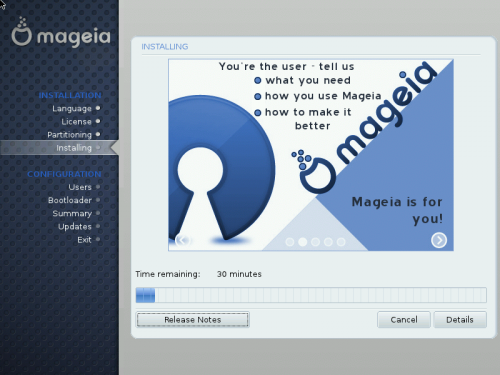
Installation in progress, you can read the Release Notes. Don't go far, it doesn't take a long time, with a recent PC, it is about 15 min ! |
|
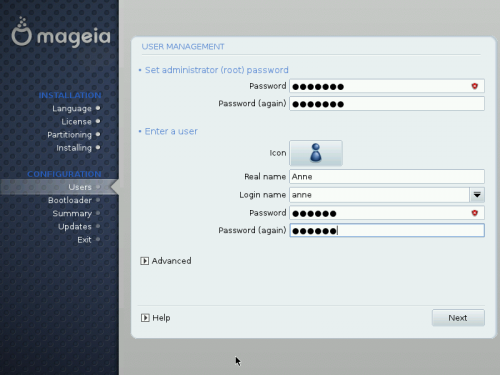
The installer is now ready to create the administrator and users accounts. The Administrator also called Root or Superuser, has all the management rights on the Mageia OS. It is generally the one who installs the system. The users have only rights on their own files and possibly extra ones given by the administrator. For security reasons (don't forget your PC is connected to Internet) the administrator must also have a user account and use it most of the time. Don't worry about all that, the system works fine with default setup and just remember to connect with user login/password and only give your root password after a Mageia request. |
|
The boot loader is a small program that acts between the BIOS and the OS. Mageia chose GRUB, from the next reboot it will show up after the computer powers on and ask you if you want start to Windows or Mageia. The installer ask you here where to write this program, if you don't know, select the First sector (MBR) of the sda disk. |
Lebarhon : A screenshot about the boot loader is lacking. Seems it doesn't exist any more |
|
Here the installer shows you the hardware detection it made. If a line is red, that means it didn't find your hardware settings, in this case, click on the Configure button and select them manually. You can also change your mind about choices you made, for example select a qwerty keyboard instead of an azerty one. |
|
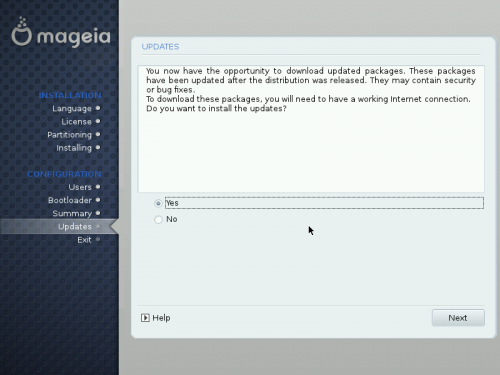
Your DVD contains packages that have been tested and approved weeks or months ago. Since this date, updates arose and they are on the Mageia servers. You can either download the updates now or later, as you want. |
|
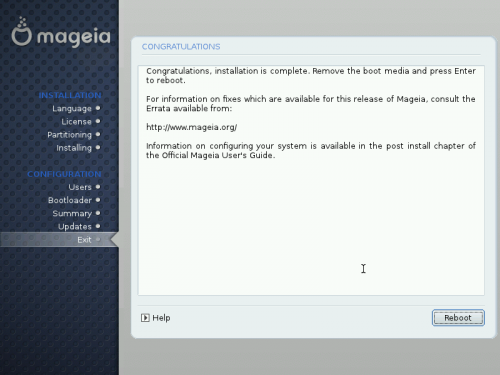
It is over! |
All partitioning solutions
From now we will play a little with these two disks.
First one, Sda for Mageia and disk 0 for Windows: ExcelStore Techno of 38 Gb
Second one, Sdb for Mageia and disk 1 for Windows: ST 320414A of 18 Gb
They have both two partitions :
|
They can be represented like this, Sda1 (C:) is Windows. |
Case 2: Use the free space on a Microsoft Windows partition
Auto mode
It is the same beginning than in the Overview, then the choices change at the partition step.
|
Here is the first disk. Except the Custom disk partitioning, always there, you have 2 solutions, use free space in the Windows partition (with 6 Go for Mageia) or use the entire disk. |

|
|
On the second disk, only one choice, Use existing partitions. This solution is suggested when you have a Linux partition detected. It is an invitation to re-use them. |

|
|
We come back on the first disk and click on Use the free space on a Microsoft Windows partition. A warning remind you the risks |
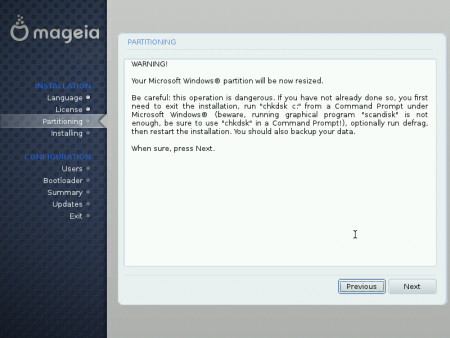
|
|
A second one |

|
And then, the following is like in the overview. When the installation is done, you can enter the Mageia Control Center and see what your disk looks like.
|
You can see in red the partitions |

|
Customized mode
The Auto mode is easy, but if you want to specify the size of the partitions for example, you have to choose the Custom disk partitioning. When you arrive in the partitioning screen (first screenshot in the Auto mode), check this solution.
|
The installer shows you a new screen with a menu on the right. You haven't the disks descriptions any more but only the tabs Sda and Sdb, so be sure the right choice is selected. Click on the Windows partition and then on Resize in the menu at your right hand. |

|
|
Mageia cares for your data. |

|
|
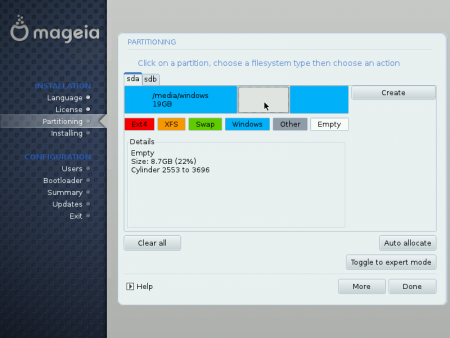
Just move the cursor with the mouse to specify the new size for the Windows partition. On the left, the installer gives you the max and min possible. Don't forget to leave some free place for Windows, 1Gb at least. On the other hand, Mageia needs at least 5Gb for a demo, from 15Gb to ... no limit for a daily use. (30 Gb is comfortable for office and some photos) |

|
|
You can see the space freed by Windows. Click on it and then on Create. |
|
|
Move the cursor to specify the size for the |

|
|
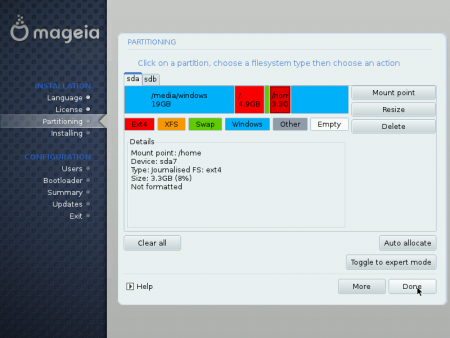
Here is the result. You have a new Linux partition. We will redo this twice for |

|
|
Swap size generally equals RAM size. Check the selected file system is Linux swap and click on OK. Repeat the operations for |

|
|
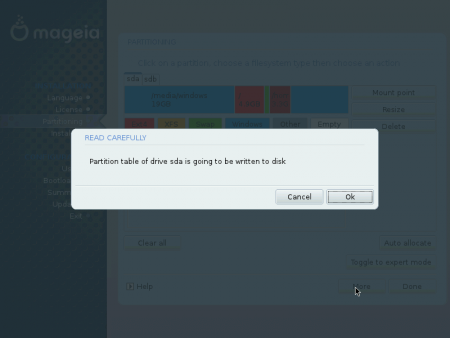
At last, your disk looks like that. If you aren't happy, it is still time to select a partition, click on Delete, and then resizing and re-create. When done, click on ...Done |
|
|
The partition table is written and the installer take over its job. |
|
Case 3: customized partitions
Use the free space on a Microsoft Windows partition is a good way to install Mageia when you have only one partition on the whole disk. However, there are two problems, firstly there always remains a risk for the data and secondly, the available space is not necessarily enough.
Using an available existing partition, our third case, has the advantage of not affecting data out of the chosen partition, it is totally harmless. We will delete a partition and create into it the three partitions /, /swap, /home. Don't mix up with Use existing partitions, that means re-using Linux partitions without changing their size, sometimes without even formatting them.
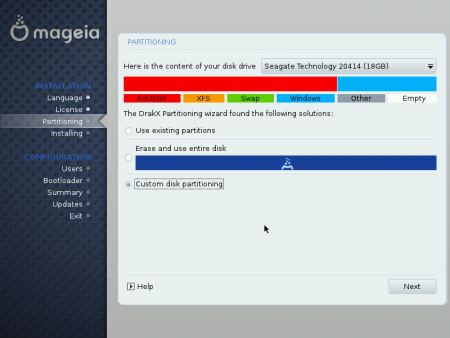
We will install Mageia in the second partition of the second disk, the installer doesn't suggest it.
|
We are again at this point, after checking it's the right disk on the top of the window, we chose Custom disk partitioning and then click on Next. |
|
|
The menu appears on your right hand, check again the right disk is selected by clicking on the tab sdb, click on the second partition (in blue) and then on Delete (I hope you guessed it) |
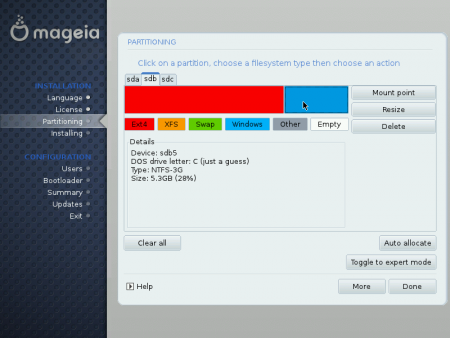
|
|
The old partition is freed (in white) and we are going to follow the same reasoning than above, three times we will:
An alternative is to click on auto allocate and the installer will create the three partitions on his own. |
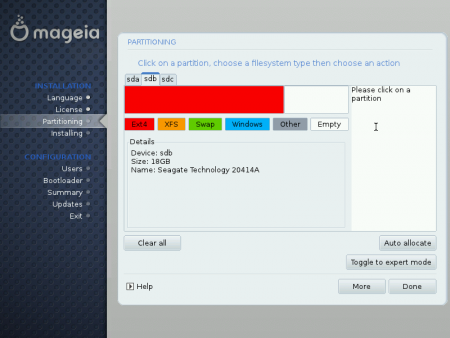
|
|
Still another one. If you are not happy, it is always time to delete one or more newly created partitions and redo the job. |
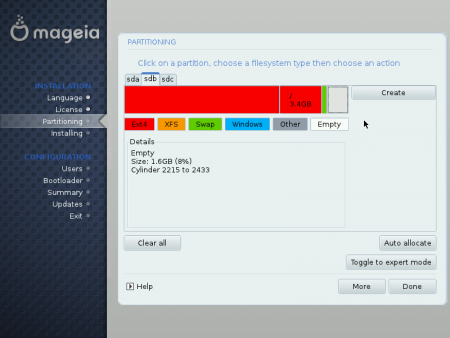
|
|
It's done. Now, if you click on Done, the table partitions will be update and the partitions formatted. |

|
Case 4: erase and use of the entire disk
If you added a new disk for Mageia, it's a good solution to install it, absolutely harmless for your data in the other disk. In the first Partitioning screen, select the right disk, click on Erase and use entire disk, and follow the same reasoning than is the case 3 with the only difference that the partition is the entire disk.
Desktop selection
Some explanations about this step. In the overview, we can see a screen with three buttons, KDE, Gnome and Custom. Mageia offers you to chose your desktop environment. The two first are good and easy choices and you can configure and customize them at any time during their use.
If for any reason, you don't want them, and you know what you want instead, you can click on Custom. The main reasons could be the compulsory use of a light desktop environment for an old PC or the lack of place.
|
This screen welcome you as if you chose KDE. If you want a light desktop, uncheck KDE and check LXDE. If you need to save place, uncheck some useless applications. Always keep an eye on the last line : Total size X / Y MB, where X is the total place you need to install the checked applications and Y is the place you have. If X is over than Y ... |

|
|
... You have this error message. You have two solutions, either to reduce the number of your choices or remake the partitioning with a larger |
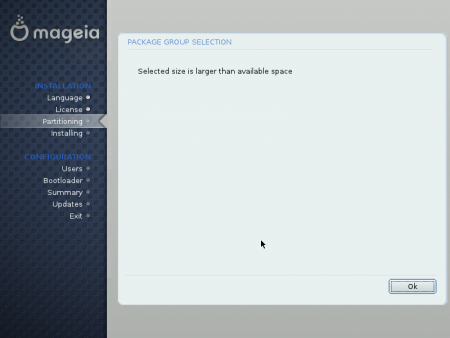
|
Summary
This screen allows you to check if everything is well detected and configured and to modify the configuration if necessary. Devices with problems appear in red font. Don't forget scrolling to see everything. One of the most important good configuration is the one of the graphic card if you don't want to have a black screen.
|
To change the graphic card configuration for example, click on the button Configure. The installer, then gives you the tools needed for a new configuration. Each line is a drop down list where you can chose the settings or the driver you want. |

|
|
If you click on "ATI Radeon X1950 and ..." for example, you will obtain the list of all the available drivers with the recommended one already selected. It is not necessary to have the best one from the installation, just have a working one. Later on, it will be possible to download and install the top driver with the Mageia Control Center. |

|
Troubleshooting
The PC doesn't reboot
What an anxiety! The PC doesn't boot any more, it was working so fine before and nobody told me to backup my data! This situation is rare but may happen. To reassure you, think your data aren't in trouble, it is only the way to reach them that is broken.
Follow the troubleshooting in the order below and check after each step if you can boot:
- 1 Did you take off all the CD/DVD, USB sticks and floppy from the drives?
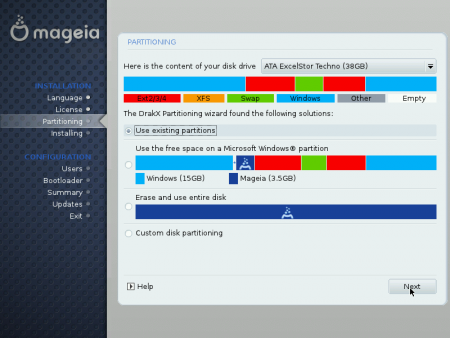
- 2 May be a partition table writing problem, to fix that, boot again from the Mageia DVD, chose Installation and not Update and once arrived in the partitioning step like below:
|
Check the showed disk is the right one and click on Use existing partitions, and click on Next. |
|
|
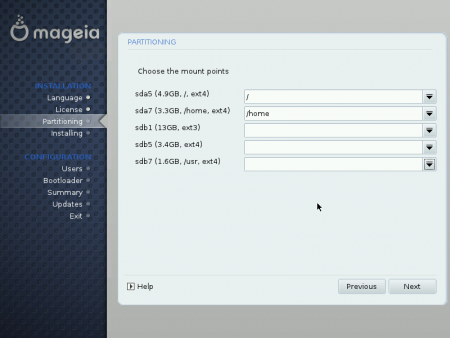
Check the selected partitions for |
|
|
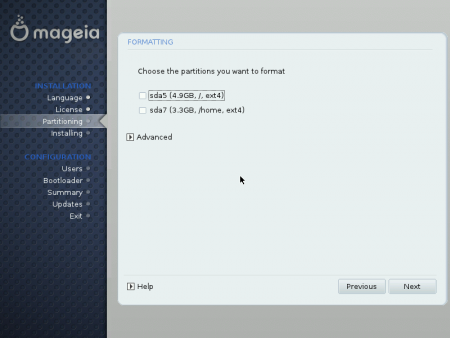
It is useless to reformat, then the boot loader will be rewritten. Finish the installation like at the first time. |
|
- 3 Reboot again from the Mageia DVD and chose Rescue System and then Re-install boot loader.
The system says it found a boot loader named Grub, do you want re-write it? Press on the key Enter to accept, it is finished.
- 4 If that isn't enough, too bad for Mageia (you will try later after some help), we will set out to give you Windows back. Reboot from the DVD Mageia like in the point 3 above, chose Rescue System and then Restore Windows boot loader. Windows will find again its own boot loader.
If you still have problems to boot Windows, go on according the version you have. It seems your Windows boot loader is damaged, something to do with the Linux installation? we will never know, but we will never let you down.
| Note: In the following procedures, if you have a branded PC, each time a Windows disk or a Windows recovery disk is mentioned, give clear preference to the disk shipped with the PC. It is possible you have to burn it. See your documentation. If you haven't such a disk, use a standard one |
.
You have Windows XP
If the screen remains black, without any message
Launch the recovery console.
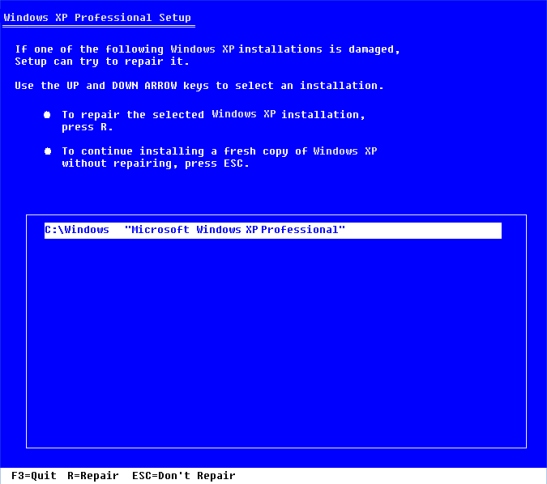
For that reboot on your Windows CD, it starts with a blue screen and a scrolling text in the bottom. It can last several minutes and then you arrive to a menu which offers, amongst others, to press R to repair Windows. Do it.
Then, the system ask you which Windows installation you want to open a session from? A list is shown if you have several systems, most often, you will only have:
1: C:\Windows
Press 1 and valid. Be careful, the numeric keypad is disabled, think to activate it.
The system ask you your administrator password, enter it (you still have your notes...). Most often, it doesn't exist, just hit Enter. The prompt appears and you can enter commands. Write:
C:\> Windows>fixmbr
and Enter, type Y for yes
C:\> Windows>fixboot C:
if C: is your partition system and Enter, type Y for yes and Enter, at last
C:\> Windows > exit
and Enter.
Take out the CD and reboot the PC.
You have the message: NTLDR is Missing Press any key to restart
NTLDR (NT LoaDeR) is the Windows boot loader (like Grub is the Linux one)
Launch the recovery console (see above), then supposing your CD/DVD drive is named D:, type
C:\> Windows >copy D:\i386\ntdetect.com C:\
and Enter, then
C:\> Windows >copy D:\i386\ntldr C:\
and Enter, then exit.
take out the CD and reboot the PC.
You have a message reading a file is missing or damaged
For example "Windows can't start because the following file is missing or damaged C:\Windows\System\vga850.fon"
Launch the recovery console (see above), then supposing your CD/DVD drive is named D:, type
C:\> Windows >expand D:\i386\vga850.fo_ C:\Windows\System\
Then Enter and exit.
Expand is a compression tool, your XP CD is compressed. vga850.fo_ is the compressed name for the file vga850.fon. All compressed files end by _.
The above methods didn't fixed the problem
Your problem has nothing to do with Mageia but as already said, we never let you down.
You have to re-install Windows "over" itself. To do that, reboot on your Windows CD like to go on the recovery console. At the menu, instead of typing R, choose to continue the installation and type on F8 to accept the license. Windows detects your system and suggest you to repair it.
This last method is effective but long, especially if your CD is old and doesn't contain the last updates SP1 and SP2, you have to re-install them alike. You won't lose any data nor applications nor settings.
| Note: At the first reboot, Windows will ask you to renew the product activation. That can be done by Internet or by phone. You don't need the product key (5 groups of 5 characters) |
You have Windows Vista or 7
If the screen remains black, without any message
Launch the recovery tools. To do that:
- If you have the Vista Installation DVD, put it into the driver and reboot, and instead of Installation, click on System Recovery Option (in the bottom), and then select the Vista partition to repair.
- If you have the CD Recovery Vista, put it into the driver and reboot.
In both cases, after language, time and keyboard selection, you arrive here:
Click on Startup repair.
You have an error message about boot problems
We will re-write the MBR (Master Boot Record). You can also try this to resolve problems concerning the black screen.
| Note: Re-write the MBR will replace a damaged MBR by a new standard one, only Vista will be able to start-up, you will lose access to the other operating systems even from Microsoft. |
.
Proceed like above to open the System Recovery Options, then click on Command Prompt. After the prompt type:
C:
and Enter to go on the C:\ unit, then enter the following commands:
C:\> bootrec.exe /fixmbr
then press Enter
C:\> bootrec.exe /fixboot
then press Enter again
Type Exit to quit the console and reboot the computer.
You have to fix the MBR
Once again open the System Recovery Options, then click on Command Prompt. After the prompt, if your CD/DVD drive is D: type:
d:
to go on the drive D: if it isn't already the case, then change the working directory to enter in \boot:
d:\>CD \boot
then press Enter. Type the following text, providing your Windows Vista is on C:
d:\boot>bootsect /nt60 C: /mbr
then press Enter and reboot.
The above methods didn't fixed the problem
The Vista re-installation "over" the old one isn't possible from the installation DVD. It is only possible from a Vista session. Instead, try to use Restore System in the System Recovery Options.
At last, if the complete re-installation is inevitable, don't modify the Vista partition and don't format it, you will find back all your personal data in the directory Windows.old.
| Note: At the first reboot, Windows will ask you to renew the product activation. That can be done by Internet or by phone. You don't need the product key (5 groups of 5 characters) |
The computer boots directly on Windows
Use the methods given in The PC doesn't reboot points 1, 2 and 3.
The computer boots directly on Mageia
Since Mageia is working let's use it!
Click on Configure your computer ![]() in the task bar in the bottom left, enter the Root password and then
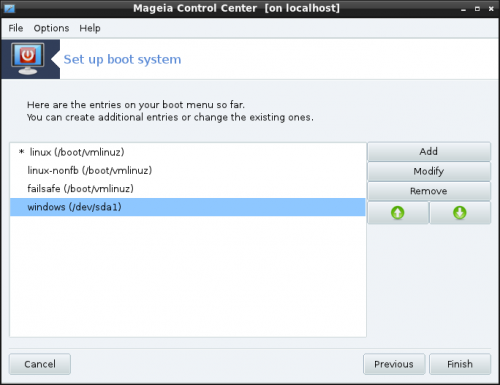
in the task bar in the bottom left, enter the Root password and then Boot -> Set up boot system, you arrive here:
Since Mageia started, what you have in this screen should be good, so click on Next.
In this new screen that appears, the line about Windows, highlighted, should be missing. To add it, Click on Add. If the line Windows exists but is may be damaged, click on Modify.
If you chose Add, click then Other OS, OK,
give the name you want in the Label field, and then, in both cases (Add or Modify) the Windows partition (get your notes...). It is generally sda1 since Windows was the first to be installed, but sometimes sda1 is the Recovery partition and Windows is on sda2.
Reboot your computer.
If this solution doesn't work, you can try the Recovery system described in the section The PC doesn't reboot
We are going out the dual boot, however, here is some information.
Windows begins to start but fails soon after
It's hard to believe, but it is pure coincidence. Since Grub, the boot loader, detected and loaded correctly Windows, if this one crashes, it has nothing to do with the Mageia installation because nothing has been written in the Windows partition.
May be you did a wrong thing. If after you chose Windows in the boot menu (Grub), an error message appears saying you must restore the windows partition boot sector, launch the recovery console and type (providing C: is the Windows partition):
C:\Windows>fixboot C:
then Enter and Y for yes, then Exit.
That doesn't affect the MBR, you will preserve the boot menu to choose between Windows and Mageia
Mageia start up fails
Many causes can explain that, it is most often a hardware detection problem, or a bad driver choice. Three drivers are essentials:
- the keyboard (very rare)
- the mouse (rare)
- the graphic card (the other cases)
To change the drivers in text mode
To fix that, we will have to use a console (text mode), because in this mode, the mouse and graphic drivers aren't used, so we can change them. It's quicker than in graphic mode, but if you prefer that one, skip to the next section.
When it seems nothing happens any more (no new text, few disk activity...) or if you arrive at the connection screen and you can't write anything, press simultaneously on the key Alt CTRL F2 (F2 is only one key). You get the console. After
Localhost Login :
Give an user login and the matching password. Then, if the user is called sam, you have something looking like this.
[sam@Localhost~]$
Type su - (don't forget the -); Enter; and the root password, you have now the root rights, be careful. Type (no capital letters):
[root@Localhost~]# drakconf
A menu appears. Use the TAB key to change the focus (try it) followed by Enter to validate; in the list, use the arrow keys to choose the device, for example Displays, Enter and TAB to go on OK and Enter.
A new menu appears. Use the same keys to select and validate Graphic card (note the Test item).
In the list, select a driver, or at least a generic driver like Xorg|Vesa, the important is that your PC boot, afterwards, it is always possible to change again for the good one, present by Mageia or elsewhere. Once the selection is made, you arrive back in the menu where a test is proposed. You can do it.
You can follow the same process for the mouse, and reboot.
To change the drivers in graphic mode
In this mode, you have to boot again with the Mageia DVD in the drive. Act like in the installation until the summary screen appears and follow this section Summary .
If your problem is still there, write down all your hardware characteristics, all your tries and the results you got (error messages, behaviour), press the ESC key during the boot and write down the last lines before crash, come and see us on the Mageia forum
I changed my mind, to go back in the previous state
Mageia didn't convince you or you can't install it correctly, in short you want get rid of it. That is your right and Mageia give you also the possibility to be uninstalled. That is not true for every operating system.
After your data backup, reboot on your Mageia DVD and select Rescue system, then, Restore Windows boot loader. At the next boot, you will only have Windows without any menu to choose your operating system.
To get back the place used by Mageia partitions, click on Start -> Control Panel -> Administrative Tools -> Computer Management -> Storage -> Disk Management to access to the partition management see here. You will recognize the Mageia partition because they are labeled Unknown, and also by there size and place in the disk. Right click on one of these partitions and select Delete. The space is become free.
- If you have XP, you can create a new partition and format it (FAT32 or NTFS). It will get a partition letter.
- If you have Vista or 7, you have one more possibility, you can extend the existing partition that is at the left hand of the free space.
It also exists in the shops or in the Internet, shareware, free or not, that allows more possibilities for XP, Vista or 7 (Gparted for example). That is at your own risk.
The dual boot maintenance
This section deals with the dual boot aspects only. You will find in this Wiki, all the other ones (sources configuration, updates ...).
- Windows settings (firewall, anti-virus,...) have nothing to do with the Mageia working
- The reverse is true also
- The devices settings such as Internet box, Wifi, ..., affects the two systems
- BIOS settings affects the two systems
- Windows service pack installation doesn't affect the dual boot
- A new Windows release installation destroys the dual boot. See The computer boots directly on Windows to fix that
- A new Mageia release installation doesn't destroy the dual boot.
- An extra Windows installation, for example 7 after XP, will give a dual boot XP and 7. See The computer boots directly on Windows to fix that and set a triple boot.
Life with two operating systems
Keep in mind that Mageia can read/write Microsoft partitions (NTFS), but Windows can't read Mageia's. About your data, generally, Microsoft products (Word, Excel, ...) can't read the Free world documents, but Free applications (Open Office.org, Gimp, VLC, ...) can read Microsoft documents. We could be tempted to deduce from that that the best is to use Free applications and save the documents on a Windows partition, for example in Documents and Settings\user\(my) documents. It is not so simple. Linux and Windows haven't the same rights management for example. Linux authorizes many possibilities and a large flexibility in rights management (hence its legendary security), provided that the data are on a Linux partition.
If you want to change the default system to boot first, click on ![]() , give your password and then
, give your password and then Boot -> Set up boot system:
Here you can change the delay before the default boot starts, click on Next:
Click on the system you want to boot first, then on Modify and check the box Default and OK.
Which pieces of advice to give ? Here are some of them that only involve the writer.
- Stay a few weeks with Windows booting first, the time to check everything is OK, change some settings, to become confident with Mageia and think about future organization. During this time, leave your documents with Windows, make some copies in
/home/user/Documentsto discover Mageia and the desktop environment. - You will have to oblige yourself to choose Mageia because it will appear less useful, less productive and less beautiful. But think that when you have used Mageia as much as Windows, you will feel the same about Windows. It's a matter of habit.
- When you are ready, make the change quickly and totally, that means:
- Boot by default on Mageia
- Copy all your documents in Mageia
/home/user/Documentsexcept the few ones that aren't exploitable under Mageia (Corel Draw, Access, ...). - Works with Free applications only, frequent application changes for a same document often leads to stability problems (compatibility is 95% only and even 0% for the macros).
- Stay a few months like that, going back under Windows for major necessity only
- At this point, you can assess the situation and make your choice between one system only, the other one only or a bit of both. In this last case, it's better to sort the files which stay and are modified under Windows and the files which stay and are modified under Mageia.
Delete Windows
To what purpose ? The only interest could be to save some place on the disk, then in this case:
To enter the Mageia Control Center (MCC), click on ![]() , enter the password, then
, enter the password, then Boot -> Set up boot system -> Next, click on the line to delete about Windows (the most often
windows (/dev/sda1)) and then on Remove and on Finish. You won't have Windows at the boot menu any more.
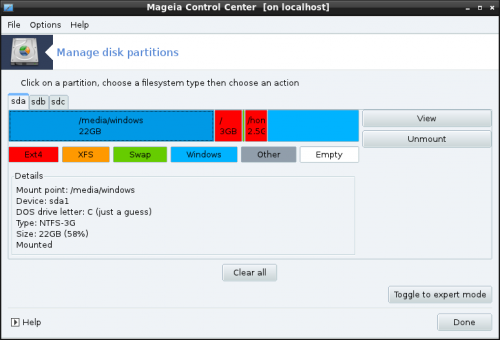
To recover the place, go in the MCC Local disks -> Manage disk partitions, and accept the warning:
Select the right disk tab (most often sda), click on the Windows partition to delete, click on Unmount and Delete. From now, you have choice between:
- Enlarge a partition which is on the left (it won't be often the case)
- Create one or more partitions in the empty space and format them with ext4 file-system type. You still have to mount these partitions and give a mounting point before they become available for what you want. Example for a mounting point:
/mnt/my directory. - If you want enlarge a partition placed on the right of the delete one, you must use a dedicated tool, for example Gparted.
