| Other languages Deutsch ; English ; Français ; |
Please remove this {{Draft}}template, when you're sure the page is complete and correct.
|
Presentation
|
This page is written with absolute beginners in mind to help them to find the tools they need when using their desktop for the first time. It may also help to choose which desktop environment to use.
More information in the MATE official website |
Where are the configuration tools?
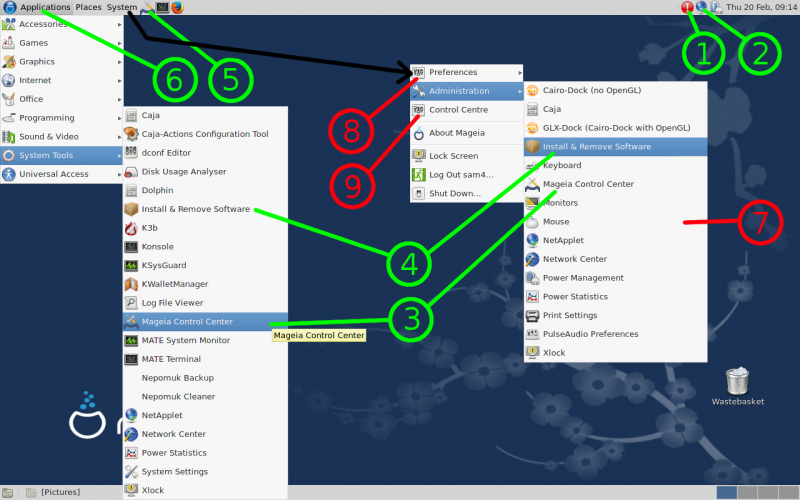
After the first reboot following the installation, your desktop looks like the screenshot below. To display the menu, click on the Mageia icon ![]() at the top left (marker 6). The green marks are for Mageia tools and the red ones for
at the top left (marker 6). The green marks are for Mageia tools and the red ones for MATE tools.
- 1: Mageia mgaapplet, it is only visible when there is software to download. The red colour means updates are available for your Mageia release, for security reasons we advise you to accept them, to do so, click on the red icon and give your user password. The blue colour means a new Mageia version is available and prompts you to do a net install of it. You can ignore it as long as your Mageia release is supported and do the update installation by any other way of your choice.
- 2: Mageia net applet, it is visible if you are connected to a network. It gives you network information when the mouse is hovering over it. A left click gives access to the
Net Centertool. A right click displays a menu to manage the network. - 3: The Mageia Control Center (MCC) is where all the Mageia tools are brought together. The applets marker 1 and marker 2 use MCC. See here for more information about MCC. MCC is the same for all the Desktop Environments. The first thing to do after an installation is to open MCC and to configure the media sources see here
- 4: The tool
Install & Remove Softwareis also part of MCC. See here for more information about the Software Management,or here. - 5: MCC is so important that you have also an access from the task bar
- 6: Access to the menu.
- 7: If you click on
System -> Administration, a submenu (marker 7) is displayed, it contains tools given byMATEto set your Desktop Environment. - 8: If you click on
System -> Preferences, another tools submenu is displayed. - 9:
Control Centrebrings together all theMATEtools and allows you to set the desktop and windows appearance and behaviour. This MATE Control Centre has nothing to do with MCC.
A light and eye-candy dock can be added thanks to the cairo-dock package available in the Mageia repositories.
You will notice there is no volume tray icon in panel although sound works. This is because mate-media packages are not installed by default. You should install either mate-media-pulse (PulseAudio backend) or mate-media-gstreamer (Gstreamer backend) to get a working volume tray applet.
Some mate utilities, e.g. mate-screenshot, are provided by mate-utils package, please install mate-utils package to access these mate utilities.
What are the configuration tools for?
Here are the tools you can use to set up the main features and/or devices:
| Note: When several tools are available to do the same action, they are in fact writing in the same configuration file, so there is no risk of conflict, use your preferred tool |
.
| Setting | MATE | Mageia |
|---|---|---|
| Windows appearance | System -> Preferences -> Appearance System -> Control Centre
|
-- |
| Workspace appearance (the desktop out of the windows) |
System -> Preferences -> Main Menu System -> Preferences -> Pop-Up Notifications System -> Control Centre Right click on the panel Right click on the Desktop Install the Cairo dock |
-- |
| Windows behaviour | System -> Preferences -> Windows System -> Control Centre
|
-- |
| Workspace behaviour | System -> Control Centre Right click on the Desktop Install the Cairo dock |
-- |
| Desktop background | System -> Preferences -> ChBg System -> Control Centre Right click on the Desktop |
-- |
| Screensaver | System -> Preferences -> Screensaver System -> Control Centre
|
-- |
| Display settings | System -> Preferences -> Monitors System -> Administration -> Monitors System -> Control Centre
|
MCC / hardware / Set up the graphical server |
| Accessibility | System -> Preferences -> Assistive Technologies System -> Control Centre
|
-- |
| Localization | System -> Preferences -> Regional Settings System -> Control Centre
|
MCC / System / Manage localization for your system |
| Preferred applications | System -> Preferences -> Preferred Applications
|
-- |
| Software Management | -- | MCC / Sotware Management Applications -> System tools -> Install & Remove Software System -> Administration -> Install & Remove Software
|
| Power Management (For Laptops) |
System -> Preferences -> Power Management System -> Administration -> Power Management System -> Control Centre
|
-- |
| Mouse and Keyboard | System -> Preferences -> Keyboard System -> Preferences -> Keyboard layout System -> Preferences -> Keyboard Shortcuts System -> Administration -> Keyboard System -> Preferences -> Mouse System -> Administration -> Mouse System -> Control Centre
|
MCC / hardware / Configure Mouse and Keyboard |
| Printer | System -> Administration -> Print settings
|
MCC / hardware / Configure printing and scanning |
| Drives and Media (Storage, Multimedia, Cameras, Input Devices...) |
-- | MCC / hardware |
| Network, Sharing, Internet, Disk management, Security, Boot ... | System -> Administration -> Disk Usage Analyser
|
MCC |

